Can a Torn Shoulder Labrum Heal on Its Own?
July 10, 2019
Dr. Steve Hamilton, a sub-specialty trained sports medicine surgeon at Beacon Orthopaedics, offers insight for when shoulder surgery is necessary and when it isn’t.
The labrum is a cartilage buffer in the shoulder joint that provides stability and reduces force and friction for the bones. When healthy, the labrum is an important part of correct, pain-free shoulder function. However, the shoulder labrum, like other cartilage discs in our body (such as the hip labrum or meniscus), can succumb to injury or degeneration. The shoulder is a complex joint that can be fragile, so it is important to have any pain analyzed by a sports medicine orthopedic specialist.
The 2 Common Types of Labral Tears
There are two common causes of labral tears. The most widely publicized is undoubtedly an acute trauma to an athlete or weightlifter. These typically happen to those 15-35 years of age and can be caused by an impact, fall, or overloading the shoulder. These are common for contact sports like football and hockey. A shoulder dislocation or subluxation events can injure the labrum and result in shoulder instability. This is typically referred to as an “acute labral tear.” If a Certified Athletic Trainer (ATC) is on-site, they will be able to assess the injury and immobilize the shoulder so no further damage occurs.
The second type of labral tear in the shoulder is a tear due to degeneration or a combination of degeneration and activity. This is more typical in someone over age 30 who often tries to perform at the same level of athleticism as they did in their 20s. It may occur from swinging a golf club or tennis racquet or from a variety of other shoulder movements. SLAP tears (Superior Labrum from Anterior to Posterior) are much more common among those 30 and over. The most important thing following a shoulder injury of any kind is to immobilize the joint to prevent further injury, and to get a proper diagnosis from a trained physician.
I Have Instability, is my Labrum Torn?
If you recently fell, were hit in the shoulder, or felt shoulder pain while lifting weights, any those may indicate a torn labrum. If overhead arm movement or other similar shoulder movements cause pain, but there was no traumatic injury, it may still be a torn labrum. Here are a few symptoms that may point to a torn shoulder labrum. As always, a diagnosis by a professional is the best way to know if your labrum is torn and the extent of the damage.
- Feeling of instability or shoulder dislocation
- Loss of strength or discomfort with shoulder exercises
- Dull pain or aching in the center of the joint
- Pain with overhead arm movement
- Inability to participate in sports that require continual arm movements
- Discomfort or noises such as grinding, grating, clicking, popping or feeling “sticky” during movement
For a complete list of frequently asked questions (FAQs) about shoulder labrum tears, please click here.
When is Surgery Necessary?
Depending on the severity of damage to the cartilage, surgery may not be necessary. In fact, some labral damage may be virtually undetectable because it won’t cause pain or instability. For more traumatic shoulder labrum tears, factors such as medical history and desired levels of activity will also be taken into consideration by a board-certified sports medicine physician. Generally speaking, athletes and those desiring to return to an active lifestyle will be recommended for surgery.
The labrum is crucial for shoulder stability, which is necessary for nearly all sports. Surgery ensures that the labrum will heal in the right place. The procedure is performed through an arthroscope where a surgeon uses a tiny camera and canula to access the joint. The labrum is re-attached to the glenoid (socket) with an anchor and suture through a very short and minimally invasive procedure.
After surgery, it is absolutely crucial to listen to your surgeon’s instructions and follow the prescribed rehabilitation protocol which often involves physical therapy. All too often athletes will re-injury their shoulders because they try to return to play too soon. Not respecting the post-surgical instructions may compromise labral healing, which can ultimately lead to chronic shoulder instability. Your doctor will clear you to return to play after he has examined your progress in follow up appointments.
For non-athletes or weekend warriors, surgery often is not necessary
Although the procedure is fast and minimally invasive, injections and physical therapy will often provide great results. Injections for shoulder labrum tears include cortisone and platelet injections (platelet injections). These can increase promising results in the future. There are other growth factor injections that may be considered, but treatment should only be recommended by a board-certified, fellowship trained orthopedic sports medicine surgeon.
For more information
If you are suffering from shoulder pain, and you suspect it may be a torn labrum, Dr. Steve Hamilton is a board certified, sub-specialty trained orthopedic surgeon. Dr. Hamilton will provide a thorough physical exam and a comprehensive review of your medical history to ensure a proper diagnosis and the right treatment recommendation for you. He also uses diagnostic imaging, such as MRI and X-ray, to help ensure that your treatment will be as effective as possible. Don’t let shoulder instability keep you from sports or an active lifestyle! Take the next step to address your shoulder pain and schedule your appointment with Dr. Steve Hamilton at Beacon Orthopedics. You may also schedule by phone 24/7 at 513.354.3700.
Tech Neck
July 7, 2019
 What Is “Tech Neck” and How Do You Prevent It?
Society revolves around technology. Our sedentary lifestyle combined with our phones in our hands means we usually have our heads tilted downwards. This can often lead to “tech neck,” the term for stressing the neck muscles from looking down at a phone, tablet, or other electronic device for too long.
What Are the Symptoms of Tech Neck?
When you look down for too long, your neck muscles begin to strain while trying to hold your head up. Many people experience the following symptoms:
- Stiffness
- Neck spasms
- Headaches
- Pain between the shoulder blades
- Numbness or tingling of the arms in severe situations due to pinched nerves
Can Tech Neck Cause Serious Problems?
Yes! As the muscles in the neck tighten, they put more pressure on the discs in your spine. The wear and tear can result in a bulging or even ruptured disc. If the ruptured disc ends up pinching a nerve, you could experience pain, weakness, or even numbness in the arms. This could result in you needing surgery to correct the problem.
How Can You Prevent Tech Neck?
Getting up and moving is the first step in preventing tech neck. This will get your blood circulating and put your neck in a different position. Your office chair should recline and have very good lumbar support, and your neck muscles should remain relaxed as much as possible. If you are able, work standing up.
If you are looking for some easy moves you can do while at work, check out our blog post Five Exercised to Do in The Workplace.
Five Exercises to Do in The Workplace
July 5, 2019
 Keeping fit and healthy when you have a desk job can be a challenge. Sitting all day is not good for your health and can lead to long-term physical deficits, yet desk jobs are the most common way of working in the United States. If you’re looking for exercises to do at your desk or in your office that won’t disrupt your coworkers, we’ve got you covered! Here are eight exercises to do in the workplace:
- Leg Planks: Sit on the edge of your seat and lift your right let so it’s parallel to the floor. Flex your foot and hold for ten seconds, then slowly release and put your leg down. Repeat with your left foot. Do five to ten reps, or as many times as you want.
- Triceps Dips: Face away from your desk or stationary chair, place your hands shoulder-width apart and bend your legs at a 90-degree angle in front of you. Bend your elbows to a 90-degree angle, then straighten. Repeat at least 10-15 times.
- Calf Raises: Stand up, place your feet hip-width apart, and raise your heels off the floor. For an extra challenge, hold on to something and stand one foot. Repeat raising your heel on one foot.
- Wall Sit: Find a sturdy wall, stand with your back to it and slowly lower yourself into a seated position. Hold for 30-60 seconds at a time.
- Lunges: Take a large step forward with your right leg and bend your back leg into a kneeling position. Shift your weight back to a standing position. Repeat with the left leg, either staying in place or moving across the floor.
Overuse Injuries
July 2, 2019
 The FIFA Women’s World Cup is well underway, and with all of the hustle and bustle around game time, we’ve been discussing the dangers of exerting oneself too much. Some of the most common athletic injuries are due to overuse. If you are an athlete or the parent of someone who is, recognizing the signs of some of the most common overuse injuries and catching them before they progress could keep you or your child healthy.
1. Achilles Tendinitis
Your Achilles Tendon is the band of tissue that connects your calf muscles to your heel at the back of your lower leg. It is characterized by a mild ache in the back of the lower leg, tenderness, or stiffness that can turn into more severe pain if left untreated. Strengthening your calf muscles and building up your level of activity are great ways to prevent this overuse injury from happening.
2. Stress Fractures
Stress fractures occur most often in athletes who run or jump on hard surfaces. Unlike other types of fractures, these occur over a long period of time after repeated low-impact forces. Persistent pain while exercising is the most common warning sign, and if the pain persists, an evaluation and x-ray should be done.
3. Shin Splints
If you feel pain in the front lower part of your leg, you could have shin splints. The pain is due to inflammation of the muscles, tendons, and bone tissue around your shin. Decreasing your activity is the best way to heal from shin splints, but if the pain continues after a few weeks even without exercising, go see a doctor to ensure it’s not something more serious.
4. Calf Muscle Strains
One of the most common overuse injuries is a strained calf muscle. While a mild strain may resolve in a few days with rest and stretching, go see a doctor if the pain does not subside or becomes worse.
If you think you or your child may have any of the above overuse injuries, the specialists at Beacon Orthopaedics & Sports Medicine are here to get you back on your feet playing the sport you love!

Common Hip Injuries
June 27, 2019
Learn more about recognizing and overcoming common hip injuries.
Fortunately, the human hip joint is not prone to as many issues as smaller and more complex joints like the wrist or knee. However, a growing number of athletes and active adults are suffering from common hip injuries. Oftentimes the cause of pain is the result of acute trauma, such as a car accident, fall on ice, or sports related impact. There is hope, though, since modern orthopaedic medicine is helping people overcome these common hip injuries and return to competitive sports or an active lifestyle. Diagnosis and treatment of a joint should only be performed by a trained, board certified orthopaedic or sports medicine surgeon.
Muscle Strains
The most common injury of the hip and groin area, according to the American Academy of Orthopaedic Surgeons (AAOS). Eccentric contractions of the muscles around the hip joint are usually the culprit, causing pulled hamstrings and groins. The good news is that many muscle strains can be treated with RICE—rest, ice, compression, and elevation. For more severe strains, or if the pain does not go away after a week, seeing a sub-specialized sports medicine physician or orthopaedist can help determine the extent of the injury. Physical therapy or an injection may be used, but surgical intervention for muscle strains is extremely rare.
Contusions (Hip Pointer)
The second most common sports-related injuries. Also called a “muscle bruise,” a hip contusion is essentially crushed muscle fiber. While rarely requiring surgery, hip contusions should be evaluated by a sports medicine specialist. Athletes are generally advised to follow the RICE protocol—rest, ice, compression, elevation—for contusions.
Stress Fractures
Stress fractures in the upper quartile of the femur (including the femoral head) are considered hip fractures. These are relatively rare for a majority of the population, since in a healthy joint stress fractures primarily occur from severe acute trauma like a bad car wreck. Many aging people find they are increasingly at risk as their bones become more brittle. A common injury, such as a fall, can sometimes result in a hip stress fracture for aging joints. Since stress fractures are more common in older joints, a hip replacement is often the best solution. Depending on the severity of the fracture, Dr. Burleson may use one or more screws (percutaneous pinning) to hold the joint in place and promote healing.
Labral Tears
These reference damage of the cartilage that protects the femur (ball) and acetabulum (socket). The most common cause of this hip injury is overuse, but occasionally repetitive impact or an acute event can be at fault. The best way to prevent a labral tear in the hip joint is to complete a strength and flexibility regimen to help the surrounding muscles avoid overloading the joint. Once a tear in the labrum occurs, a sub-specialty orthopaedic hip doctor will make a recommendation of arthroscopic surgery or physical therapy. A full recovery after a labral tear in the hip is common, and the right doctor can help patients achieve it remarkably fast.
Contact Beacon Orthopaedics & Sports Medicine
If you are suffering from a hip injury, Dr. Drew Burleson would be happy to make an effective, personalized treatment recommendation for you. Dr. Burleson will provide a thorough physical exam and a comprehensive review of your medical history to ensure you can overcome your hip injury and return to a pain free, active life.
He also uses diagnostic imaging, such as MRI and X-ray, to help ensure that your treatment will be as effective and efficient as possible. Take the next step to address your hip injury and schedule your appointment with Dr. Burleson at Beacon Orthopaedics. You may also schedule by phone 24/7 at (513) 354-3700.
Questions to Ask Before Your Hip Surgery
June 27, 2019
Dr. Drew Burleson, a hip surgeon at Beacon Orthopaedics in Miamisburg, lets patients know what questions they should ask before agreeing to hip surgery.
The decision to have hip surgery can be a daunting one. Fortunately, advancements in arthroscopes, traction tables, and other medical technology are leading to better outcomes and shorter recovery times. Still, surgical techniques and hip surgeons are not all created equal. It is important to understand who will be performing the surgery, what the recovery timeline looks like, and even have a basic understanding of the technology being used.
The good news is that you don’t have to go to medical school and complete a surgical residency to educate yourself. Instead, you can rely on the expertise of a sub-specialty trained, board-certified orthopaedic hip surgeon. In addition to his extensive training, Dr. Drew Burleson treats athletes of all levels (high school, college, amateur, and professional) as well as active adults. He operates both at the Ambulatory Surgery Center (ASC) at Beacon Orthopaedics and Sports Medicine and in the operating rooms at the some of the region’s major hospitals.
Doctors want patients to understand their care, and they agree that it is important for patients to be their own advocates. It is a good idea to remember that your orthopaedic surgeon wants to help you in the best way possible, so if they are recommending surgery it probably is the best treatment plan. However, making the decision can still be challenging, and patients often don’t know where to begin with questions.
5 simple questions to help you start the conversation with your doctor as you consider arthroscopic hip surgery:
- Does the surgical team specialize in orthopaedics?
Many hospital surgical teams see everything from adenoid removals to appendectomies to knee replacements, with a few hip arthroscopies a year. While the breadth of experience is certainly vast, it is preferable to have specialized experts on your team. If you are having a hip procedure done, you want a surgical team (nurses, surgical techs, physician assistants, and so on) that do hundreds or thousands of hip procedures every year.
- What training and experience does the doctor performing the surgery have?
Understanding your surgeon’s background and specialization is crucial when it comes to making the decision to trust him or her with your surgery or to go somewhere else. Knowing if your surgeon is board-certified, if they completed a hip surgery or orthopaedic fellowship, and what types of cases they usually treat are all important.
This also ensures that you know who will be performing the surgery. At many teaching hospitals, a resident or fellow will be performing the surgery as part of their training. Obviously, a resident won’t be board certified yet and they will have minimal comparative experience. Asking this question can help you trust your care to someone with related specialization, board certification, and hundreds of hip arthroscopies under their belt.
- What will likely happen if I choose not to have surgery?
Most orthopaedic surgeons will only recommend surgery when it is the most effective method of treatment. Still, if you have other health conditions that may make recovery from surgery challenging, or if you want to explore other treatment options such as injections or physical therapy, it is worth asking your doctor’s opinion. This will also help clarify what exactly the surgery will accomplish. Usually, surgery is only offered as a last resort when rest, physical therapy, and injections are insufficient.
- Which traction table is being used?
For decades, traction tables for hip arthroscopy relied on a center pole. Pulling against this pole sometimes lead to groin numbness or discomfort. While many orthopaedic specialty surgery centers have upgraded to modern traction tables (such as the Stryker Pivot Guardian table), many large hospital systems are still using the old technology. If a hip arthroscopy can be performed without the use of a center pole traction table, it makes sense to avoid any potential complications that may result.
- What can I do to expedite recovery or reduce the likelihood of reinjury?
For the first couple of weeks following your procedure, common activities such as sleeping posture, standing for long periods of time, stretching, and so on may slow down recovery or even lead to reinjury. This will depend on the specifics of your medical history and your surgery, but it helps to understand what you should and should not do following your arthroscopy.
Your surgeon will most likely recommend 3-6 weeks of physical therapy post-surgery. Often light stretching and specific movements can help speed up the recovery process, but it is important not to overdo it. Your surgeon or physical therapist may have some suggestions for additional activities you can try to reduce the probability of reinjury.
For more information
If you are suffering from hip pain, a hip arthroscopy may be the best solution. Dr. Drew Burleson is a sub-specialty trained, board certified orthopaedic hip specialist. His surgical team specializes in orthopaedic procedures and perform thousands of operations every year. Dr. Burleson would be happy to make an effective, personalized treatment recommendation for you. Don’t let hip pain keep you from an active, pain-free lifestyle! Take the first step toward feeling better and schedule your appointment with Dr. Drew Burleson at Beacon Orthopaedics. You may also schedule by phone 24/7 at (513) 354-3700.
Exercising with Hip Impingement (FAI)
June 27, 2019
Dr. Steve Hamilton, a sub-specialty trained sports medicine surgeon at Beacon Orthopedics, explains how to stay fit without causing joint damage.
While many acute orthopedic injuries resolve with physical therapy or minimally invasive surgery, some chronic conditions aren’t as simple to heal. This is the case with femoroacetabular impingement (FAI), a condition that refers to a misshapen hip joint. Only a small number of patients with FAI undergo surgery, since it can often respond to injections and therapy. In this article, we’ll take a closer look at what exercises to engage in and which ones to avoid so that FAI is improved instead of aggravated. For an overview of Femoroacetabular Impingement, please refer to this blog post.
FAI can effect both females and males especially athletes whose hips face repeated impact. For example, a study at the University of Utah found that football players have over a 75% chance of suffering from irregular hip shapes. Among the young, active population, MRI imaging of the hip can show evidence of damage in over 70% of scans. Repetitive impact and trauma can damage a hip joint, so proper technique and regular rest cycles are important.
Femoracetabular impingement may involve an abnormality of the femoral head (ball) or the acetabulum (socket). In some cases, the extra bone growth can lead to labral tears and early arthritis, but the most common symptom of FAI is groin pain. FAI may also lead to feelings of pulling, popping, or pinching in the hip joint. A complaint of hip pain will generally lead to an x-ray or MRI to determine the cause of pain. If there is no associated pain, there is probably no need for diagnostic imaging.
FAI is generally easy to diagnose since a bump on the bone, also called a “cam,” and misshapen cups, also called a “pincer,” are visible on x-rays. An MRI may be used to guide treatment recommendations or simply to better assess joint damage. Before implementing any recommendations, it is important to be evaluated and diagnosed by a board certified orthopedic surgeon.
Exercises to Avoid
Even before FAI has been treated, there are some conventional exercises that should be avoided if hip pain is present. As a general rule, any exercise which causes the knee to move above the hip should be modified or not performed. Additionally, heavy weight or repeated impact on the hip joint can cause pain or more damage. These include:
- Deep squats (especially variations like sumo squats)
- High knees
- Lunges
- Leg press
- Deadlifts
- High box jumps
- Rowing on an ergometer
- Plyometrics such as bounding and squat-jacks
If an exercise is not listed above and causes hip pain, it should also be avoided. Please talk to a board-certified hip surgeon before beginning demanding physical activities. Some activities, for example biking, may still be performed, but it important that the equipment is properly sized to support healthy joint movement.
Exercises to Perform with FAI
While some exercises should be avoided, it is important to strengthen the supporting muscles around the hip joint. This can be accomplished through careful activities targeting the core, hip stabilization muscles, and improving functional mobility.
- Hip flexor and piriformis stretches
- Clam shells
- Bridges and single leg bridges
- Isometric hip raises
- Pelvic tilts
- Swimming
- Standing on a balance board
For athletes who want to continue competing, learning how to jump, land, and accelerate correctly may help preserve the hip joint and reduce pain. Not taking the time to perfect these techniques can cause the hip joint to wear out.
Surgical and Nonsurgical Intervention
Once FAI has been diagnosed, your orthopedic surgeon will recommend either a nonsurgical or surgical approach. In both cases, proper exercises to strengthen and support the joint will be crucial. Doing this before surgery can reduce your post-surgical recovery time, as well as reduce the likelihood of pain after surgery.
If surgery is recommended, it will be an arthroscopic procedure called a “hip scope.” This is an advanced procedure where a surgeon operates using a tiny camera and canula to access the joint. Your surgeon will be able to remove the cam or fix the pincer while preserving the healthy tissue around the hip. Hip scopes are outpatient procedures that take about an hour in the operating room.
Physical Therapy
After injections or surgery, physical therapy will be crucial in maintaining a healthy hip joint. Without physical therapy and retraining the hip, the activities that caused FAI in the first place will most likely deliver the same results again. The primary goals of physical therapy are 1) support the joint better and 2) develop proper muscle memory.
Supporting the joint will help offload impact from the bone and cartilage (labrum) of the hip to the surrounding muscles. Range of motion, flexibility, and core strength are all part of supporting the hip and will be part of a physical therapy program.
Developing proper muscle memory is more nuanced, but may involve training the spine, knees, and ankles to perform correctly, helping to offload the hip. If the entire lower extremity is functioning correctly during running, jumping, and long periods of sitting, FAI is far less likely to develop.
For more information
If your hip is popping or pulling, it may be femoroacetabular impingement. Dr. Steve Hamilton is a board certified, sub-specialty trained orthopedic surgeon serving the Greater Cincinnati area. Dr. Hamilton will provide a thorough physical exam and a comprehensive review of your medical history to ensure a proper diagnosis and the right treatment recommendation for you. Don’t let hip pain prevent athletic competition or an active lifestyle! Take the next step to address your shoulder pain and schedule your appointment with Dr. Steve Hamilton at Beacon Orthopaedics. You may also schedule by phone 24/7 at (513) 354-3700.
Common Golf Injuries
June 19, 2019
Getting Back on the Green
 The summer months bring people out of their homes to soak up the sun and enjoy outdoor sports. However, sports injuries tend to skyrocket during this time. If you’ve found yourself with one of the common golf injuries listed below, keep reading to learn how to recover quickly and get back on the green!
- Rotator Cuff Injury.
Your rotator cuffs are the four stabilizing muscles found around each of your shoulders. These can easily become overworked, swollen, or even torn due to overuse. All of these common golf injuries can seriously impact your game, and even take you off the green for the rest of the season. If you have a rotator cuff injury, try using the RICE method: rest, ice, compress, elevate. If the pain persists or is too much to handle, go see a doctor to make sure nothing is torn.
- Golf Elbow.
Similar to tennis elbow, golf elbow is a common injury that plagues many golfers. Golf elbow is tendinitis of the inner tendon and occurs due to improper overuse. Rest is the best way to treat this common golf injury and easing back into the sport will help keep your tendons strong and healthy. - Tendinitis in the Wrist.
Similar to the elbow, tendinitis in the wrist occurs when the tendons become overworked and inflamed. Strengthening your wrist muscles will help prevent this from occurring and resting when you notice fatigue will make your recovery quick!
- Back Pain.
Lower back pain is common due to being hunched over your clubs for hours. Correct form is the best way to prevent this from happening, and regularly exercising your back muscles can drastically decrease your chances of experiencing pain. Rest and alternating hot and cold packs can help reduce the pain, but if the pain persists an appointment with a specialist should be made to ensure you don’t have a serious injury.
If you’ve ever experienced one (or more) of these injuries, Beacon Orthopaedics & Sports Medicine could be the answer you’ve needed! Schedule an appointment today with one of our expert sports medicine physicians!
Scoliosis Awareness Month
June 17, 2019

Is A Curve in Your Spine Going to Change Your Life?
June is Scoliosis Awareness Month, and Beacon Orthopaedics & Sports Medicine is committed to early detection and prevention. When a spine curvature is detected early enough and proper measures are taken, corrective surgery later in life can be avoided.
What Is Scoliosis?
 Scoliosis is a sidewise curve in the spine. While most cases are very mild, occurring commonly in the general population, some can become severe and impact daily life. When the curve becomes severe, the spine can twist and reduce the amount of space in the chest. This impacts everything from mobility to breathing. It is important to detect as soon as possible in order to create an effective treatment plan, if necessary.
What Are the Signs of Scoliosis?
When most people think of scoliosis, they think of people hunched over and incapacitated. However, it takes a long time to get to that point, even in the most severe cases. The most common signs are:
- uneven shoulders
- uneven hips/waist
- one leg appears slightly longer than the other
- one shoulder blade is more prominent than the other
These signs can go unnoticed for a long time, and many people with scoliosis don’t even realize they have it.
When Is Treatment Needed?
Surprisingly, most cases of scoliosis are so mild they don’t require treatment. However, if you notice a curve in the spine of your child, it is best to take them to see a doctor. Only about 30% of people with scoliosis require bracing to stop the curve from getting worse, and 10% require corrective surgery.
If you or a loved one has scoliosis, consider seeking treatment at Beacon Orthopaedics & Sports Medicine. Our spine specialists are equipped to handle any condition you may have, and we offer services such as physical therapy, bracing, and spinal injections conveniently at our main locations. Conditions like scoliosis are usually easily treated, and we are here to help.
When Diving Becomes Dangerous
June 11, 2019
 5 Things to Remember About Diving Injuries
When you go to a pool, you’re likely to notice the “No Diving” signs posted around the perimeter of the shallow end. Yet every year, both children and adults choose to ignore these warnings and sustain life-changing injuries.
June is the start of pool season, meaning that the amount of diving and pool-related injuries increase. Diving in any depth of water can be dangerous, but shallow water injuries are the most common at public pools. However, diving injuries don’t just happen at pools! Lakes, rivers, ponds, and creeks are common places for diving injuries as well.
Before taking the plunge, keep in mind these 5 things to remember about diving injuries.
- Diving is the fourth leading cause of injuries leading to spinal paralysis.
Making a poor decision by diving into shallow water can impact your physical health for the rest of your life. When you hit your head or neck on the bottom of a pool, the vertebrae that encircle the spinal cord can collapse, causing potentially permanent damage.
- 9 feet is the minimum depth for “safely” diving head-first.
The American Red Cross advises that you should be diving in at least 9 feet of water. Any less, and you’re putting yourself at risk for injury.
- Water can be deceptive.
The safest thing to do in any body of water (pool, lake, pond, etc.) is to test the depth of the water before diving in. Even if you can see the bottom or have been to that area before, it is always better to be safe than sorry.
- Your experience level doesn’t make you immune to injuries.
Whether you’re a professional diver or just playing around, diving injuries can happen to anyone. One mistake can have consequences for the rest of your life.
- Diving accidents are 100% preventable.
Only you can make the choice to prevent diving injuries. Before diving in, take a moment to remember the above safety tips and stay safe.
Proven Treatments for Hip Arthritis
May 14, 2019
Dr. Drew Burleson, a hip arthroscopy specialist at Beacon Orthopaedics in Miamisburg (Dayton), shares tips to overcoming a common joint condition.
As we age, our joints naturally start to break down or degenerate. This is a form of arthritis called “osteoarthritis,” and the American Academy of Orthopaedic Surgeons (AAOS) estimates that over 21 million Americans suffer from the condition. Osteoarthritis often occurs in the knees, hands, and hips. When it comes to hip arthritis, there are four treatments that can effectively help you return to an active, pain-free lifestyle. Once you notice joint pain, it is important to see a fellowship trained, board certified sports medicine specialist or orthopaedic surgeon as soon as possible. This will help minimize any continued damage and often means a more conservative treatment plan will be effective.

(Hip Joint with Arthritis)

(Healthy Hip Joint)
The four most common and widely recommended treatments for hip arthritis, from most conservative to least are:
- Physical Therapy
- Injections/Ortho-biologics
- Arthroscopy or Hip Scope
- Total Hip Replacement
Each treatment path should be recommended by your orthopaedist based on your desired goals, medical history, and the severity of your hip arthritis.
Physical Therapy:
Many specialists will recommend starting with physical therapy to try to repair the hip joint without surgery. At Beacon Orthopaedics and Sports Medicine in Miamisburg, physical therapy teams work with orthopaedic doctors to provide patient-specific treatment plans. Some general goals of physical therapy are to eliminate or reduce pain, control swelling, improve range of motion, strengthen supporting muscles, and improve blood supply to the hip joint. For many people who address their osteoarthritis early, physical therapy can be an effective treatment option.
Hip Arthroscopy (“Hip Scope”):
Over the past twenty years, a revolutionary approach to surgery has been blossoming. This minimally invasive surgical method is called “scoping” and allows your surgeon to operate through a small tool called a “cannula.” The surgeon can interchange different surgical instruments through the cannula (which acts like an access tunnel), all while seeing inside the hip joint with a tiny camera. For most forms of hip arthritis, this is the most effective treatment method. A hip scope allows the physician to remove damaged tissue and physically repair damage to bone and cartilage. Removing small pieces of cartilage or bone floating in the joint is often an important part of the repair, which can only be done surgically. Often times a hip scope will be paired with platelet injections injections and/or physical therapy to speed up the recovery process.

Total Hip Replacement:
Unfortunately, severe cases of hip arthritis are often too advanced for physical therapy, injections, or arthroscopy to be effective. This is often because patients wait years or even decades before addressing the problem, and the deterioration worsens. Once a joint is damaged irreparably, it may be time for a total hip replacement. This procedure is done through a 3 to 4-inch incision on the front of a patient’s hip (anterior approach). The damaged femoral head (upper leg bone) and acetabulum (pelvic bone surrounding the femoral head) are removed and replaced. Replacement hip joint stems are generally made from titanium alloy or chrome cobalt with ceramic or cobalt-chromium alloy heads. The acetabular cup generally consists of a metal shell and polyethylene liner. This technique is generally recommended only after a thorough examination that rules out arthroscopy as an effective option. A hip replacement is an effective method of treatment that has been perfected over more than 70 years.

Contact Beacon Orthopaedics & Sports Medicine
If you are suffering from hip arthritis, Dr. Burleson would be happy to make an effective, personalized treatment recommendation for you. Dr. Burleson will provide a thorough physical exam and a comprehensive review of your medical history to ensure you can achieve your goals. He also uses diagnostic imaging, such as MRI and X-ray, to help ensure that your treatment will be as effective as possible. Don’t let hip arthritis keep you from an active, pain-free lifestyle! Take the next step to address your hip arthritis with proven treatment options and schedule your appointment with Dr. Drew Burleson at Beacon Orthopaedics. You may also schedule by phone 24/7 at 513-354-3700.
Minimally Invasive Hip Procedures
March 22, 2019
Beacon Orthopaedics leads the region in minimally invasive treatment options.
Repairing damaged hip joints can be done with a surgical technique called “arthroplasty.” This minimally invasive procedure is fairly common and allows a surgeon to operate through a small tool called a “cannula.” The surgeon can interchange different types of equipment through the cannula, all while seeing inside the joint using a tiny camera. Dr. Drew Burleson is a leading hip surgeon in South Dayton who operates at the Ambulatory Surgery Center at Beacon Orthopaedics and Sports Medicine. He treats patients in the Dayton area, including athletes and non-athletes of all ages, using minimally invasive hip procedures.
Hip damage can be the result of trauma, such as a car accident or sports injury, but it can also occur chronically as the body ages. Often the cartilage that protects the bones in the joint begins to wear out as less blood and nutrients are delivered. An inactive lifestyle or overactive lifestyle can also lead to accelerated degeneration.
Potential reasons for hip pain or stiffness include:
- Lower blood supply to the joint
- Osteo or rheumatoid arthritis
- Bone spurs
- Femoroacetabular impingement (FAI)
- Labral/cartilage damage
- Trauma or injury
- Joint infection
- Bursitis or tendonitis (also called tendonosis)
- Untreated problem from the past, such as overuse
The good news is that many common hip injuries and conditions are easily treated with arthroscopy by Dr. Burleson. Even better news may be that many patients can experience a full recovery through physical therapy, injections, or other nonsurgical treatments. More damaging conditions, such as advanced arthritis, may require a minimally invasive hip replacement, but talking to Dr. Burleson about your condition will allow him to make the right treatment recommendation for your goals and medical situation.
If arthroscopy is the best treatment option for you, there are two major advantages compared to a traditional open surgery: shorter recovery time and preservation of healthy tissue, resulting in less scar tissue damage left behind.
Preservation of healthy tissue
In the past, to repair damaged tissue meant cutting through healthy tissue. Although this process ultimately fixed the problem, it caused additional trauma to muscles and ligaments around the joint. Using an arthroscope now allows a surgeon to access the hip joint while preserving as much healthy tissue as possible. Smaller incisions also mean that patients have wider ranges of motion without adding stress to the surgical site.
Less scar tissue
Another primary benefit of arthroscopy is that the smaller incisions mean less scar tissue after recovery. For some patients, scar tissue can cause additional stiffness, discomfort, or restrict range of motion after an open joint surgery. Use of an arthroscope for minimally invasive hip surgery effectively prevents this problem.
For more information
If you are suffering from a hip injury or condition, a hip arthroscopy might be the best treatment option for you. Dr. Burleson will provide a thorough physical exam and a comprehensive review of your medical history. He also uses diagnostic imaging, such as MRI and X-ray, to ensure that he recommends the most effective treatment. If more conservative options like physical therapy and injections don’t provide the desired results, you can rest assured that Dr. Burleson is a leader in orthopaedic arthroscopy in the Cincinnati and Dayton area.
Take the next step to stop your hip pain and schedule your appointment with Dr. Drew Burleson at Beacon Orthopaedics. You may also schedule by phone 24/7 at 513.354.3700.
Shoulder Stretches
February 20, 2019
With spring right around the corner, it’s important to teach proper stretching techniques to overhead athletes.
Check out some of the stretches below to prevent shoulder and elbow injuries:

Now Available: Hip Surgery for Dayton Athletes
February 18, 2019
Dr. Drew Burleson of Beacon Orthopaedics provides the insight of a college level athlete and a sub-specialized sports medicine surgeon.
Dr. Drew Burleson is a sub-specialty trained sports medicine surgeon who brings his additional training in hip arthroscopy to South Dayton. Also called a “hip scope” procedure, hip arthroscopy provides patients with a superior alternative to open hip surgery. Traditional open surgery requires a surgeon to make an incision and damage healthy tissue to get to the damaged joint. Hip arthroscopy, on the other hand, allows the surgeon to operate through two small incisions. A camera (scope) is inserted in one of the incisions while a cannula with interchangeable instruments is inserted through the other. The camera displays the inside of the joint on a monitor for the surgeon to accurately fix injuries and chronic conditions without opening up the joint.
At the Ambulatory Surgery Center at Beacon Orthopaedics, where Dr. Burleson performs his hip arthroscopies, families of patients (and often the agents for professional athletes recovering from injuries) can watch the surgery in a viewing room attached to the operating room. This allows Dr. Burleson to speak with the patient’s loved ones during surgery. Another advantage of having an outpatient hip arthroscopy at Beacon Orthopaedics is the brand new Stryker Guardian Pivot table: the first traction table designed for hip scope patients without a center post.
Why Hip Arthroscopy?
Dr. Burleson typically recommends an arthroscopic procedure if more conservative treatments (such as physical therapy or injections) have not provided the desired outcome. If a patient is a good candidate for an arthroscopic procedure, Dr. Burleson typically recommends a scope before turning to open surgery. Since the hip is a ball (femur) and socket (acetabulum) joint, any type of damaged or lost cartilage, bone spurs, or obstructions floating in the joint are often made worse by movement. This can cause discomfort, pain, and stiffness. The socket of the joint is lined by strong cartilage called the “labrum.” Think of it like a gasket protecting the pelvic bone.
Unfortunately, as we age or experience injuries, the labrum can fray or be worn down. Surrounding this joint are ligaments—tight bands of tissue that support the joint. These ligaments can be damaged due to an acute injury or wear and tear over time. The hip joints undertake a lot of impact from our bodies as we stand, walk, run, or compete in high level sports. Fortunately, most conditions or injuries of the joint, labrum, and surrounding ligaments can be solved with an arthroscopic hip procedure.
Common conditions include:
- Labral tears (or other damaged cartilage)
- Bone spurs
- Hip bursitis or synovitis
- Femoroacetabular impingement (FAI)
- Floating bodies in the joint
- Snapping hip syndrome or other tendon-related problems
Since Dr. Burleson was a competitive athlete, he understands the emotional and social impact elite athletes face when they are injured. He is able to diagnose and treat patients quickly at Beacon Orthopaedics in South Dayton. With physical therapy and a state-of-the-art x-ray machine on-site, patients can be seen and start the road to recovery quickly. If surgery is required for a hip injury, Dr. Burleson can perform a hip scope at Beacon’s Ambulatory Surgery Center in Sharonville, OH, and schedule follow up appointments at the South Dayton location. With his background, and after years of working with athletes of all levels, it is Dr. Burleson’s goal to help each athlete recover and return to play with a safe and aggressive timeline.
If you are a Dayton area athlete who is suffering from a hip injury, schedule your appointment with Dr. Drew Burleson at Beacon Orthopaedics in South Dayton (Miamisburg) or Cincinnati (Summit Woods). You may also schedule by phone 24/7 at (513) 354-3700.
A Better Way to Perform Hip Scope surgery
February 11, 2019
Dr. Drew Burleson of Beacon Orthopaedics brings a better operating table to the region.
One of the advantages to being a specialty practice is the ability to be agile. This means that when new technology comes along, a specialty practice can test and adopt it first. Such is the case with the Stryker Pivot Guardian table. It is the industry’s first ever traction table designed to improve patient experiences with arthroscopic hip surgery. Sports medicine and orthopedic surgeon Dr. Drew Burleson was instrumental in bringing this new technology to the area.
Arthroscopic hip surgery has traditionally involved a patient’s joint being distracted by using a center post (called a “perineal post”) on an operating table. The upper interior of the leg was stabilized by the padded post, while the hip joint was distracted to create room for the camera and cannula. The surgeon would then perform a hip scope surgery, which typically lasts anywhere from 20-45 minutes.
This old approach sometimes resulted in cases of numbness, sexual dysfunction, bruising, heel slip related problems, and other groin complications. When the opportunity to mitigate these risks was presented to Dr. Burleson and his team at Beacon Orthopaedics, the organization reacted promptly and brought the first table to the region for use in its Ambulatory Surgery Center.
In addition to removing the perineal post, the Pivot Guardian table allows for clearer imaging than many other operating room tables due to its radiolucent carbon fiber construction. The superiority over other hip arthroscopy tables continues: even the boots are designed specifically to improve each patient’s safety and comfort. This reduces complications to the Achilles and other heel slip related problems.
In a recent clinical study of 1,000 orthopaedic hip arthroscopies performed on the Pivot Guardian table, without the use of a perineal post, researchers discovered that the procedure allowed for safe, adequate, reproducible access to the hip joint with zero groin-related soft tissue or nerve complications.1 This is a big step forward for patients, and should result in more peace of mind and better overall outcomes from hip scope surgery. For the time being, patients who want to take advantage of this recent evolution in medical technology have to come to Beacon Orthopaedics and Sports Medicine, since they have the only Stryker Pivot Guardian table in the region.
If you are considering an arthroscopic hip surgery, schedule your appointment with Dr. Drew Burleson at Beacon Orthopaedics in South Dayton (Miamisburg) or Cincinnati (Summit Woods). You may also schedule by phone 24/7 at (513) 354-3700.
- Omer Mei-Dan, MD et. al. Hip Distraction Without a Perineal Post. March 2018, The American Journal of Sports Medicine
Hip Arthroscopy is Now Available in Dayton, OH
December 14, 2018
Dr. Drew Burleson is a fellowship trained orthopedic sports medicine surgeon who brings specialized training in hip arthroscopy to Dayton, OH. Although many of his cases do not require surgery, in the event that a surgical procedure is the best course of action Dr. Burleson and his team try to use minimally invasive techniques.
Hip arthroscopy is a cutting edge, minimally invasive option for patients suffering from common conditions such as:
- Femoroacetabular impingement (FAI)
- Muscle and tendon tears
- Synovitis
- Snapping hip syndrome
- Labral damage
- Bone spurs
- Floating fragments in the joint
Arthroscopic treatments, also called “scopes” allow a surgeon to operate inside of a joint without a large incision. To put it succinctly, hip arthroscopy is a great alternative to open surgery. The doctor performs the procedure using a cannula with interchangeable tools and a camera to perform the surgery without opening the joint up.
This type of treatment has several big advantages for the patient. First, it allows the doctor to perform the surgery without damaging healthy tissue. This preserves undamaged areas of the hip joint and reduces the amount of scar tissue, since there are no major incisions—hip arthroscopy incisions are usually around two inches. Second, it reduces the likelihood of infections since the incisions are so small and because the joint was never opened up. Third, it is a much faster procedure. For a procedure like removing bone spurs, a skilled surgeon can perform several hip arthroscopies in the time it takes to perform a single open surgery.
If you are suffering from a hip injury or chronic condition, and you are looking for high quality treatment options near Dayton, OH, Dr. Drew Burleson may be able to help. He will provide you with a comprehensive review of your medical records and a thorough exam to recommend the best treatment option.
If surgical intervention is required to treat your hip pain, Dr. Burleson brings additional training in hip arthroscopy to ensure you can return to the activities you love as soon as possible.
Full Thickness Gluteus Medius Repair with or without Labral Repair
November 9, 2018
The intent of this protocol is to provide guidelines for your patient’s therapy progression. It is not intended to serve as a recipe for treatment. We request that the PT/PTA/ATC should use appropriate clinical decision making skills when progressing a patient. The exercises listed are not all inclusive, you can modify exercises as long as you maintain the appropriate precautions. Please obtain documentation of the exact procedure that was performed from our office. Please contact Dr. Burleson if there are any questions about the protocol or your patient’s progression
Please keep in mind common problems that may arise following hip arthroscopy: Hip flexor tendonitis, adductor tendonitis, sciatica/piriformis syndrome, ilial upslips and rotations, LB pain from QL hypertonicity and segmental vertebral rotational lesions. If you encounter any of these problems, please evaluate, assess and treat as you feel appropriate maintaining Dr. Burleson’s precautions and guidelines at all times. Gradual progression is essential to avoid flare-ups. If a flare-up occurs, back off with therapeutic exercises until it subsides.
Please reference the exercise progression sheet for timelines and use the following precautions during your treatments. Thank you for progressing all patients appropriately and please fax all progress notes to Dr. Burleson’s office or hand deliver the patient. Successful treatment requires a team approach. Please contact Dr. Burleson at any time with your input on how to improve the therapy protocol.
General Guidelines/Precautions following surgery
-Weight bearing: Partial-thickness tear: 2 crutches, 20 pounds weight bearing for the first 6 weeks postoperatively Full-thickness tear: 2 crutches, 20 pounds weight bearing for the first 8 weeks postoperatively
-ROM: NO Active hip abduction and IR and NO Passive hip ER and adduction for the first 6 weeks postoperatively
-Do not push through pain or pinching, gentle stretching will gain more ROM.
-Use Continuous Passive Motion (CPM) 4 hours/day or stationary bike on zero resistance 2 hours/day ONLY for patients who have also had an arthroscopic procedure inside the hip joint
-Manage scarring around portal sites
-General precautions: Hip flexor tendonitis, Trochanteric bursitis, synovitis, scar tissue around portals
-Therapy should begin 6 weeks post-op
Weeks 6-8 postop
-CPM for 4 hours/day or upright bike (no resistance) for 2 hours/day for patients who have had gluteus medius repair AND arthroscopy inside the hip joint
-ROM: PROM hip IR; AAROM: hip ER, abduction, adduction; AROM: hip flexion, extension -Upright bike: NO RESISTANCE (must be painfree, begin 1⁄2 circles, progress to full circles)
-Soft tissue mobilization: Gentle to scar and hip flexor, ITB
-Gait training: Weight bearing as tolerated for partial-thickness gluteus medius tears 20 pound weight bearing for full-thickness gluteus medius tears
-Strength:
-Hip isometrics
(Begin at 6 weeks): extension, adduction
(Begin at 8 weeks): sub max pain free hip flexion
-Quad sets, Hamstring sets, Lower abdominal activation
-Modalities for pain control, swelling
Weeks 8-10 postop
-Continue with previous exercises
-Gait training: Weight bearing as tolerated, work on symmetry
-ROM: progress A/PROM in all directions -Upright bike: progress resistance as tolerated
-Soft tissue massage: PRN (scar, iliopsoas, TFL, ITB, piriformis, QL, lumbar paraspinals, hip adductors)
– Strength
-Hip abduction: Isometrics to isotonics (see addendum for progression)
-Progress isometric resistance
-Quad and hamstring isotonic exercise
-Quadruped rocking -Stretching
-Manual hip flexor stretching (gentle, no pain)
-Modified Thomas position, or pillows under buttock
-Modalities for pain control, swelling
Weeks 10-12 postop
-Gait: Work on symmetry
-Continue with previous exercises
-ROM: progress A/PROM in all directions -Soft tissue massage: PRN (scar, iliopsoas, TFL, ITB, piriformis, QL, paraspinals, hip adductors, gluteus medius) -Strength
-Progress core strengthening
-Initiate hip flexion and extension strengthening progression (see addendum)
-Hip IR/ER using stool under knee (make sure to hold onto object for support).
-Upright bike with resistance
-Begin Elliptical training
-Stretching: Manual and self hip flexor stretching
-Modalities for pain control, swelling
Weeks 12-14 postop
-Gait: Normalize without AD
-ROM: progress A/PROM all directions -Soft tissue massage: PRN (scar, iliopsoas, TFL, ITB, piriformis, QL, paraspinals, hip adductors, gluteus medius)
-Strength
-Progress LE and core strength and endurance as able
-Begin proprioception/balance activity (2 legs to 1 leg, stable to unstable)
-Begin closed chain strengthening such as leg press -Side stepping with theraband
-Single leg squats, step-ups, lunges -Stretching: Manual and self hip flexor stretching
-Modalities for pain control, swelling
Weeks 14-16 postop
-Gait: Normalize without AD
-ROM: progress A/PROM all directions
-Soft tissue massage: PRN (scar, iliopsoas, TFL, ITB, piriformis, QL, paraspinals, hip adductors, gluteus medius)
-Strength:
-Progress LE and core strengthening
-Increased emphasis on single leg strength moves
-Unilateral leg press, hip hikes, eccentric step downs
-Progress balance and proprioception
-Stretching: Manual and self (hip flexor, hip adductors, glute, piriformis, TFL, ITB)
Weeks 16-18 postop (Advanced Rehabilitation)
Criteria for progression to this level
-Full ROM -Painfree, normal gait pattern
-Hip flexor strength 4/5 or better –
-Hip abd, add, ext and IR/ER strength of 4+/5 or better
-Strength:
-Progress core, hip, LE strength and endurance
-Lunges (multi angle) -Plyometric progression (Must have good control with all exercises first)
-Forward/Backward running program (Must have good control with all exercises first)
-Agility drills (Must have good control with all exercises first)
–Stretching: Progress self and manual stretches
PRECAUTIONS
-No contact activities until cleared by MD
-No forced (aggressive) stretching
Pain Medication Safety
November 5, 2018
SAFE Use, Storage, and Disposal of Prescription Opioid Medicines from the American Academy of Orthopaedic Surgeons.
Unfortunately, prescription drug abuse is a serious public health issue, widely referred to as an “epidemic” by public policymakers. Opioids are prescribed for short-term pain reduction, but can be extremely dangerous if used improperly.
Safe Use of Your Prescription:
Please be aware that improper use of prescription pain medication is a leading cause of accidental death. Please keep the below suggestions in mind to ensure the proper use of your prescription.
- Combining opioids with alcohol or other drugs increases the risk of death
- Take medications only as prescribed.
- Never take more than instructed
- Never take somebody else’s medicine
- Never give or sell your medicine to someone else
- Combining opioids with medicines used to calm anxiety can result in overdose
- Using opioids for something other than pain (anxiety, sleep, fear of pain, to feel good) can create a harmful dependence/addiction
Storing Your Prescription Safely:
Unused medicines in your home risk being used inappropriately.
Pain relievers are a leading cause of serious poisoning of children and pets when they are left where others can get them
Hide or lock up opioid medications to avoid access by family, friends, or houseguests
Keep prescription medications in their original packaging so it is clear for whom the medications were prescribed and to save the directions for appropriate use
Safe Disposal:
Place all unused prescription opioids in the proper disposal unit at your local pharmacy or police station. There are dozens in Greater Cincinnati and the surrounding areas.
To search for a registered disposal site convenient for you, please click here.
In the rare case no medicine take-back facilities are available within your area, you can flush your unused medication down the toilet or follow these simple steps to dispose of most medicines in the household trash:
- Mix medicines (do NOT crush tablets or capsules) with an unpalatable substance such as used coffee grounds or kitty litter;
- Place the mixture in a container such as a sealed plastic bag; and
- Throw the container in your household trash.
- Before throwing out your empty pill bottle or other empty medicine packaging, please be sure to scratch out all of the information on the label to make it unreadable.
REHABILITATION GUIDELINES TO IMPROVE DYNAMIC STABILITY
October 29, 2018
PHASE I – BASELINE STABILIZATION
Goals:
- Diminish pain and inflammation
- Improve posterior flexibility
- Re-establish dynamic stability (muscular balance)
- Re-establish muscular control
- Improve scapula position, strength, and control
Treatment Modalities:
- Cryotherapy to posterior capsule/ cuff
- Iontophoresis (Empi Hybresis)
- Electrical stimulation
Flexibility:
- Sleeper stretch
- IR stretch @ 90° ABD
- Horizontal ADD w/ IR stretch
- Shoulder flexion and ER ROM (gentle stretch)
Exercises:
- Emphasize muscle balance (unilateral muscle ratios)
- Rotator cuff strengthening (esp ER)
- Scapular strengthening exercises
- Prone exercises on table and physioball
- Dynamic stabilization exercises
- ER/IR t-band w/ manual resistance and rhythmic stabilization
- Manual resistance side-lying ER w/ end ROM rhythmic stabilization
- Manual resistance prone rowing w/ end ROM rhythmic stabilization
- Proprioceptive training
- Closed kinetic chain
- push-up position rhythmic stabilization at mid ROM
- ball on wall in scapular plane w/ rhythmic stabilization
- Monitored Rehabilitation System- ER/IR neuromuscular program
- Seated neuromuscular control drill
- Push-ups on plyoball w/ rhythmic stabilization / tilt board perturbations
PHASE II – INTERMEDIATE PHASE
Goals:
- Progress strengthening exercises
- Restore muscular balance (ER/IR)
- Enhance dynamic stability
- Maintain flexibility and mobility
- Improve core stabilization
Flexibilty:
- Control stretches and flexibility exercises
- Sleeper stretch
- Horizontal ADD w/ IR stretch
Exercises:
- Progress strengthening exercises
- Initiate core stabilization program
- Implement LE strength program
- Dynamic stability
- Seated ER t-band on physioball w/ manual resistance and rhythmic stabilization @ end ROM
- Prone scapular exercises on physioball w/ trunk extension (performed bilaterally)
- Planks on plinth
- Planks on physioball
- Manual resistance rowing w/ rhythmic stabilization
- Seated neuromuscular control drill on physioball and contralateral knee extension
- Body Blade activities for endurance
- Single leg stance on foam w/t-band ER/IR
- Weighted cross motion while single leg stance on foam
- PNF D2 flexion/extension w/ rhythmic stabilization @ 45°, 90°,145°
- PNF D2 seated on physioball
- Side-lying scapula neuromuscular control drill
- Initiate 2 hand plyometrics
- Chest pass soccer throw
- Alternating over-head side-to-side
- Side under-hand throw
PHASE III – ADVANCED STRENGTHENING
Goals:
- Aggressive strengthening program
- Progress neuromuscular control
- Improve strength, power, endurance
Exercises:
Continue all exercises and stretches previously listed
- Manual resistance
- Dynamic stability drills
- Seated physioball ER/IR t-band @ 0° ABD w/ manual resistance and rhythmic stabilization
- Seated physioball ER/IR t-band @ 90° ABD w/ manual resistance and rhythmic stabilization
- Planks on table
- Bilateral UE support w/ rhythmic stabilization
- Unilateral UE support w/ rhythmic stabilization
- Unilateral UE support w/ LE movement and rhythmic stabilization
- Continue Monitored Rehabilitation System for ER/IR
- Plyometrics
- Continue 2 hand drills
- Initiate 1 hand drills
- Wall dribble (30-60 sec bouts)
- Plyometrics throw at 90°/ 90°
- Stretch post exercise
Non-Operative Knee Pain
October 26, 2018
- BFR- for quad strengthening
- Hip abductor and Glute strengthening à must be able to perform one legged squat with knee control by discharge of therapy
- Hip/core strengthening à pelvis stabilization and biomechanics
- Quadriceps Strengthening, emphasize VMO strengthening, closed-chain exercises
- Iliotibial Band, hamstring, buttocks stretching à must develop a daily home program to continue after discharge from PT
- Hip abductor and adductor strengthening
- Calf stretching
- Patellar and soft tissue mobilization
- Knee proprioception with stairs and boxes
Patellofemoral Syndrome (Non-Operative)
October 26, 2018
- Hip abductor and Glute strengthening à must be able to perform one legged squat with knee control by discharge of therapy
- Hip/core strengthening à pelvis stabilization and biomechanics
- Quadriceps Strengthening, emphasize VMO strengthening, closed-chain exercises
- Iliotibial Band, hamstring, buttocks stretching à must develop a daily home program to continue after discharge from PT
- Hip abductor and adductor strengthening
- Calf stretching
- Patellar and soft tissue mobilization
- Knee proprioception with stairs and boxes
Rotator Cuff Tear/Tendinitis/ Impingement Syndrome Non-Operative
October 26, 2018
Weeks 1-4
- Upper Body Ergometer
- PROM: full in all planes with emphasis on functional IR
- Scapular plane elevation to 90 degrees
- Elastic Band ER/IR
- Bodyblade: ER/IR in modified neutral o Scapular plane elevation at 90 degrees
- Periscapular strengthening such as:
- wall push-ups o supine punch-ups
- prone scapular retraction with horizontal abduction with IR and ER rowing,
- shrugs
- press-ups
Weeks 4-8
- Prone horizontal and, prone ER
- Modified D2 flexion to cocking
- Bodyblade: scapular plane elevation to 140 degrees
- Scapular plane elevation to 140 degrees
Weeks 8+
- Advance ER/IR strengthening to cocking position as tolerated
- Plyoball rebounder for eccentric cocking to ER
- Increase speed of training
**MUST HAVE HOME EXERCISE PROGRAM & THERABANDS
Dr. Haleem Chaudhary Featured on Living Senior Smart (WCPO)
October 23, 2018
Dr. Haleem Chaudhary is a joint replacement specialist at Beacon Orthopaedics and Sports Medicine. He specializes in adult joint reconstruction, including total hip replacements and total and partial knee replacements. Host Clyde Gray spent some time with the joint replacement specialist to uncover some insight for active adults as we age.
You can watch the video interview with Dr. Haleem Chaudhary here:
Expert Joint Care from Dr. Haleem Chaudhary:
Dr. Haleem Chaudhary recommends maintaining a healthy, active lifestyle as you age. This helps strengthen the supporting structures around you hip and knee joints, as well as promotes proper healing in the affected regions. Unlike some surgeons, Dr. Chaudhary does not immediately recommend jumping into surgery. Rather, he suggests considering options like physical therapy or injections first.
Keeping the joint nimble, maintaining strength and the range of motion is important. Sometimes this can be solved with injections. Later, If joint degeneration persists, the eventual cure for arthritis is typically a total or partial (knee) joint replacement. Although this may sound intimidating at first, advances in orthopedic medicine have drastically reduced the severity and recovery time of the procedure. In fact, it is common for total hip and total knee patients to return home the same day.
Joint replacement became widespread in the 1970s, and over the past 40 years it has advanced dramatically. The book of research and best practices has grown exponentially, leading to minimally invasive techniques designed to preserve healthy tissue. The surgery itself is also much shorter and includes new approaches, which helps reduce the impact to the body.
Recovery time is typically between 4 and 6 weeks for a hip replacement and 8 to 10 weeks for a total knee replacement. Most outpatients joint replacement patients begin physical therapy within 24-hours of their surgery.
Dr. Haleem Chaudhary explains that The goal of the procedure is to create a well functioning, pain-free joint and restore full range of motion. This is accomplished by removing the damaged cartilage and replacing it with a metal and plastic piece. The durability of these components has improved dramatically, causing the average age of joint replacement patients to drop significantly.
If you are considering a total or partial knee replacement, schedule your appointment with Dr. Haleem Chaudhary by calling (513) 354-3700 or scheduling online.
POSTOPERATIVE INSTRUCTIONS – ACHILLES TENDON REPAIR
October 1, 2018
-6 weeks of walking boot starting at first visit w/ 3 heel lifts
– decrease 1 heel lift per week
Medication:
If you were given a nerve block for anesthesia, it will wear off over 18-24 hours. During this time you will have little to no feeling in the body part where you had surgery (i.e. leg).
To control your pain during this transition while the nerve block is wearing off, you are to eat first and then begin taking the pain medication (e.g. Vicodin, Percocet, etc) immediately when you get home from surgery. This will prevent you from having severe pain. Take the pain medication every 4 hours until you go to bed.
You have also been given a prescription for antibiotics – please take this prescription as directed.
A sleeping medication (e.g. Ambien) is also provided to help you sleep at night. Take one tablet 30 minutes before you plan to sleep.
Dressings:
Keep splint on at all times. Call if splint becomes too tight.
Crutches:
Use crutches and maintain leg non-weight bearing.
Driving:
Do not attempt to use your surgical leg for driving activities until advised otherwise by Dr. Burleson.
DVT (blood clot) prevention:
- Perform range of motion exercises for right and left ankle to exercise calf muscles. Do ten reps every hour minimum while awake
- When upright, place surgical foot on ground and apply body weight for balance. Do not have leg suspended in air when walking with crutches, if using crutches.
- Beginning the day of surgery, take one baby aspirin or regular aspirin daily until first post-operative visit unless not allowed for other medical reasons. Clear this with your family doctor before starting the aspirin.
- You should not do any flying for two weeks following surgery
Post-Operative Appointment:
Please make a post-operative appointment to see Dr. Burleson seven to ten days following surgery.
POSTOPERATIVE INSTRUCTIONS – ANKLE ARTHROSCOPY
October 1, 2018
WEIGHT BEARING/MOVEMENT
Unless told otherwise by Dr. Burleson, you should be non-weight bearing on the operative extremity until your follow-up visit. You have been placed in a post-operative splint. Please keep this splint on at all times. Utilize crutches to mobilize.
ICE
You can utilize ice packs over the splint – ensuring that the splint does not get wet. Ice will help decrease swelling.
In addition to icing your ankle, elevate your ankle so that your toes are above your nose. This elevates your ankle above your heart and will help reduce swelling.
MEDICATIONS
If you were given a nerve block for anesthesia, it will wear off over 18-24 hours. During this time you will have little to no feeling in the body part where you had surgery (i.e. leg). To control your pain during this transition while the nerve block is wearing off, you are to eat first and then begin taking the pain medication (e.g. Vicodin, Percocet, etc) immediately when you get home from surgery. This will prevent you from having severe pain. Take the pain medication every 4 hours until you go to bed.
You have been given an antibiotic medication – please take this as prescribed until completion of the medication.
Please take 325mg of Aspirin daily for the first two weeks after surgery.
A sleeping medication (e.g. Ambien) is also provided to help you sleep at night. Take one tablet 30 minutes before you plan to sleep.
DRESSING/BANDAGES
Keep your surgical dressing clean and dry. Do not remove your dressing until your first post-operative visit. You may take a shower with a plastic bag over your leg to keep the dressing clean and dry.
Do not take a bath or submerge your knee in water until your incisions are checked at your first post-operative visit.
TEMPERATURE
It is normal to have an elevated temperature during the first 2-3 days post-operatively. Please call our office if your temperature is above 101oF, if there is increased redness around the incision sites, or if there is increased drainage from the incision sites.
APPOINTMENT
Please call the office prior to, or immediately following, your surgery in order to schedule a post-operative appointment. This should be scheduled 7-10 days after surgery. At that visit your stitches will be removed and you will be given a prescription for physical therapy.
POSTOPERATIVE INSTRUCTIONS – ELBOW ARTHROSCOPY
October 1, 2018
MOVEMENT
You can move your elbow as much as tolerated. You should come out of your sling multiple times a day to move the elbow. The sling is for comfort only.
ICE
An ice machine will be provided to you prior to your surgery. This will help decrease swelling and pain after your surgery. Use the ice machine as much as possible when you get home at intervals of 30 minutes on and off. You should keep the ice machine for approximately two weeks. Do not use the ice machine while you are sleeping.
If you did not receive an ice machine, you can utilize regular ice at intervals of 20 minutes at a time – keep your dressing clean and dry.
In addition to icing your elbow, elevate your arm while at rest. This will help reduce swelling.
MEDICATIONS
An injection of local anesthesia was injected into your elbow after the completion of the operation. This medication will wear off in 5 to 6 hours. To control your pain during this transition, you are to eat first and then begin taking the pain medication (e.g. Vicodin, Percocet, etc) immediately when you get home from surgery. This will prevent you from having severe pain. Take the pain medication every 4 hours until you go to bed. Two days after your surgery, you can supplement your pain medication with an anti-inflammatory (e.g. Advil, Aleve, etc.) – this will help you wean from the narcotic pain medication.
You have also been given a prescription for antibiotics – please take these as prescribed.
DRESSING/BANDAGES
Keep your dressing clean and dry. You may remove the dressing two days after surgery. Please place waterproof band-aids over the incision sites. It is okay to shower two days after surgery – keep incisions clean and dry.
DRIVING
You may drive 3 to 5 days after surgery if you are not taking pain medication.
APPOINTMENT
Please call the office prior to, or immediately following, your surgery in order to schedule a postoperative appointment. This should be scheduled 7-10 days after surgery. At that visit your stitches will be removed and you will be given a prescription for physical therapy.
If you develop a fever (101.5), redness or drainage from the surgical incision site, please call our office to arrange for an evaluation.
POSTOPERATIVE INSTRUCTIONS – MEDIAL EPICONDYLE ORIF
October 1, 2018
SLING/MOVEMENT
You will be placed in a soft cast for 1 week after your surgery. This will limit the movement of your elbow as to not disrupt the reduced medial epicondyle. You will also be given a sling that you may wear for comfort. You may move your shoulder in any direction that is comfortable. Do not force the motion though, because this will likely cause pain.
DRESSING/BANDAGES
Your dressing is NOT waterproof; therefore, you are not to get your soft cast wet. You can bathe; however, will need to cover your arm with a plastic bag or trash bag to avoid getting your incisions wet. Your soft cast will be removed at your first post-op visit at which point you will be placed in an elbow brace until 6 weeks post op.
MEDICATIONS
If you were given a nerve block for anesthesia, it will wear off over 18-24 hours. During this time, you will have little to no feeling in the body part where you had surgery (i.e. arm). An injection of local anesthesia was injected into your elbow after the completion of the operation. This medication will wear off in 5-6 hours. Therefore, begin taking the medication (e.g. Vicodin, Percocet, etc.) immediately when you get home. This will prevent you from having severe pain. Take the pain medication as needed, every 4-6 hours until you go to bed.
You have been given a prescription for antibiotics (Keflex/cephalexin) – please take as prescribed.
APPOINTMENT
Your post-operative visit should be scheduled 7-10 days after surgery. At that visit your stitches will be removed.
POSTOPERATIVE INSTRUCTIONS – KNEE ARTHROSCOPY WITH ACL RECONSTRUCTION
October 1, 2018
BRACE/MOVEMENT
You can walk and bend your knee as much as tolerated. Use your crutches and brace for the first 2-3 weeks. Do not go for long walks or stand on your feet for extended periods of time. This will cause swelling and pain. Wear the brace at all times when not icing or bathing. Have the brace locked in extension while ambulating until your follow-up visit.
A continuous passive motion (CPM) machine will be provided for you – you should use this machine for a minimum of 4 hours a day, for 2 weeks postoperatively. Begin at 0-40 degrees and then progress 5-10 degrees of flexion daily as tolerated.
ICE
An ice machine will be provided to you prior to your surgery. This will help decrease swelling and pain after your surgery. Use the ice machine as much as possible when you get home at intervals of 20 minutes on and off. You should keep the ice machine for approximately two weeks. Do not use the ice machine while you are sleeping.
If you did not receive an ice machine – you should use ice packs over the surgical site regularly throughout the day.
In addition to icing your knee, elevate your knee so that your toes are above your nose. This elevates your knee above your heart and will help reduce swelling.
MEDICATIONS
If you were given a nerve block for anesthesia, it will wear off over 18-24 hours. During this time you will have little to no feeling in the body part where you had surgery (i.e. leg). To control your pain during this transition while the nerve block is wearing off, you are to eat first and then begin taking the pain medication (e.g. Vicodin, Percocet, etc) immediately when you get home from surgery. This will prevent you from having severe pain. Take the pain medication every 4 hours until you go to bed.
You have been given an antibiotic medication – please take this as prescribed until completion of the medication.
Please take 325mg of Aspirin daily for the first two weeks after surgery.
A sleeping medication (e.g. Ambien) is also provided to help you sleep at night. Take one tablet 30 minutes before you plan to sleep.
DRESSING/BANDAGES
Keep your surgical dressing clean and dry. Do not remove your dressing until your first post-operative visit. You may take a shower with a plastic bag over your leg to keep the dressing clean and dry.
Do not take a bath or submerge your knee in water until your incisions are checked at your first post-operative visit.
DRIVING
You may drive 1-2 weeks after surgery if you are not taking pain medication. If your right leg is the operative side, then you must have good control of your leg prior to driving.
TEMPERATURE
It is normal to have an elevated temperature during the first 2-3 days post-operatively. Please call our office if your temperature is above 101oF, if there is increased redness around the incision sites, or if there is increased drainage from the incision sites.
If you have any difficulty using anti-inflammatory medications or aspirin or have a history of ulcer disease, please let us know.
POSTOPERATIVE INSTRUCTIONS HIP ARTHROSCOPY WITH TROCHANTERIC BURSECTOMY
October 1, 2018
MOVEMENT
You are touch down (50%) weight bearing after surgery; it is required that you use crutches for 2weeks postoperatively to provide you with extra stability and to protect your hip. Do not hyperextend or hyperflex your hip. This will be painful. Only move your hip within a pain-free range of motion.
The day after surgery, once your nerve block has worn off, we encourage you to ride a stationary bike two times a day every day for 5-10 minutes as tolerated. This will keep your hip from getting too stiff immediately after surgery. A continuous passive motion machine will be provided for you – you should use this machine for 4 hours a day – 2 hours a day if utilizing the bicycle.
BRACE
You have been provided a hinged hip brace; it is unlocked from 0 – 90 degrees.
A hip positioner brace has been provided for your use. Please wear it at night while you sleep for the first week after your surgery. This will keep your feet straight and not allow your legs to turn out.
ICE
An ice machine will be provided to you prior to your surgery. This will help decrease swelling and pain after your surgery. Use the ice machine as much as possible when you get home at intervals of 30 minutes on and off. You should keep the ice machine for approximately two weeks. Do not use the ice machine while you are sleeping.
MEDICATIONS
If you were given a nerve block for anesthesia, it will wear off over 18-24 hours. During this time you will have little to no feeling in the body part where you had surgery (i.e. leg). Please be careful and use your brace or crutches during this time to avoid any falls after your surgery. Also, an injection of local anesthesia was injected into your hip after the completion of the operation. This medication will wear off in 5 to 6 hours. To control your pain during this transition while the nerve block is wearing off, you are to eat first and then begin taking the pain medication (e.g. Vicodin, Percocet, etc) immediately when you get home from surgery. This will prevent you from having severe pain. Take the pain medication every 4 hours until you go to bed.
The day after surgery you can take 600 mg of Ibuprofen (Advil/Motrin) every 6 hours to help with inflammation and pain. This medication will help cut down the use of narcotic-based pain medication. However, if you still have pain after taking the Ibuprofen, continue taking the pain medication every 4-6 hours as needed.
A sleeping medication (e.g. Ambien) is also provided to help you sleep at night. Take one tablet 30 minutes before you plan to sleep.
DRESSING/BANDAGES
Your hip dressing is waterproof. You may shower the next day after surgery. Two days after surgery you may remove the entire dressing. Gently wash the wounds with soap and warm water and towel dry. You may then cover the incisions with band-aids until your post op visit.
Do not take a bath or submerge your hip in water until your incisions are checked at your first post-op visit.
DRIVING
You may drive 3 to 5 days after surgery if you are not taking pain medication. If your right leg is the operative side, then you must have good control of your leg prior to driving.
APPOINTMENT
Please call the office prior to, or immediately following, your surgery in order to schedule a postoperative appointment. This should be scheduled 7-10 days after surgery. At that visit your stitches will be removed and you will be given a prescription for physical therapy.
POSTOPERATIVE INSTRUCTIONS – UCL Reconstruction
October 1, 2018
– Start of week 2: Elbow brace 30-60 deg.
-Begin PT @ week & 7: Isotonics of scap/shoulder/elbow/forearm/wrist
-Week 8 and as motion returns: IR/ER strength, pronation/supination strength, thrower’s ten
-Week 12: Plyometric program (begin two handed)
-4mos: interval throwing
-5mos: hitting
-14mos: throwing at live batters
SLING/MOVEMENT
You will be placed in a soft cast for 1 week after your surgery. This will limit the movement of your elbow as to not disrupt the reconstructed ligament. You will also be given a sling that you may wear for comfort. You may move your shoulder in any direction that is comfortable. Do not force the motion though because this will likely cause pain.
DRESSING/BANDAGES
Your dressing is NOT waterproof; therefore, you are not to get your soft cast wet. You can bathe; however, will need to cover your arm with a plastic bag or trash bag to avoid getting your incisions wet. Your soft cast will be removed at your first post-op visit at which point you will be placed in an elbow brace until 6 weeks post op.
MEDICATIONS
If you were given a nerve block for anesthesia, it will wear off over 18-24 hours. During this time, you will have little to no feeling in the body part where you had surgery (i.e. arm). An injection of local anesthesia was injected into your elbow after the completion of the operation. This medication will wear off in 5-6 hours. Therefore, begin taking the medication (e.g. Vicodin, Percocet, etc.) immediately when you get home. This will prevent you from having severe pain. Take the pain medication every 4 hours until you go to bed.
The day after surgery you can take 600 mg of Ibuprofen (Advil/Motrin) every 6 hours to help with inflammation and pain. This medication will help cut down the use of narcotic-based pain medication. However, if you still have pain after taking the Ibuprofen, continue taking the pain medication every 4-6 hours as needed.
A sleeping medication (e.g. Ambien) is also provided to help you sleep at night. Take one tablet 30 minutes before you plan to sleep.
You have been given a prescription for antibiotics (Keflex/cephalexin) – please take as prescribed.
APPOINTMENT
Your post-operative visit should be scheduled 7-10 days after surgery. At that visit your stiches will be removed.
POSTOPERATIVE INSTRUCTIONS – ULNAR NERVE DECOMPRESSION/TRANSPOSITION
October 1, 2018
MOVEMENT
It is okay to come out of the sling to move the shoulder and wrist. Light passive range of motion of the elbow is permitted as well. The sling is for comfort as well as to protect the incision.
ICE
An ice machine will be provided to you prior to your surgery. This will help decrease swelling and pain after your surgery. Use the ice machine as much as possible when you get home at intervals of 30 minutes on and off. You should keep the ice machine for approximately two weeks. Do not use the ice machine while you are sleeping.
If you did not receive an ice machine, you can utilize regular ice at intervals of 20 minutes at a time – keep your dressing clean and dry.
In addition to icing your elbow, elevate your arm while at rest. This will help reduce swelling.
MEDICATIONS
An injection of local anesthesia was injected into your elbow after the completion of the operation. This medication will wear off in 5 to 6 hours. To control your pain during this transition, you are to eat first and then begin taking the pain medication (e.g. Vicodin, Percocet, etc) immediately when you get home from surgery. This will prevent you from having severe pain. Take the pain medication every 4 hours until you go to bed. Two days after your surgery, you can supplement your pain medication with an anti-inflammatory (e.g. Advil, Aleve, etc.) – this will help you wean from the narcotic pain medication.
You have also been given a prescription for antibiotics – please take these as prescribed.
DRESSING/BANDAGES
Keep your dressing clean and dry. Do not remove your dressing until follow-up.. It is okay to shower two days after surgery – keep dressing clean and dry.
DRIVING
You may drive 3 to 5 days after surgery if you are not taking pain medication.
APPOINTMENT
Please call the office prior to, or immediately following, your surgery in order to schedule a postoperative appointment. This should be scheduled 7-10 days after surgery. At that visit your stitches will be removed and you will be given a prescription for physical therapy.
If you develop a fever (101.5), redness or drainage from the surgical incision site, please call our office to arrange for an evaluation.
POSTOPERATIVE INSTRUCTIONS – Abductor Repair
October 1, 2018
Post Op
- WB as tolerated
- Brace 6 weeks limiting adduction
- PROM at week 1
- No CPM
Week 7
D/C brace
Begin strength: hip flexion, adduction, Knee open chain flexion/extension
Avoid strength with ER, Extension, and Abduction
MOVEMENT AND BRACING
After your surgery you will be placed in a hinged hip brace that is worn around your waist and your thigh. You are to wear this at all times except when bathing.
The hinged hip brace will be preset to limit flexion of your hip to protect the repair. This will be based on the amount of required repair. You may only move within this preset range of motion. The limits of your brace will be adjusted at your post-operative visits.
For the first two weeks you will be partial weight bearing. You will progress to full weight bearing after your first post-operative visit.
ICE
An ice machine will be provided to you prior to your surgery. This will help decrease swelling and pain after your surgery. Use the ice machine as much as possible when you get home at intervals of 20 minutes on and off. You should keep the ice machine for approximately two weeks. Do not use the ice machine while you are sleeping.
If you were not provided an ice machine, regular ice will suffice.
MEDICATIONS
If you were given a nerve block for anesthesia, it will wear off over 18-24 hours. During this time you will have little to no feeling in the body part where you had surgery (i.e. leg). Please be careful and use your brace or crutches during this time to avoid any falls after your surgery. Also, an injection of local anesthesia was injected into your hip after the completion of the operation. This medication will wear off in 5 to 6 hours. To control your pain during this transition while the nerve block is wearing off, you are to eat first and then begin taking the pain medication (e.g. Vicodin, Percocet, etc) immediately when you get home from surgery. This will prevent you from having severe pain. Take the pain medication every 4 hours until you go to bed.
You have also been given an anti-inflammatory prescription called Naprosyn. You should begin taking this medicine the night of the surgery. You are to take 500mg (1 tab) two times daily. This medicine serves two purposes: 1. It will help cut down on the use of the narcotic medicine, and 2. Prevent bone from re-growing around the hip joint. You are to take this medication for an entire month.
A sleeping medication (e.g. Ambien) is also provided to help you sleep at night. Take one tablet 30 minutes before you plan to sleep.
DRESSING/BANDAGES
Your hip dressing is waterproof. You may shower the next day after surgery and pat the dressing dry. Do not remove the dressing at any time. Your dressing will be removed once your incisions are checked at your first post-op visit.
DRIVING
You may drive 3 to 5 days after surgery if you are not taking pain medication. If your right leg is the operative side, then you must have good control of your leg in the brace prior to driving.
TEMPERATURE
It is normal to have an elevated temperature during the first 2-3 days post-operatively. Please call our office if your temperature is above 101oF, if there is increased redness around the incision site, or if there is increased drainage from the incision site.
APPOINTMENT
Please call the office prior to, or immediately following, your surgery in order to schedule a post-operative appointment. This should be scheduled 7-10 days after surgery. At that visit your stitches will be removed and you will be given a prescription for physical therapy.
POSTOPERATIVE INSTRUCTIONS – HIP ARTHROSCOPY WITH LABRAL REPAIR
October 1, 2018
MOVEMENT
You are touch down (50%) weight bearing after surgery; it is required that you use crutches for 3 weeks postoperatively to provide you with extra stability and to protect your hip. Do not hyperextend or hyperflex your hip. This will be painful. Only move your hip within a pain-free range of motion. You have been provided a hinged hip brace – this is to be used for your comfort only while ambulating; it is unlocked from 0 – 90 degrees.
The day after surgery, once your nerve block has worn off, we encourage you to ride a stationary bike two – four times a day every day for 5-10 minutes as tolerated. This will keep your hip from getting too stiff immediately after surgery. A continuous passive motion (CPM) machine will be provided for you – you should use this machine for 4 hours a day – 2 hours a day if utilizing the bicycle. Keep hip flexion less than 90 degrees with the CPM.
SLEEP
A hip positioner brace has been provided for your use while sleeping. Please wear it at night while you sleep for the first week after your surgery. This will keep your feet straight and not allow your legs to turn out.
ICE
An ice machine will be provided to you prior to your surgery. This will help decrease swelling and pain after your surgery. Use the ice machine as much as possible when you get home at intervals of 30 minutes on and off. You should keep the ice machine for approximately two weeks. Do not use the ice machine while you are sleeping.
MEDICATIONS
If you were given a nerve block for anesthesia, it will wear off over 18-24 hours. During this time you will have little to no feeling in the body part where you had surgery (i.e. leg). Please be careful and use your brace or crutches during this time to avoid any falls after your surgery. Also, an injection of local anesthesia was injected into your hip after the completion of the operation. This medication will wear off in 5 to 6 hours. To control your pain during this transition while the nerve block is wearing off, you are to eat first and then begin taking the pain medication (e.g. Vicodin, Percocet, etc) immediately when you get home from surgery. This will prevent you from having severe pain. Take the pain medication every 4 hours until you go to bed.
You have also been given an anti-inflammatory prescription called Naprosyn. You should begin taking this medicine the night of the surgery. You are to take 500mg (1 tab) two times daily. This medicine serves two purposes: 1. It will help cut down on the use of the narcotic medicine, and 2. Prevent bone from re-growing around the hip joint. You are to take this medication for an entire month.
A sleeping medication (e.g. Ambien) is also provided to help you sleep at night. Take one tablet 30 minutes before you plan to sleep.
DRESSING/BANDAGES
Your hip dressing is waterproof. You may shower the next day after surgery. Two days after surgery you may remove the entire dressing. Gently wash the wounds with soap and warm water and towel dry. You may then cover the incisions with band-aids until your post op visit.
Do not take a bath or submerge your hip in water until your incisions are checked at your first post-op visit.
DRIVING
You may drive 10 days after surgery if you are not taking pain medication. If your right leg is the operative side, then you must have good control of your leg prior to driving.
APPOINTMENT
Please call the office prior to, or immediately following, your surgery in order to schedule a postoperative appointment. This should be scheduled 10-12 days after surgery. At that visit your stitches will be removed and you will be given a prescription for physical therapy.
If you develop a fever (101.5), redness or drainage from the surgical incision site, please call our office to arrange for an evaluation.
You may experience some low back pain due to muscle spasm from the epidural anesthesia and / or traction. If so, apply a heating pad to the area and take an analgesic if you have not already done so.
If you have any difficulty using anti-inflammatory medications or aspirin or have a history of ulcer disease, please let us know.
POSTOPERATIVE INSTRUCTIONS – KNEE ARTHROSCOPY WITH PCL/PLC RECONSTRUCTION
September 28, 2018
Post op
- Brace locked at 0° for 1 week
- Increase 20° of flexion every two weeks in brace
- FWB at 7 days with brace
- PT starts at 7 days ( quad sets, tens therapy)
- D/C brace at 7 weeks
- Stationary bike at 7 weeks (fellow lecture)
- Agility at 12 weeks (fellow lecture)
SLING/MOVEMENT
Please keep the knee brace locked in extension at all times unless otherwise directed by your physician – this will be for the first two weeks post-operatively. Use your crutches and be partial weight bearing on the affected leg. Do not go for long walks or stand on your feet for extended periods of time. This will cause swelling and pain.
ICE
An ice machine will be provided to you prior to your surgery. This will help decrease swelling and pain after your surgery. Use the ice machine as much as possible when you get home at intervals of 20 minutes on and off. You should keep the ice machine for approximately two weeks. Do not use the ice machine while you are sleeping.
If you did not receive an ice machine – you should use ice packs over the surgical site regularly throughout the day.
In addition to icing your knee, elevate your knee so that your toes are above your nose. This elevates your knee above your heart and will help reduce swelling.
MEDICATIONS
If you were given a nerve block for anesthesia, it will wear off over 18-24 hours. During this time you will have little to no feeling in the body part where you had surgery (i.e. leg). To control your pain during this transition while the nerve block is wearing off, you are to eat first and then begin taking the pain medication (e.g. Vicodin, Percocet, etc) immediately when you get home from surgery. This will prevent you from having severe pain. Take the pain medication every 4 hours until you go to bed.
You have been given an antibiotic medication – please take this as prescribed until completion of the medication.
Please take one 325mg Aspirin daily for two weeks.
A sleeping medication (e.g. Ambien) is also provided to help you sleep at night. Take one tablet 30 minutes before you plan to sleep.
DRESSING/BANDAGES
Keep your surgical dressing clean and dry. Do not remove your dressing until your first post-operative visit.. You may take a shower with a plastic bag over your leg to keep the dressing clean and dry.
Do not take a bath or submerge your knee in water until your incision are checked at your first post-operative visit.
TEMPERATURE
It is normal to have an elevated temperature during the first 2-3 days post-operatively. Please call our office if your temperature is above 101oF, if there is increased redness around the incision sites, or if there is increased drainage from the incision sites.
APPOINTMENT
Please call the office prior to, or immediately following, your surgery in order to schedule a post-operative appointment. This should be scheduled 7-10 days after surgery. At that visit your stitches will be removed and you will be given a prescription for physical therapy.
POSTOPERATIVE INSTRUCTIONS – PATELLAR REALIGNMENT
September 28, 2018
Post- op
– Ambulation locked at 0 for 6 weeks
– Early PROM with CPM up to 90 deg.
– MPFL: limit CPM flexion to less 20 deg.
– Early Quad sets and SLR
– Weight bearing as tolerated
7 weeks
– Shields brace
– Zero ROM restrictions
– Quad sets/SLR
– Wean off brace / crutches
BRACE/MOVEMENT
You can walk with the brace locked in extension with full weight. Have the brace locked in extension while ambulating until your follow-up visit. Use your crutches for stability. Do not go for long walks or stand on your feet for extended periods of time. This will cause swelling and pain. Wear the brace at all times when not icing or bathing. While at rest you can bend your knee as tolerated with assistance.
ICE
An ice machine will be provided to you prior to your surgery. This will help decrease swelling and pain after your surgery. Use the ice machine as much as possible when you get home at intervals of 20 minutes on and off. You should keep the ice machine for approximately two weeks. Do not use the ice machine while you are sleeping.
If you did not receive an ice machine – you should use ice packs over the surgical site regularly throughout the day.
In addition to icing your knee, elevate your knee so that your toes are above your nose. This elevates your knee above your heart and will help reduce swelling.
MEDICATIONS
If you were given a nerve block for anesthesia, it will wear off over 18-24 hours. During this time you will have little to no feeling in the body part where you had surgery (i.e. leg). To control your pain during this transition while the nerve block is wearing off, you are to eat first and then begin taking the pain medication (e.g. Vicodin, Percocet, etc) immediately when you get home from surgery. This will prevent you from having severe pain. Take the pain medication every 4 hours until you go to bed.
You have been given an antibiotic medication – please take this as prescribed until completion of the medication.
Please take 325mg of Aspirin daily for the first two weeks after surgery.
A sleeping medication (e.g. Ambien) is also provided to help you sleep at night. Take one tablet 30 minutes before you plan to sleep.
DRESSING/BANDAGES
Keep your surgical dressing clean and dry. Do not remove your dressing until your first post-operative visit. You may take a shower with a plastic bag over your leg to keep the dressing clean and dry.
Do not take a bath or submerge your knee in water until your incisions are checked at your first post-operative visit.
TEMPERATURE
It is normal to have an elevated temperature during the first 2-3 days post-operatively. Please call our office if your temperature is above 101oF, if there is increased redness around the incision sites, or if there is increased drainage from the incision sites.
APPOINTMENT
Please call the office prior to, or immediately following, your surgery in order to schedule a post-operative appointment. This should be scheduled 7-10 days after surgery. At that visit your stitches will be removed and you will be given a prescription for physical therapy.
POSTOPERATIVE INSTRUCTIONS – ORIF PATELLA
September 28, 2018
BRACE/MOVEMENT
You can walk with the brace locked in extension with full weight. Have the brace locked in extension at all times until your post-operative visit. Use your crutches for stability. Do not go for long walks or stand on your feet for extended periods of time. This will cause swelling and pain.
ICE
An ice machine will be provided to you prior to your surgery. This will help decrease swelling and pain after your surgery. Use the ice machine as much as possible when you get home at intervals of 20 minutes on and off. You should keep the ice machine for approximately two weeks. Do not use the ice machine while you are sleeping.
If you did not receive an ice machine – you should use ice packs over the surgical site regularly throughout the day.
In addition to icing your knee, elevate your knee so that your toes are above your nose. This elevates your knee above your heart and will help reduce swelling.
MEDICATIONS
If you were given a nerve block for anesthesia, it will wear off over 18-24 hours. During this time you will have little to no feeling in the body part where you had surgery (i.e. leg). To control your pain during this transition while the nerve block is wearing off, you are to eat first and then begin taking the pain medication (e.g. Vicodin, Percocet, etc) immediately when you get home from surgery. This will prevent you from having severe pain. Take the pain medication every 4 hours until you go to bed.
You have been given an antibiotic medication – please take this as prescribed until completion of the medication.
Please take 325mg of Aspirin daily for the first two weeks after surgery.
A sleeping medication (e.g. Ambien) is also provided to help you sleep at night. Take one tablet 30 minutes before you plan to sleep.
DRESSING/BANDAGES
Keep your surgical dressing clean and dry. Do not remove your dressing until your first post-operative visit. You may take a shower with a plastic bag over your leg to keep the dressing clean and dry.
Do not take a bath or submerge your knee in water until your incisions are checked at your first post-operative visit.
TEMPERATURE
It is normal to have an elevated temperature during the first 2-3 days post-operatively. Please call our office if your temperature is above 101oF, if there is increased redness around the incision sites, or if there is increased drainage from the incision sites.
APPOINTMENT
Please call the office prior to, or immediately following, your surgery in order to schedule a post-operative appointment. This should be scheduled 7-10 days after surgery. At that visit your stitches will be removed and you will be given a prescription for physical therapy.
POSTOPERATIVE INSTRUCTIONS – KNEE ARTHROSCOPY WITH PATELLAR TENDON DEBRIDEMENT/REPAIR
September 28, 2018
SLING/MOVEMENT
Use your crutches for the first week. Do not go for long walks or stand on your feet for extended periods of time. This will cause swelling and pain. Wear the brace at all times when not icing or bathing. Have the brace locked in extension while ambulating until your follow-up visit.
ICE
An ice machine will be provided to you prior to your surgery. This will help decrease swelling and pain after your surgery. Use the ice machine as much as possible when you get home at intervals of 20 minutes on and off. You should keep the ice machine for approximately two weeks. Do not use the ice machine while you are sleeping.
If you did not receive an ice machine – you should use ice packs over the surgical site regularly throughout the day.
In addition to icing your knee, elevate your knee so that your toes are above your nose. This elevates your knee above your heart and will help reduce swelling.
MEDICATIONS
If you were given a nerve block for anesthesia, it will wear off over 18-24 hours. During this time you will have little to no feeling in the body part where you had surgery (i.e. leg). To control your pain during this transition while the nerve block is wearing off, you are to eat first and then begin taking the pain medication (e.g. Vicodin, Percocet, etc) immediately when you get home from surgery. This will prevent you from having severe pain. Take the pain medication every 4 hours until you go to bed.
You have been given an antibiotic medication – please take this as prescribed until completion of the medication.
Please take 325mg of Aspirin daily for the first two weeks after surgery.
DRESSING/BANDAGES
Keep your surgical dressing clean and dry. You can remove the dressing and stocking on the second day after surgery. Place waterproof band-aids over the incision sites. You may take a shower but do not soak the incisions.
Do not take a bath or submerge your knee in water until your incisions are checked at your first post-operative visit.
TEMPERATURE
It is normal to have an elevated temperature during the first 2-3 days post-operatively. Please call our office if your temperature is above 101oF, if there is increased redness around the incision sites, or if there is increased drainage from the incision sites.
APPOINTMENT
Please call the office prior to, or immediately following, your surgery in order to schedule a post-operative appointment. This should be scheduled 7-10 days after surgery. At that visit your stitches will be removed and you will be given a prescription for physical therapy.
POSTOPERATIVE INSTRUCTIONS – Osteochondral allograft Femoral condyle
September 28, 2018
Post op
- 50% PWB x 6 weeks
- Full PROM
- CPM x 4 weeks
- Less than 90 until 1st post op
- Start PT at 1 week for PROM and quad sets
- Locked in brace at 0 for ambulation
BRACE/MOVEMENT
For the initial six weeks following surgery you must limit the weight you put on the knee. Have the brace locked in extension while ambulating until your follow-up visit with only partial weight bearing. Use your crutches for stability. Do not go for long walks or stand on your feet for extended periods of time. This will cause swelling and pain. Wear the brace at all times when not icing or bathing. While at rest you can bend your knee as tolerated with assistance.
ICE
An ice machine will be provided to you prior to your surgery. This will help decrease swelling and pain after your surgery. Use the ice machine as much as possible when you get home at intervals of 20 minutes on and off. You should keep the ice machine for approximately two weeks. Do not use the ice machine while you are sleeping.
If you did not receive an ice machine – you should use ice packs over the surgical site regularly throughout the day.
In addition to icing your knee, elevate your knee so that your toes are above your nose. This elevates your knee above your heart and will help reduce swelling.
MEDICATIONS
If you were given a nerve block for anesthesia, it will wear off over 18-24 hours. During this time you will have little to no feeling in the body part where you had surgery (i.e. leg). To control your pain during this transition while the nerve block is wearing off, you are to eat first and then begin taking the pain medication (e.g. Vicodin, Percocet, etc) immediately when you get home from surgery. This will prevent you from having severe pain. Take the pain medication every 4 hours until you go to bed.
You have been given an antibiotic medication – please take this as prescribed until completion of the medication.
Please take 325mg of Aspirin daily for the first two weeks after surgery.
A sleeping medication (e.g. Ambien) is also provided to help you sleep at night. Take one tablet 30 minutes before you plan to sleep.
DRESSING/BANDAGES
Keep your surgical dressing clean and dry. Do not remove your dressing until your first post-operative visit. You may take a shower with a plastic bag over your leg to keep the dressing clean and dry.
Do not take a bath or submerge your knee in water until your incisions are checked at your first post-operative visit.
TEMPERATURE
It is normal to have an elevated temperature during the first 2-3 days post-operatively. Please call our office if your temperature is above 101oF, if there is increased redness around the incision sites, or if there is increased drainage from the incision sites.
APPOINTMENT
Please call the office prior to, or immediately following, your surgery in order to schedule a post-operative appointment. This should be scheduled 7-10 days after surgery. At that visit your stitches will be removed and you will be given a prescription for physical therapy.
POSTOPERATIVE INSTRUCTIONS – MPFL Recon/repair
September 28, 2018
Post- op
– Ambulation locked at 0 for 6 weeks, some 30 of flexion at week 1
– Early PROM with CPM up to 90 deg.
-MPFL: limit CPM flexion to less 20 deg.
– Early Quad sets and SLR
– Weight bearing as tolerated
7 weeks
– Shields brace
– Zero ROM restrictions
– Quad sets/SLR
– Wean off brace / crutches
BRACE/MOVEMENT
You can walk with the brace locked in extension with full weight. Have the brace locked in extension while ambulating until your follow-up visit. Use your crutches for stability. Do not go for long walks or stand on your feet for extended periods of time. This will cause swelling and pain. Wear the brace at all times when not icing or bathing. While at rest you can bend your knee as tolerated with assistance.
ICE
An ice machine will be provided to you prior to your surgery. This will help decrease swelling and pain after your surgery. Use the ice machine as much as possible when you get home at intervals of 20 minutes on and off. You should keep the ice machine for approximately two weeks. Do not use the ice machine while you are sleeping.
If you did not receive an ice machine – you should use ice packs over the surgical site regularly throughout the day.
In addition to icing your knee, elevate your knee so that your toes are above your nose. This elevates your knee above your heart and will help reduce swelling.
MEDICATIONS
If you were given a nerve block for anesthesia, it will wear off over 18-24 hours. During this time you will have little to no feeling in the body part where you had surgery (i.e. leg). To control your pain during this transition while the nerve block is wearing off, you are to eat first and then begin taking the pain medication (e.g. Vicodin, Percocet, etc) immediately when you get home from surgery. This will prevent you from having severe pain. Take the pain medication every 4 hours until you go to bed.
You have been given an antibiotic medication – please take this as prescribed until completion of the medication.
Please take 325mg of Aspirin daily for the first two weeks after surgery.
A sleeping medication (e.g. Ambien) is also provided to help you sleep at night. Take one tablet 30 minutes before you plan to sleep.
DRESSING/BANDAGES
Keep your surgical dressing clean and dry. Do not remove your dressing until your first post-operative visit. You may take a shower with a plastic bag over your leg to keep the dressing clean and dry.
Do not take a bath or submerge your knee in water until your incisions are checked at your first post-operative visit.
TEMPERATURE
It is normal to have an elevated temperature during the first 2-3 days post-operatively. Please call our office if your temperature is above 101oF, if there is increased redness around the incision sites, or if there is increased drainage from the incision sites.
APPOINTMENT
Please call the office prior to, or immediately following, your surgery in order to schedule a post-operative appointment. This should be scheduled 7-10 days after surgery. At that visit your stiches will be removed and you will be given a prescription for physical therapy.
POSTOPERATIVE INSTRUCTIONS – KNEE ARTHROSCOPY WITH MENISCUS REPAIR
September 28, 2018
Post- op
- 0-90 x 6 weeks
- Crutches x 6 weeks with TTWB and brace locked at zero
- 7 wks begin closed chain exercises
- 7 wks continue flexion ROM, not aggressive
- 13 wks, possibly running progression
WEIGHT BEARING / MOVEMENT
You are NOT to bend your knee past 90 degrees for the first 6 weeks after surgery. Use crutches for the first 6 weeks with weight bearing as tolerated on the surgical side. You will have a knee brace locked at 0o while using crutches to ambulate to help prevent damaging the repair. Use the brace locked while sleeping as well.
ICE
An ice machine will be provided to you prior to your surgery. This will help decrease swelling and pain after your surgery. Use the ice machine as much as possible when you get home at intervals of 20 minutes on and off. You should keep the ice machine for approximately two weeks. Do not use the ice machine while you are sleeping.
If you did not receive an ice machine – you should use ice packs over the surgical site regularly throughout the day. In addition to icing your knee, elevate your knee so that your toes are above your nose. This elevates your knee above your heart and will help reduce swelling.
MEDICATIONS
If you were given a nerve block for anesthesia, it will wear off over 18-24 hours. During this time you will have little to no feeling in the body part where you had surgery (i.e. leg). Also, an injection of local anesthesia was injected into your knee after the completion of the operation. This medication will wear off in 5 to 6 hours. To control your pain during this transition while the nerve block is wearing off, you are to eat first and then begin taking the pain medication (e.g. Vicodin, Percocet, etc) immediately when you get home from surgery. This will prevent you from having severe pain. Take the pain medication every 4 hours until you go to bed.
You have been given an antibiotic medication – please take this as prescribed until completion of the medication.
A sleeping medication (e.g. Ambien) is also provided to help you sleep at night. Take one tablet 30 minutes before you plan to sleep.
DRESSING/BANDAGES
Keep your surgical dressing clean and dry. You may remove your dressing two days after surgery. Please place band-aids over the incision sites. At this time you may take a shower, however you should avoid direct contact on the incision sites. Water-proof band-aids over the incision sites are very helpful. Please keep the incision sites clean and dry.
Do not take a bath or submerge your knee in water until your incision are checked at your first post-operative visit.
TEMPERATURE
It is normal to have an elevated temperature during the first 2-3 days post-operatively. Please call our office if your temperature is above 101oF, if there is increased redness around the incision sites, or if there is increased drainage from the incision sites.
POSTOPERATIVE INSTRUCTIONS – KNEE ARTHROSCOPY WITH MENISCUS REPAIR + ACL reconstruction
September 28, 2018
Post- op
- Brace locked at Zero with ambulation x 6 weeks
- Use crutches for 4 weeks with PWB
- Wear brace at night
- Limit ROM to 90 deg. For 6 weeks.
SLING/MOVEMENT
You can weight bear and walk as much as tolerated after your surgery. You are NOT to bend your knee past 90 degrees for the first month after surgery. You will have a knee brace locked from 0 – 90o to help prevent injury. Use the brace at all times. Use your crutches for the first week. Do not go for long walks or stand on your feet for extended periods of time. This will cause swelling and pain.
ICE
An ice machine will be provided to you prior to your surgery. This will help decrease swelling and pain after your surgery. Use the ice machine as much as possible when you get home at intervals of 20 minutes on and off. You should keep the ice machine for approximately two weeks. Do not use the ice machine while you are sleeping.
If you did not receive an ice machine – you should use ice packs over the surgical site regularly throughout the day. In addition to icing your knee, elevate your knee so that your toes are above your nose. This elevates your knee above your heart and will help reduce swelling.
MEDICATIONS
If you were given a nerve block for anesthesia, it will wear off over 18-24 hours. During this time you will have little to no feeling in the body part where you had surgery (i.e. leg). Also, an injection of local anesthesia was injected into your knee after the completion of the operation. This medication will wear off in 5 to 6 hours. To control your pain during this transition while the nerve block is wearing off, you are to eat first and then begin taking the pain medication (e.g. Vicodin, Percocet, etc) immediately when you get home from surgery. This will prevent you from having severe pain. Take the pain medication every 4 hours until you go to bed.
You have been given an antibiotic medication – please take this as prescribed until completion of the medication.
A sleeping medication (e.g. Ambien) is also provided to help you sleep at night. Take one tablet 30 minutes before you plan to sleep.
DRESSING/BANDAGES
Keep your surgical dressing clean and dry. You may remove your dressing two days after surgery. Please place band-aids over the incision sites. At this time you may take a shower, however you should avoid direct contact on the incision sites. Water-proof band-aids over the incision sites are very helpful. Please keep the incision sites clean and dry.
Do not take a bath or submerge your knee in water until your incision are checked at your first post-operative visit.
TEMPERATURE
It is normal to have an elevated temperature during the first 2-3 days post-operatively. Please call our office if your temperature is above 101oF, if there is increased redness around the incision sites, or if there is increased drainage from the incision sites.
APPOINTMENT
Please call the office prior to, or immediately following, your surgery in order to schedule a post-operative appointment. This should be scheduled 7-10 days after surgery. At that visit your stiches will be removed and you will be given a prescription for physical therapy.
POSTOPERATIVE INSTRUCTIONS – QUAD/PATELLA TENDON REPAIR
September 28, 2018
Post op
- Can start incremental PROM at 4-7 weeks ( i.e. 15° Weekly) have brace mirror this
- Start Quad sets at 1 weeks, patellar mobs okay
- Can start closed chain strength approx week 7
BRACE/MOVEMENT
You can walk with the brace locked in extension with full weight. Have the brace locked in extension at all times until your post-operative visit. Use your crutches for stability. Do not go for long walks or stand on your feet for extended periods of time. This will cause swelling and pain.
ICE
An ice machine will be provided to you prior to your surgery. This will help decrease swelling and pain after your surgery. Use the ice machine as much as possible when you get home at intervals of 20 minutes on and off. You should keep the ice machine for approximately two weeks. Do not use the ice machine while you are sleeping.
If you did not receive an ice machine – you should use ice packs over the surgical site regularly throughout the day.
In addition to icing your knee, elevate your knee so that your toes are above your nose. This elevates your knee above your heart and will help reduce swelling.
MEDICATIONS
If you were given a nerve block for anesthesia, it will wear off over 18-24 hours. During this time you will have little to no feeling in the body part where you had surgery (i.e. leg). To control your pain during this transition while the nerve block is wearing off, you are to eat first and then begin taking the pain medication (e.g. Vicodin, Percocet, etc) immediately when you get home from surgery. This will prevent you from having severe pain. Take the pain medication every 4 hours until you go to bed.
You have been given an antibiotic medication – please take this as prescribed until completion of the medication.
Please take 325mg of Aspirin daily for the first two weeks after surgery.
A sleeping medication (e.g. Ambien) is also provided to help you sleep at night. Take one tablet 30 minutes before you plan to sleep.
DRESSING/BANDAGES
Keep your surgical dressing clean and dry. Do not remove your dressing until your first post-operative visit. You may take a shower with a plastic bag over your leg to keep the dressing clean and dry.
Do not take a bath or submerge your knee in water until your incisions are checked at your first post-operative visit.
TEMPERATURE
It is normal to have an elevated temperature during the first 2-3 days post-operatively. Please call our office if your temperature is above 101oF, if there is increased redness around the incision sites, or if there is increased drainage from the incision sites.
APPOINTMENT
Please call the office prior to, or immediately following, your surgery in order to schedule a post-operative appointment. This should be scheduled 7-10 days after surgery. At that visit your stitches will be removed and you will be given a prescription for physical therapy.
POSTOPERATIVE INSTRUCTIONS – KNEE Tibial plateau fracture
September 28, 2018
- TTWB for 6 weeks
- Brace locked in extension while ambulating
- Early PT for Quad sets/SLR
- CPM
- Flexion up to 90 deg. For 4 weeks if meniscus repair
MOVEMENT
You can walk and bend your knee as much as tolerated. Use your crutches as needed for the first week. Do not go for long walks or stand on your feet for extended periods of time. This will cause swelling and pain.
ICE
An ice machine will be provided to you prior to your surgery. This will help decrease swelling and pain after your surgery. Use the ice machine as much as possible when you get home at intervals of 30 minutes on and off. You should keep the ice machine for approximately two weeks. Do not use the ice machine while you are sleeping.
If you did not receive an ice machine, you can utilize regular ice at intervals of 20 minutes at a time – keep your dressing clean and dry.
In addition to icing your knee, elevate your knee so your toes are above your nose. This elevates your knee above your heart and will help reduce swelling.
MEDICATIONS
An injection of local anesthesia was injected into your knee after the completion of the operation. This medication will wear off in 5 to 6 hours. To control your pain during this transition, you are to eat first and then begin taking the pain medication (e.g. Vicodin, Percocet, etc) immediately when you get home from surgery. This will prevent you from having severe pain. Take the pain medication every 4 hours until you go to bed. Two days after your surgery, you can supplement your pain medication with an anti-inflammatory (e.g. Advil, Aleve, etc.) – this will help you wean from the narcotic pain medication.
You have also been given a prescription for antibiotics – please take these as prescribed.
DRESSING/BANDAGES
Keep your dressing clean and dry. You may remove the dressing two days after surgery. Please place waterproof band-aids over the incision sites. It is okay to shower two days after surgery – keep incisions clean and dry.
DRIVING
You may drive 3 to 5 days after surgery if you are not taking pain medication. If your right leg is the operative side, then you must have good control of your leg prior to driving.
APPOINTMENT
Please call the office prior to, or immediately following, your surgery in order to schedule a postoperative appointment. This should be scheduled 7-10 days after surgery. At that visit your stitches will be removed and you will be given a prescription for physical therapy.
If you develop a fever (101.5), redness or drainage from the surgical incision site, please call our office to arrange for an evaluation.
POSTOPERATIVE INSTRUCTIONS – AC JOINT/CC LIGAMENT RECONSTRUCTION
September 28, 2018
Post op
- Sling x 4 weeks
- PT @ 4 weeks for PROM
SLING/MOVEMENT
For the first 4 weeks after surgery, you must wear your sling at all times including while you are asleep. You may only remove the sling to shower and to perform range of motion exercises for your elbow, and the passive range of motion exercises for the shoulder (which will begin after your first post-operative visit).
You should flex and extend your elbow 3 to 4 times a day to prevent stiffness. Do not move your elbow away from your body as this may damage the repair.
ICE
An ice machine will be provided to you prior to your surgery. This will help decrease swelling and pain after your surgery. Use the ice machine as much as possible when you get home at intervals of 20 minutes on and off. You should keep the ice machine for approximately two weeks. Do not use the ice machine while you are sleeping.
MEDICATIONS
If you were given a nerve block for anesthesia, it will wear off over 18-24 hours. During this time you will have little to no feeling in the body part where you had surgery (i.e. arm). Also, an injection of local anesthesia was injected into your shoulder after the completion of the operation. This medication will wear off in 5 to 6 hours. To control your pain during this transition while the nerve block is wearing off, you are to eat first and then begin taking the pain medication (e.g. Vicodin, Percocet, etc) immediately when you get home from surgery. This will prevent you from having severe pain. Take the pain medication every 4 hours until you go to bed.
You have been given an antibiotic medication – please take this as prescribed until completion of the medication.
A sleeping medication (e.g. Ambien) is also provided to help you sleep at night. Take one tablet 30 minutes before you plan to sleep.
DRESSING/BANDAGES
Keep your surgical dressing clean and dry. You may remove your dressing two days after surgery. Please place band-aids over the incision sites. At this time you may take a shower, however you should avoid direct contact on the incision sites. Water-proof band-aids over the incision sites are very helpful. Please keep the incision sites clean and dry.
Do not take a bath or submerge your shoulder in water until your incision are checked at your first post-operative visit.
TEMPERATURE
It is normal to have an elevated temperature during the first 2-3 days post-operatively. Please call our office if your temperature is above 101oF, if there is increased redness around the incision sites, or if there is increased drainage from the incision sites.
APPOINTMENT
Please call the office prior to, or immediately following, your surgery in order to schedule a post-operative appointment. This should be scheduled 7-10 days after surgery. At that visit your stitches will be removed and you will be given a prescription for physical therapy.
POSTOPERATIVE INSTRUCTIONS – PROXIMAL HAMSTRING REPAIR
September 28, 2018
Post op
-PWB as tolerated immediately, wean off crutches at 6 weeks
– No brace
– At 4 weeks begin PT with light strength
MOVEMENT AND PHYSICAL THERAPY
For the first 6 weeks you will be partial weight bearing with the use of crutches. Always use crutches while walking. We want you to avoid stretching the hamstring during this period (Always bend your knees when bending at the waist in order to protect the repair). We will provide you with a PT prescription at your first post op visit (PT will begin at 2 week post op mark). You will progress to full weight bearing at the 6 week mark.
ICE
An ice machine will be provided to you prior to your surgery. This will help decrease swelling and pain after your surgery. Use the ice machine as much as possible when you get home at intervals of 20 minutes on and off. You should keep the ice machine for approximately two weeks. Do not use the ice machine while you are sleeping.
If you were not provided an ice machine, regular ice will suffice.
MEDICATIONS
Begin taking the pain medication (e.g. Vicodin, Percocet, etc) immediately when you get home. This will prevent you from having severe pain. Take the pain medication every 4 hours until you go to bed.
The day after surgery you can take 600 mg of Ibuprofen (Advil/Motrin) every 6 hours to help with inflammation and pain. This medication will help cut down the use of narcotic-based pain medication. However, if you still have pain after taking the Ibuprofen, continue taking the pain medication every 4-6 hours as needed.
A sleeping medication (e.g. Ambien) is also provided to help you sleep at night. Take one tablet 30 minutes before you plan to sleep.
DRESSING/BANDAGES
Your hip dressing is waterproof. You may shower the next day after surgery and pat the dressing dry. Do not remove the dressing at any time. Your dressing will be removed once your incisions are checked at your first post-op visit.
DRIVING
You may drive 3 to 5 days after surgery if you are not taking pain medication. If your right leg is the operative side, then you must have good control of your leg before driving.
TEMPERATURE
It is normal to have an elevated temperature during the first 2-3 days post-operatively. Please call our office if your temperature is above 101oF, if there is increased redness around the incision site, or if there is increased drainage from the incision site.
APPOINTMENT
Please call the office prior to, or immediately following, your surgery in order to schedule a post-operative appointment. This should be scheduled 7-10 days after surgery. At that visit your incision will be evaluated and you will be given a prescription for physical therapy.
POSTOPERATIVE INSTRUCTIONS – OPEN PECTORALIS MAJOR REPAIR
September 28, 2018
Post op
- Begin PROM PT at 4 weeks
- Can feed self and pendulums in initial weeks only
- Sling for 4 weeks
- NO ROM restrictions at 7 weeks
SLING/MOVEMENT
For the first 4 weeks after surgery, you must wear your sling at all times including while you are asleep. You may only remove the sling to shower and to perform range of motion exercises for your elbow and wrist.
You should flex and extend your elbow 3 to 4 times a day to prevent stiffness. Do not move your elbow away from your body as this may damage the repair.
ICE
An ice machine will be provided to you prior to your surgery. This will help decrease swelling and pain after your surgery. Use the ice machine as much as possible when you get home at intervals of 20 minutes on and off. You should keep the ice machine for approximately two weeks. Do not use the ice machine while you are sleeping.
MEDICATIONS
If you were given a nerve block for anesthesia, it will wear off over 18-24 hours. During this time you will have little to no feeling in the body part where you had surgery (i.e. arm). Also, an injection of local anesthesia was injected into your shoulder after the completion of the operation. This medication will wear off in 5 to 6 hours. To control your pain during this transition while the nerve block is wearing off, you are to eat first and then begin taking the pain medication (e.g. Vicodin, Percocet, etc) immediately when you get home from surgery. This will prevent you from having severe pain. Take the pain medication every 4 hours until you go to bed.
You have been given an antibiotic medication – please take this as prescribed until completion of the medication.
A sleeping medication (e.g. Ambien) is also provided to help you sleep at night. Take one tablet 30 minutes before you plan to sleep.
DRESSING/BANDAGES
Keep your surgical dressing clean and dry. Do not remove the dressing until your follow-up visit. A waterproof dressing has been applied You may take a shower, however you should avoid direct contact on the dressing with water.
Do not take a bath or submerge your shoulder in water until your incision is checked at your first post-operative visit.
TEMPERATURE
It is normal to have an elevated temperature during the first 2-3 days post-operatively. Please call our office if your temperature is above 101oF, if there is increased redness around the incision sites, or if there is increased drainage from the incision sites.
APPOINTMENT
Please call the office prior to, or immediately following, your surgery in order to schedule a post-operative appointment. This should be scheduled 7-10 days after surgery. At that visit your stitches will be removed and you will be given a prescription for physical therapy.
POSTOPERATIVE INSTRUCTIONS – ORIF CLAVICLE FRACTURE
September 28, 2018
Post Op
- Can start pendulums @ 1 week
- Start PT @ 4 weeks
- @ 7 weeks no ROM restrictions if no issues
Clavicle HW removal
– No heavy lifting x 6 weeks
Healing
- Op = 16wks
- Non-op = 28 wks
Surgical indications = 2cm displacement or 2cm shortening
SLING/MOVEMENT
For the first 4 weeks after surgery, you must wear your sling at all times including while you are asleep. You may only remove the sling to shower and to perform range of motion exercises for your elbow, and the passive range of motion exercises for the shoulder (which will begin after your first post-operative visit).
You should flex and extend your elbow 3 to 4 times a day to prevent stiffness. Do not move your elbow away from your body as this may damage the repair.
ICE
An ice machine will be provided to you prior to your surgery. This will help decrease swelling and pain after your surgery. Use the ice machine as much as possible when you get home at intervals of 20 minutes on and off. You should keep the ice machine for approximately two weeks. Do not use the ice machine while you are sleeping.
MEDICATIONS
If you were given a nerve block for anesthesia, it will wear off over 18-24 hours. During this time you will have little to no feeling in the body part where you had surgery (i.e. arm). Also, an injection of local anesthesia was injected into your shoulder after the completion of the operation. This medication will wear off in 5 to 6 hours. To control your pain during this transition while the nerve block is wearing off, you are to eat first and then begin taking the pain medication (e.g. Vicodin, Percocet, etc) immediately when you get home from surgery. This will prevent you from having severe pain. Take the pain medication every 4 hours until you go to bed.
You have been given an antibiotic medication – please take this as prescribed until completion of the medication.
A sleeping medication (e.g. Ambien) is also provided to help you sleep at night. Take one tablet 30 minutes before you plan to sleep.
DRESSING/BANDAGES
Keep your surgical dressing clean and dry. Do not remove your dressing until your follow-up visit.
Do not take a bath or submerge your shoulder in water until your incisions are checked at your first post-operative visit.
TEMPERATURE
It is normal to have an elevated temperature during the first 2-3 days post-operatively. Please call our office if your temperature is above 101oF, if there is increased redness around the incision sites, or if there is increased drainage from the incision sites.
APPOINTMENT
Please call the office prior to, or immediately following, your surgery in order to schedule a post-operative appointment. This should be scheduled 7-10 days after surgery. At that visit your stitches will be removed and you will be given a prescription for physical therapy.
POSTOPERATIVE INSTRUCTIONS – SHOULDER ARTHROSCOPY WITH LABRAL REPAIR
September 28, 2018
-Sling x 4 weeks
-Begin PT @ week 1 or 4
Week 1: PROM if older/subjective instability
-Week 4: PROM if frank instability
-Week 7: 0 ROM restrictions
-Week 8: Begin strength (Throwers Ten) / okay to begin running
-3 mos: Heavier strength (Closed chain/bench/overhead)
-4mos: Interval throwing program
-6mos: Throwing from mound
SLING/MOVEMENT
For the first 4 weeks after surgery, you must wear your sling at all times including while you are asleep. You may only remove the sling to shower and to perform range of motion exercises for your elbow.
You should flex and extend your elbow 3 to 4 times a day to prevent stiffness. Do not move your elbow away from your body as this may damage the repair.
ICE
An ice machine will be provided to you prior to your surgery. This will help decrease swelling and pain after your surgery. Use the ice machine as much as possible when you get home at intervals of 20 minutes on and off. You should keep the ice machine for approximately two weeks. Do not use the ice machine while you are sleeping.
If you did not receive an ice machine – you should use ice packs over the surgical site regularly throughout the day.
MEDICATIONS
If you were given a nerve block for anesthesia, it will wear off over 18-24 hours. During this time you will have little to no feeling in the body part where you had surgery (i.e. arm). Also, an injection of local anesthesia was injected into your shoulder after the completion of the operation. This medication will wear off in 5 to 6 hours. To control your pain during this transition while the nerve block is wearing off, you are to eat first and then begin taking the pain medication (e.g. Vicodin, Percocet, etc) immediately when you get home from surgery. This will prevent you from having severe pain. Take the pain medication every 4 hours until you go to bed.
You have been given an antibiotic medication – please take this as prescribed until completion of the medication.
A sleeping medication (e.g. Ambien) is also provided to help you sleep at night. Take one tablet 30 minutes before you plan to sleep.
DRESSING/BANDAGES
Keep your surgical dressing clean and dry. You may remove your dressing two days after surgery. Please place band-aids over the incision sites. At this time you may take a shower, however you should avoid direct contact on the incision sites. Water-proof band-aids over the incision sites are very helpful. Please keep the incision sites clean and dry.
Do not take a bath or submerge your shoulder in water until your incision is checked at your first post-operative visit.
TEMPERATURE
It is normal to have an elevated temperature during the first 2-3 days post-operatively. Please call our office if your temperature is above 101oF, if there is increased redness around the incision sites, or if there is increased drainage from the incision sites.
APPOINTMENT
Please call the office prior to, or immediately following, your surgery in order to schedule a post-operative appointment. This should be scheduled 7-10 days after surgery. At that visit your stiches will be removed and you will be given a prescription for physical therapy.
POSTOPERATIVE INSTRUCTIONS – SHOULDER ARTHROSCOPY/DECOMPRESSION/MUMFORD
September 28, 2018
SLING/MOVEMENT
You may come out of the sling and move your shoulder both with passive and active range of motion exercises as soon as you feel comfortable. There was no repair performed in your shoulder so there are no restrictions in range of motion of your shoulder.
You should also flex and extend your elbow 3 to 4 times a day to prevent stiffness. Your sling is only for comfort.
ICE
An ice machine will be provided to you prior to your surgery. This will help decrease swelling and pain after your surgery. Use the ice machine as much as possible when you get home at intervals of 20 minutes on and off. You should keep the ice machine for approximately two weeks. Do not use the ice machine while you are sleeping.
If you did not receive an ice machine – you should use ice packs over the surgical site regularly throughout the day.
MEDICATIONS
If you were given a nerve block for anesthesia, it will wear off over 18-24 hours. During this time you will have little to no feeling in the body part where you had surgery (i.e. arm). Also, an injection of local anesthesia was injected into your shoulder after the completion of the operation. This medication will wear off in 5 to 6 hours. To control your pain during this transition while the nerve block is wearing off, you are to eat first and then begin taking the pain medication (e.g. Vicodin, Percocet, etc) immediately when you get home from surgery. This will prevent you from having severe pain. Take the pain medication every 4 hours until you go to bed.
You have been given an antibiotic medication – please take this as prescribed until completion of the medication.
A sleeping medication (e.g. Ambien) is also provided to help you sleep at night. Take one tablet 30 minutes before you plan to sleep.
DRESSING/BANDAGES
Keep your surgical dressing clean and dry. You may remove your dressing two days after surgery. Please place band-aids over the incision sites. At this time you may take a shower, however you should avoid direct contact on the incision sites. Water-proof band-aids over the incision sites are very helpful. Please keep the incision sites clean and dry.
Do not take a bath or submerge your shoulder in water until your incision are checked at your first post-operative visit.
TEMPERATURE
It is normal to have an elevated temperature during the first 2-3 days post-operatively. Please call our office if your temperature is above 101oF, if there is increased redness around the incision sites, or if there is increased drainage from the incision sites.
APPOINTMENT
Please call the office prior to, or immediately following, your surgery in order to schedule a post-operative appointment. This should be scheduled 7-10 days after surgery. At that visit your stitches will be removed.
POSTOPERATIVE INSTRUCTIONS – SHOULDER ARTHROSCOPY WITH ROTATOR CUFF REPAIR
September 28, 2018
Congratulations on taking the crucial step toward your rotator cuff recovery journey after surgery. The following guidelines have been prepared to ensure your healing process is as smooth and effective as possible.
Over the next few weeks, your focus will be on dedicated care and adherence to specific instructions outlined for the initial phase of your recuperation. From the crucial use of the sling and the necessity of regular movement exercises to managing pain and monitoring your body’s response, each detail plays a pivotal role in your road to recovery.
This guide will walk you through the essential aspects of your post-operative care, including the proper administration of medications, dressing changes, temperature monitoring, and scheduling essential follow-up appointments. Please read and follow these directives carefully to facilitate a successful recovery journey. Your commitment to these guidelines will significantly contribute to a smoother and faster healing process.
Rotator Cuff Range Of Motion Timeline
- Sling x 4 weeks
- Passive ROM @ 4 weeks
- Active ROM @ 7 weeks
- Light strength @ 10 weeks
Large cuff tear
- Sling x 6 weeks
- PROM @ 4 weeks
SLING/MOVEMENT: How to maintain your sling when caring for your Rotator Cuff
For the first 4 weeks after surgery, you must wear your sling at all times including while you are asleep. You may only remove the sling to shower and to perform range of motion exercises for your elbow, and the passive range of motion exercises for the shoulder (which will begin after your first post-operative visit).
You should flex and extend your elbow 3 to 4 times a day to prevent stiffness. Do not move your elbow away from your body as this may damage the repair.
ICE: Manage Swelling to Your Rotator Cuff
An ice machine will be provided to you prior to your surgery. This will help decrease swelling and pain after your surgery. Use the ice machine as much as possible when you get home at intervals of 20 minutes on and off. You should keep the ice machine for approximately two weeks. Do not use the ice machine while you are sleeping.
MEDICATIONS: Manage Pain after Rotator Cuff Surgery
If you were given a nerve block for anesthesia, it would wear off over 18-24 hours. During this time you will have little to no feeling in the body part where you had surgery (i.e. arm). Also, an injection of local anesthesia was injected into your shoulder after the completion of the operation. This medication will wear off in 5 to 6 hours. To control your pain during this transition while the nerve block is wearing off, you are to eat first and then begin taking the pain medication (e.g. Vicodin, Percocet, etc) immediately when you get home from surgery. This will prevent you from having severe pain. Take the pain medication every 4 hours until you go to bed.
You have been given an antibiotic medication – please take this as prescribed until completion of the medication.
A sleeping medication (e.g. Ambien) is also provided to help you sleep at night. Take one tablet 30 minutes before you plan to sleep.
DRESSING/BANDAGES: Manage Wound Care after Rotator Cuff Surgery
Keep your surgical dressing clean and dry. You may remove your dressing two days after surgery. Please place band-aids over the incision sites. At this time you may take a shower, however, you should avoid direct contact with the incision sites. Water-proof band-aids over the incision sites are very helpful. Please keep the incision sites clean and dry.
Do not take a bath or submerge your shoulder in water until your incision is checked at your first post-operative visit.
TEMPERATURE: Fever after Rotator Cuff Surgery
It is normal to have an elevated temperature during the first 2-3 days post-operatively. Please call our office if your temperature is above 101oF, if there is increased redness around the incision sites, or if there is increased drainage from the incision sites.
APPOINTMENT; Post Operative Care After Rotaor Cuff Surgery
Please call the office prior to, or immediately following, your surgery in order to schedule a post-operative appointment. This should be scheduled 7-10 days after surgery. At that visit your stiches will be removed and you will be given a prescription for physical therapy.
Your commitment to these detailed post-operative instructions is a significant stride towards your well-being. By adhering diligently to these guidelines, you are setting the stage for a successful recovery. Remember, while the coming weeks may present challenges, each action—whether it’s wearing the sling consistently, managing your medications, or staying vigilant about temperature changes—plays an essential role in your healing process. Your proactive approach and attention to detail are pivotal in ensuring a smooth recuperation. Embrace this period as a crucial part of your journey toward restored health. Should you have any concerns or queries, our office is here to support you. Stay dedicated, remain patient, and take comfort in knowing that each step you take aligns with your ultimate goal: a complete and successful recovery. Your proactive commitment today will pave the way for a healthier tomorrow.
POSTOPERATIVE INSTRUCTIONS – UNICOMPARTMENTAL KNEE ARTHROPLASTY
September 28, 2018
MOVEMENT
You can walk and bend your knee as much as tolerated. Use your crutches for the first week. Do not go for long walks or stand on your feet for extended periods of time. This will cause swelling and pain. Have the brace locked in extension while ambulating until your block has worn off.
You have been provided a continuous passive motion machine (CPM). Use this from 0-110 degrees 4-6 hours a day.
ICE
An ice machine will be provided to you prior to your surgery. This will help decrease swelling and pain after your surgery. Use the ice machine as much as possible when you get home at intervals of 20 minutes on and off. You should keep the ice machine for approximately two weeks. Do not use the ice machine while you are sleeping.
In addition to icing your knee, elevate your knee so that your toes are above your nose. This elevates your knee above your heart and will help reduce swelling.
MEDICATIONS
If you were given a nerve block for anesthesia, it will wear off over 18-24 hours. During this time you will have little to no feeling in the body part where you had surgery (i.e. leg). To control your pain during this transition while the nerve block is wearing off, you are to eat first and then begin taking the pain medication (e.g. Vicodin, Percocet, etc) immediately when you get home from surgery. This will prevent you from having severe pain. Take the pain medication every 4 hours until you go to bed.
You have been given an antibiotic medication – please take this as prescribed until completion of the medication.
A sleeping medication (e.g. Ambien) is also provided to help you sleep at night. Take one tablet 30 minutes before you plan to sleep.
You are to start your anticoagulation medicine (eg Lovenox) on the first post-operative day. You should continue this medicine for two weeks.
DRESSING/BANDAGES
Keep your surgical dressing clean and dry. Do not remove your dressing until your first post-operative visit. You may take a shower with a plastic bag over your leg to keep the dressing clean and dry.
Do not take a bath or submerge your knee in water until your incisions are checked at your first post-operative visit.
TEMPERATURE
It is normal to have an elevated temperature during the first 2-3 days post-operatively. Please call our office if your temperature is above 101oF, if there is increased redness around the incision sites, or if there is increased drainage from the incision sites.
APPOINTMENT
Please call the office prior to, or immediately following, your surgery in order to schedule a post-operative appointment. This should be scheduled 7-10 days after surgery. At that visit your stiches will be removed and you will be given a prescription for physical therapy.
FLEXOR/PRONATOR MASS REPAIR
August 13, 2018
IMMEDIATE POSTOPERATIVE PHASE
Goals
- Protect healing tissue
- Decrease pain/inflammation
- Retard muscular atrophy
- Avoid strengthening the flexor mass muscle group during this initial phase to allow for healing at medial epicondyle
Weeks 1-2
- Brace: 90° elbow flexion
- Cryotherapy: To elbow joint
- Active assisted ROM
- Brace: Elbow ROM 0-120° (Gradually increase ROM – 5°, Ext/10° of Flex per week)
- Continue wrist ROM exercises
- Initiate light scar mobilization incision
- Cryotherapy to elbow
INTERMEDIATE PHASE
Goals
- Gradual increase to full ROM
- Promote healing of repaired tissue
- Regain and improve muscular strength
- Restore full function of graft site
Weeks 3-4
- Brace: Elbow ROM 0-140°
- Continue all exercises listed above
- Elbow ROM in brace
- Initiate active ROM Wrist and Elbow (No resistance)
- Initiate light wrist flexion stretching
- Initiate active ROM shoulder:
- ER/IR tubing
- Elbow flex/extension
- Lateral raises
- Initiate light scapular strengthening exercises
- May incorporate stationary bike for lower extremity
- D/C brace and use wrist
- Begin light resistance exercises for arm (1 lb)
- Wrist curls, extensions, pronation, supination
- Elbow extension/flexion
- Progress shoulder program emphasize rotator cuff and scapular strengthening
- Initiate shoulder strengthening with light dumbbells
ADVANCED STRENGTHENING PHASE
Goals
- Increase strength, power, endurance
- Maintain full elbow ROM
- Gradually initiate sporting activities
Weeks 6-18
- ROM: Elbow ROM 0-135°
- Continue all Exercises: Progress all shoulder and UE exercises
- Progress elbow strengthening exercises
- Initiate shoulder external rotation strengthening
- Initiate eccentric elbow flexion/extension
- Continue isotonic program: forearm & wrist
- Initiate plyometric exercise program (2 hand plyos close to body only)
- Chest pass
- Side throw close to body
- Continue stretching calf and hamstrings
- Continue all exercises listed above
- Program plyometrics to 2 hand drills away from body
- Side to side throws
- Soccer throws
- Side throws
- Initiate isotonic machines strengthening exercises (if desired)
- Bench press (seated)
- Lat pull down
- Initiate golf, swimming
- Continue strengthening program
- Emphasis on elbow and wrist strengthening and flexibility exercises
- Maintain full elbow ROM
- Initiate one hand plyometric throwing (stationary throws)
- Initiate one hand wall dribble
- Initiate one hand baseball throws into wall
Tommy John Rehabilitation
August 13, 2018
Introduction
The ulnar collateral ligament reconstruction is a tendon transfer procedure. No muscles are transected during this process which allows for a faster recovery time since there is less surgical trauma. Postoperatively, the body requires time to accept the transfer and establish adequate blood supply in the new tissue. The focus of this rehabilitation program is to provide gradually increasing stresses on the transferred material to allow the tendon to adapt to the forces the ulnar collateral ligament would typically withstand. According to Wolff’s Law, the strength of the tissues matrix is directly proportional to the stresses place upon them during their development.
Approximately one year is needed for the transferred tissues to assume their new functions completely. The patient tends to protect and compensate for their limited ability which promotes dysfunction of the upper extremity as a whole; therefore, it is important to address the function of the should girdle (i.e., scapulothoracic, glenohumeral, and acromioclavicaluar joints), along with the return of full elbow function (i.e., range of motion, strength and endurance).
In general, avoid any valgus stress during the rehabilitation period until actual pitching starts. Many athletes wish to resume playing golf during their rehabilitation period but valgus forces are not permitted. Putting is allowed, as is chipping, as advised by your physician. No drives are allowed for six months. Before this time, hitting a divot may pull out the repair altogether.
0 to 7 days:
- Splint is work for one week.
- No valgus stress to the elbow.
- Full active forearm pronation and supination range of motion.
- Full active wrist radial and ulnar deviation range of motion. Gentle stretching of write and fingers is okay.
- Active and active assistive wrist flexion and extension range of motion exercises.
- Full active should range of motion – flexion, abduction, internal & external rotation.
1 to 4 weeks:
- Discontinue splint in one week.
- A sling may be worn for one more week, if necessary.
- Two weeks post-operation, begin a Total Body Conditioning Program after incision is closed {starting earlier, you run the risk of getting perspiration in or on the wound, increasing the risk of infection).
- Gradually achieve full elbow range of motion.
1 to 2 months:
- Athlete should have full range of motion at elbow, wrist, forearm, and shoulder joints.
- One month post-operation, add light weights for resistive elbow and forearm exercises (i.e. elbow flexion and extension, forearm pronation and supination).
2 to 3 months:
- Continue active, resistive exercises for the entire extremity, including the rotator cuff.
- Continue lower body and trunk conditioning program.
3 to 4 months:
- If there is no swelling and the athlete has full, pain free elbow range of motion, the athlete may begin easy tossing (no wind-up), start with 25 to 30 throws, building up to 70 throws and gradually increase the throwing distance.
NOTE: The Throwing Program is performed 3 – 4 times per week. Apply ice after each throwing session to help decrease the inflammatory response to microtrauma.
| # of Throws | Distance (ft) |
| 20 | 20 (warm-up phase) |
| 25-40 | 30-40 |
| 10 | 20 (cool down phase) |
4 to 5 months:
- Continue the Throwing Program by tossing the ball with an easy wind-up on alternate days.
| # of Throws | Distance (ft) |
| 10 | 20 (warm-up) |
| 10 | 30-40 |
| 30-40 | 50 |
| 10 | 20-30 (cool down) |
5 to 6 months:
- Continue increasing the throwing distance to a maximum of 60 feet.
- Continue tossing the ball with an occasional throw at no more than half speed.
| # of Throws | Distance (ft) |
| 10 | 30 (warm-up) |
| 10 | 40-45 |
| 30-40 | 60-70 |
| 10 | 30 (cool down) |
6 to 7 months:
- During this step gradually increase the distance to 150 feet maximum.
| Phase 1 | # of Throws | Distance (ft) |
| 10 | 40 (warm-up) | |
| 10 | 50-60 | |
| 15-20 | 70-80 | |
| 10 | 50-60 | |
| 10 | 40 (cool down) |
| Phase 2 | # of Throws | Distance (ft) |
| 10 | 40 (warm-up) | |
| 10 | 50-60 | |
| 20-30 | 80-90 | |
| 20 | 50-60 | |
| 10 | 40 (cool down) |
| Phase 3 | # of Throws | Distance (ft) |
| 10 | 40 (warm-up) | |
| 10 | 60 | |
| 15-20 | 100-110 | |
| 20 | 60 | |
| 10 | 40 (cool down) |
| Phase 4 | # of Throws | Distance (ft) |
| 10 | 40 (warm-up) | |
| 10 | 60 | |
| 15-20 | 120-150 | |
| 20 | 60 | |
| 10 | 40 (cool down) |
7 to 8 months:
- Progress to throwing off the mound at 1/2 to 3/4 speed. Try to use proper body mechanics, especially when throwing off the mound:
- Stay on top of the ball.
- Keep the elbow up.
- Throw over the top.
- Follow through with the arm and trunk.
| Phase 1 | # of Throws | Distance (ft) |
| 10 | 60 (warm-up) | |
| 10 | 120-150 (lobbing) | |
| 30 | 45 (off the mound) | |
| 10 | 60 (off the mound) | |
| 10 | 40 (cool down) |
| Phase 2 | # of Throws | Distance (ft) |
| 10 | 50 (warm-up) | |
| 10 | 120-150 (lobbing) | |
| 20 | 45 (off the mound) | |
| 20 | 60 (off the mound) | |
| 10 | 40 (cool down) |
| Phase 3 | # of Throws | Distance (ft) |
| 10 | 50 (warm-up) | |
| 10 | 120-150 (lobbing) | |
| 10 | 45 (off the mound) | |
| 30 | 60 (off the mound) | |
| 10 | 40 (cool down) |
| Phase 4 | # of Throws | Distance (ft) |
| 10 | 50 (warm-up) | |
| 10 | 120-150 (lobbing) | |
| 10 | 45 (off the mound) | |
| 40-50 | 60 (off the mound) | |
| 10 | 40 (cool down) |
9 to 10 months:
- At this time, if the if the pitcher has successfully completed the above phase without pain or discomfort and is throwing approximately 3/4 speed, the pitching coach and trainer may allow the pitcher to proceed to the next step of “Up/Down Bullpens”. Up/Down Bullpens is used to simulate a game situation. The pitcher rests in between a series of pitches to reproduce the rest period in between innings.
| Day 1 | # of Throws | Distance (ft) |
| 10 warm-up | 120-150 lobbing | |
| 10 warm-up | 60 (off the mound) | |
| 40 pitches | 60 (off the mound) | |
| REST 10 Minutes | ||
| 20 pitches | 60 (off the mound) |
| Day 2 | OFF |
| Day 3 | # of Throws | Distance (ft) |
| 10 warm-up | 120-150 lobbing | |
| 10 warm-up | 60 (off the mound) | |
| 30 pitches | 60 (off the mound) | |
| REST 10 Minutes | ||
| 10 warm-up | 60 (off the mound) | |
| 20 pitches | 60 (off the mound) | |
| REST 10 Minutes | ||
| 10 warm-up | 60 (off the mound) | |
| 20 pitches | 60 (off the mound) |
| Day 4 | OFF |
| Day 5 | # of Throws | Distance (ft) |
| 10 warm-up | 120-150 lobbing | |
| 10 warm-up | 60 (off the mound) | |
| 30 pitches | 60 (off the mound) | |
| REST 8 Minutes | ||
| 20 pitches | 60 (off the mound) | |
| REST 8 Minutes | ||
| 20 pitches | 60 (off the mound) | |
| REST 8 Minutes | ||
| 20 pitches | 60 (off the mound) |
9 to12months:
- At this point, the pitcher is ready to begin a normal routine, from throwing batting practice to pitching in the bullpen. This program should be adjusted as needed by your physician, athletic trainer or physical therapist.
Triceps Repair
August 13, 2018
Maximum Protection Phase (Day 1 to Week 8)
Weeks 0-2
- Brace: 30 to 60 degrees flexion
- ROM:
- Wrist and hand ROM
- Gripping exercises
- Shoulder pendulum in elbow brace
- Perform PROM shoulder exercises
- Strengthening exercises:
- Gripping for hand
- Wrist flexion and extension, light dumbbell
- Cryotherapy applied to triceps
Weeks 3-4
- ROM brace applied: 0 to 60 degrees of flexion
- No active elbow extension x4-6 weeks
- Continue shoulder PROM exercises
- Light isometric biceps at 60 degrees flexion
- Initiate ER/IR tubing at 0 degrees adduction
- Manual scapular neuromuscular exercises (seated)
- Continue shoulder, elbow, wrist PROM
- Continue with ice and compression
Weeks 5-6
- ROM brace: increase ROM to 0-90 degrees gradually
- Initiate light shoulder and scapular strengthening exercises at 6 weeks
Weeks 7-8
- ROM brace: progress to 0 to full flexion at 8 weeks
- Initiate light isotonic strengthening for shoulder and scapula
- Continue ice prn
Moderate Protection Phase (Weeks 9-16)
Weeks 9-12
- Progress strengthening exercises slowly
ULNAR NERVE TRANSPOSITION
August 13, 2018
0 to 2 weeks:
- Squeeze soft sponge or a soft putty
- Elbow supported in sling leaving the wrist free
NOTE: During the first two weeks following surgery, passive terminal elbow extension (i.e., last 5° – 10°) with wrist extension should be avoided.
2 to 4 weeks:
- Remove sling.
- Passive elbow ROM exercises, progressing to active/active assist ROM exercises.
- May add shoulder ROM exercise, as needed.
- Begin wrist (flexion and extension), forearm (pronation and supination) and hand and finger strengthening exercises.
1 to 2 months:
- Continue shoulder and elbow ROM exercises and wrist & forearm strengthening exercises as above.
- ADD elbow flexion and extension strengthening exercises
- May add radial and ulnar strengthening exercises
- Begin upper body ergometer (UBE) for upper extremity conditioning
2 to 3 months:
- Progress to heavier weights as tolerated.
- May begin shoulder strengthening exercises with light weight, if have not already started, with emphasis on the rotator cuff muscles.
- At 2½ months, isokinetic wrist flexion & extension, and forearm pronation & supination exercises may be added.
3 to 4 months:
- Perform Isokinetic Strength Test: wrist flexion & extension, forearm pronation & supination.
- Continue with strengthening exercises to the wrist, elbow and shoulder, as needed.
- May begin practicing functional or work-related activities, or sport specific drills (e.g., throwers may begin tossing, golfers begin putting, volleyball players begin passing and bumping).
NOTE: Apply ice after each session to help decrease the inflammatory response to microtrauma.
HIP ARTHROSCOPY REHABILITATION
August 13, 2018
GENERAL GOALS:
- Non-antalgic gait (No pain with ambulation)
- Increase passive ROM of the affected hip
- Compliance with instructed weight bearing
- No pain at rest
- Modalities PRN
- Home therapy education
- Soft tissue manipulation around portal sites once healed (after week 2)
- AVOID THE FOLLOWING:
- Excessive external rotation
- Exercises beyond fatigue/pain
- Strenuous hip flexion (e.g. straight leg raises)
- Greater trochanteric bursitis
- Sacroilitis
- Hip flexor tendonitis
GUIDELINES (WEEKS 0-2)
- Partial weight bearing (50%) with crutches
- CPM 4hrs/day (can lower to 2 hours/day if on stationary bike at least 20 minutes/day)
- Stationary bike 20 minutes/day; can increase to 2x/day if patient able to tolerate
- Passive ROM exercises of affected hip
- Supine log rolling
- Iliopsoas stretching (AVOID EXCESSIVE EXTENSION!)
- Stool rotations (Hip AAROM ER/IR)
- Modalities as needed
- Hip isometric exercises
- NO FLEXION EXERCISES o ABDUCTION, ADDUCTION, EXTENSION, EXTERNAL
GUIDELINES (WEEKS 2-4)
- Include all regimens from weeks 0-2 may advance weight bearing to full weight bearing as tolerated by the patient
- Wean off crutches over 1-2 weeks. Do not advance or remove crutches if patient still ambulates with an antalgic gait
- Increase ROM exercises
- Gluteal and piriformis stretching
- Core strengthening (AVOID iliopsoas tendonitis)
- Step downs
- Scar massage at portal sites
- Treadmill side stepping from level surface holding on to side rail (WEEK 4)
- May begin aqua therapy in low end water at WEEK 4 once portal sites are healed
- NO SWIMMING/TREADING
- Clam shells
- Isometric side-lying hip abduction
- Bike/Elliptical (may start elliptical at weeks 3-4)
- Proprioception training (start on week 4)
- Balance boards, single leg stance
- Continue with isometrics EXCEPT flexion
- May being isometric sub maximum pain free hip flexion at 4 weeks
GUIDELINES (WEEKS 4-8) INCLUDE ALL THERAPY REGIMENS FROM WEEKS 0-4
- Increase ROM
- Hip flexor and IT band stretching
- LOWER EXTREMITY STRENGTHENING
- Hip flexor isometric exercises
- Leg press (avoid deep flexion)
- Knee flexion and extension isokinetics
- Core strengthening: PLANKS
- LE proprioception exercises (Avoid torsion)
- Hip hiking on stairmaster
GUIDELINES (WEEKS 8-12) INCLUDE ALL THERAPY REGIMENS FROM WEEKS 4-8
- Hip endurance activities
- Dynamic proprioception exercises
- Increase LE strengthening
- Continue to improve HIP ROM
GUIDELINES (WEEKS 12-16) ALL OF THE ABOVE
- Continue LE strengthening
- Sport-specific drills
- May begin treadmill running
- Plyometrics
CRITERIA FOR DISCHARGE
- Step down test
- Pain free or at a manageable level of discomfort
- Biodex testing
- Quads and hamstrings within 15% of unaffected side
- Single leg cross-over triple hop for distance
- < 85% of normal side considered abnormal
ACHILLES TENDON REPAIR
August 13, 2018
POST OPERATIVE MANAGEMENT
- Posterior splint for 14 days
- NWB with crutches
WEEKS 2-6
- NWB weightbearing ambulation with crutches in walking boot. May remove boot for ROM exercise.
- Active inversion and eversion ROM
- Active dorsiflexion to neutral; passive plantar flexion
- Stationary cycling with minimal resistance (anterior foot placement)
WEEKS 6-12
- Progress to FWB in walking boot
- Discontinue walking boot 2 weeks after FWB
- Use heel cups for 2 weeks after discontinue walking boot
- Progressive resistance Theraband ankle strengthening exercises
- Intrinsic foot muscle strengthening exercises
- Single leg standing balance activities
- Active bilateral heel raises
- Initiate passive heel cord stretching
- Bilateral to unilateral standing, heel raise exercises
- Stationary cycling with progressive resistance (standard foot placement)
- Progressive depth (30° to 90° knee flexion flat-footed mini-squats
- Progressive retrograde treadmill ambulation
- “Flat-Footed” single leg balance
- BAPs “Level 1-2-3” (seated PWB progressed to FWB standing)
- “On-Toes” standing balance/proprioception activities on mini-trampoline
- Progressive duration/velocity Stairmaster ambulation
- Lateral sliding board maneuvers
3-6 MONTHS
- Stationary jogging and jumping on mini-trampoline
- Straight ahead jog-to-run progression on a level surface
- Progressive acuity cutting agility maneuvers
- Large-to-small Figure of 8 agility maneuvers
- Sport/Position specific functional activities
- Running and agility maneuvers on progressive incline/decline surfaces
- Discharged to normal activities when cleared by doctor
Conditions for Knee Replacement
August 2, 2018
Healthy knees are vital for many people to complete every day, physical activities.
Unfortunately, when the knee joint is painful and stiff, even simple acts such as rising from bed, climbing stairs, or bending down to pick up objects can seem nearly impossible. Moreover, your condition can inhibit your ability to work, hinder your social life, and prevent you from participating in sports and exercise. When knee pain and stiffness become so severe that it interferes with your ability to live a normal life, and less invasive treatment options have failed, an orthopaedic specialist may recommend knee replacement surgery.
Knee replacement surgery, or knee arthroplasty, is a safe and effective treatment for relieving your knee pain, restoring your mobility, and improving your overall quality of life. In fact, knee replacement is considered a routine procedure with approximately 600,000 surgeries performed in the United States each year. At Beacon Orthopaedics and Sports Medicine, we routinely treat a diverse range of patients—including patients between 50 and 80 years of age to younger high school and college athletes—for knee pain and stiffness.
And while the patients we treat vary in age and activity level, they commonly have one of the following conditions:
- Osteoarthritis
- Rheumatoid arthritis
- Hemophilia
- Avascular Necrosis
These conditions often cause intense pain and loss of mobility that require surgery. Continue reading for information about each of the conditions that commonly require knee replacement surgery.
Osteoarthritis
Osteoarthritis, also known as degenerative arthritis or “wear and tear” arthritis, is the most common reason for knee replacement surgery. Osteoarthritis is a degenerative condition in which the cartilage covering the ends of the bones gradually wears away. And while osteoarthritis has historically been thought to be caused by the natural wearing away of cartilage over the years, it is now treated as an active disease that affects every component of a joint.
Post-traumatic arthritis is a specific form of osteoarthritis that results from a direct injury to a joint such as a break or dislocation. Athletes who participate in sports that cause direct blunt trauma to joints (such as football, soccer, or lacrosse) are at higher risk of developing post-traumatic arthritis. With that said, it’s important to note that even non-athletes are at risk. A vehicle accident or even just a significant fall can cause enough physical trauma to a joint that can lead to post-traumatic arthritis.
Osteoarthritis has no directly identifiable cause but, like other forms of arthritis, it tends to run in families and is believed to have a genetic basis. It usually occurs in individuals 50 years of age or older, but it may also occur in younger individuals.
Signs and Symptoms
Pain and stiffness are the most common symptoms of osteoarthritis. Pain will typically occur during activity and after movement. By contrast, stiffness will be most noticeable after waking up or after a period of inactivity. These symptoms tend to develop over time rather than come on suddenly. Some other symptoms of osteoarthritis in the knee include:
- Swelling around the knee joint
- Limited range of motion in the knee
- Tenderness when pressure is applied to the joint
- Clicking or cracking sound when the knee bends
- Deformity, bone spurs, or lumps in the knee
Rheumatoid Arthritis
Rheumatoid arthritis is a chronic inflammatory disorder in which the body’s own immune system mistakenly attacks the joints. As a result, the tissue that lines the inside of joints thickens and causes painful swelling. If inflammation continues, it will permanently damage bones, cartilage, and ligaments, eventually causing the joint to become loose, painful, and difficult to move.
Signs and Symptoms
Similar to osteoarthritis, pain and stiffness are also common symptoms of rheumatoid arthritis. Some other symptoms of rheumatoid arthritis in the knee include:
- Swelling and redness around the knee joint
- Limited range of motion in the joint
- Tenderness around the knee joint
- Joint warmth, with or without visible swelling or redness
- Fatigue, particularly when the knee is inflamed
Hemophilia
Hemophilia is a rare disorder in which blood doesn’t clot normally. An individual with hemophilia may bleed longer due to their blood clotting more slowly. In mild instances of the disorder, its signs and symptoms may not be readily apparent. However, in severe instances, the individual may bleed for a significant length of time following an injury or even bleed without an apparent cause.
Individuals with hemophilia are at high risk of hermathrosis, or bleeding within joints. Over time, recurrent hermathrosis causes cartilage to erode away and joints to become destroyed. Eventually, the now unprotected ends of bones begin to rub together causing intense pain and damage with movement. Bending the knee also becomes difficult due to the build-up of scar tissue. By age 20 to 30, the majority of people with hemophilia will suffer from some degree of joint damage and stiffness. In short, the results of hermathrosis are primarily why knee replacement surgery is one of the most common procedures performed on patients with hemophilia.
Signs and Symptoms
The primary sign and symptoms of hemophilia are excessive bleeding and easy bruising.
External signs include:
- Prolonged bleeding
- Heavy bleeding from a minor cut
- Bleeding from a cut that resumes after stopping for a short time
- Bleeding that occurs without an apparent cause
- Deep bruises
- Bruises that occur without an apparent cause
Internal signs include:
- Bubbling or tingling sensation within the joint
- Joint warmth, with or without visible swelling or redness
- Limited range of motion in the joint
Avascular Necrosis
Bone consists of living tissue that requires a constant supply of nutrients delivered to it by blood. Without blood, the bone tissue will eventually die and the bone collapses.
Avascular necrosis, also called osteonecrosis, is the death of bone tissue due to a lack of blood supply. Reduced blood flow can be caused by an acute traumatic injury, such as a dislocation or fracture, that damages blood vessels. Fat deposits in blood vessels, as well as certain diseases, can also block the flow of blood to bones.
While avascular necrosis can occur in anyone, it is most common in people age 30 to 50. It often begins as a painless bone abnormality and can remain painless while the condition advances. Unfortunately, the condition advances quickly and the damage it causes is irreversible. This means that early detection is critical in order to preserve your knee joint and other bone structures in your body. Eventually, the damaged bone will become painful to use. The outcomes of nonoperative treatment of osteonecrosis are relatively poor and most patients require replacement surgery.
Speak with an Orthopaedic Specialist
If you have any of the aforementioned conditions as well as severe knee pain that limits your activities during the day and interferes with your sleep at night, you should speak with an orthopaedic specialist.
At Beacon Orthopaedics and Sports Medicine, Dr. Haleem Chaudhary can talk to you about the differences between a partial knee replacement and total knee replacement, assess your personal health history and factors, and determine if you need a knee replacement.
Learn more about Dr. Chaudhary or schedule an appointment. For your convenience, he is available at Beacon East, Summit Woods, and Beacon West in Ohio or at Beacon’s Northern Kentucky location. You can also ask if you’re qualified for Dr. Chaudhary’s new study that utilizes Zimmer Biomet and Apple Watches to guide patients through the surgery and rehab process, and improve it.
What to Expect After AC Reconstruction
August 1, 2018
When we think of the shoulder joint, we often think of a single joint that allows us to raise or lower our arm, move it closer or further away from our body’s midline, or rotate it either internally or externally. The truth of the matter is that your shoulder relies on more than one joint. The “shoulder joint” consists of 4 joints: the glenohumeral joint, the acromioclavicular joint, the sternoclavicular joint, and the scapulothoracic joint. In order for the shoulder to have its full range of motion, these individual components must work together seamlessly.
As you would imagine, if any of these joints become severely damaged, the rest of the shoulder is affected. Unfortunately, shoulder injuries are common among athletes and other physically active individuals. Football players who take frequent blows to their shoulder, in particular, face a high risk of acromioclavicular joint separation. The acromonioclavicular joint, or AC joint, is located at the top of the shoulder and facilitates raising the arm over the head. When it is damaged, it can seem impossible to lift your arm, let alone reach overhead.
Not every AC injury requires surgery. However, if you are an athlete who needs to regain elbow function or if your symptoms impair your ability to live normally, an orthopaedic surgeon will recommend AC reconstruction. Reconstructive surgery is an option for both athletes as well as non-athletes to regain loss shoulder mobility. It is a standard procedure that has been shown to be highly effective. As with any form of surgery, though, your outcomes are determined in part by your adherence to post-operative guidelines. If you are considering reconstructive surgery, here is what you can expect during the months following your procedure and guidelines to follow in order to improve your outcomes.
Phase I – Immediate Post-Surgical Phase (Weeks 1 -4)
Rest should be your top priority following surgery. This will allow your shoulder to recover while also protecting it from further trauma. You can apply ice every hour for 15 minutes to minimize swelling and promote healing.
By the end of the fourth week, you should be able to passively bend your arm and move it away from the midline of your body by 70 degrees. A passive range of motion refers to someone else—such as a physical therapist—moving the joint for you. By contrast, active range of motion refers to your ability to move your joint on your own.
Goals:
- Minimize shoulder pain and inflammatory response
- Protect the integrity of the surgical repair
- Achieve gradual restoration of passive range of motion
What to Expect:
- Minimal pain which will gradually decrease
- No active range of motion in the affected shoulder
- Gradual restoration of passive range of motion
- Use of a sling for the first 4 weeks
- The need for assistance in order to complete daily activities
- Physical therapy starting at week 2
- Education regarding posture, joint protection, positioning, etc.
Milestones to Progress to Phase II:
- Appropriate healing of the surgical repair
- Adherence to the post-operative protocols
- Achieved at least:
- 90 degrees of passive forward elevation
- 30 degrees of passive external rotation at 20 degrees abduction
- 30 degrees of passive internal rotation
- Completion of Phase I activities without pain or difficulty
Phase II – Intermediate Phase (Weeks 4 – 8)
Goals:
- Continue to minimize shoulder pain and inflammatory response
- Continue to protect the integrity of the surgical repair
- Continue to restore passive range of motion
- Achieve gradual restoration of active range of motion
- Discontinue use of the sling by the end of week 6-8
What to Expect:
- Minimal to no pain and inflammation
- Discontinued use of a sling
- Continued physical therapy
- Gradual restoration of passive range of motion
- Gradual restoration of active range of motion starting at week 8
- Continued education regarding posture, joint protection, positioning, etc.
Milestones to Progress to Phase III:
- Achieved at least:
- Passive forward elevation at 165 degrees
- Passive external rotation at least 75 degrees at 90 degrees abduction
- Passive internal rotation at least 50 degrees att90 degrees abduction
- Active forward elevation at lest 145 degrees with good mechanics
- Dynamic control of the scapula (shoulder blade)
- Appropriate posture of the scapula (shoulder blade) at rest
- Completion of Phase II activities without pain or difficulty
Phase III – Early Strengthening Phase (Weeks 10 – 16)
Goals:
- Initiate balanced strengthening program
- Normalize strength, endurance, and neuromuscular control
- Resume chest level full functional activities
- Strengthen scapular retractors and upward rotators
What to Expect:
- Pain-free activities
- Continued physical therapy:
- Exercises requiring progressively greater intensity, shoulder elevation and joint stress
- Exercises consisting of both open chain and closed chain activities
- No heavy lifting or plyometrics
- Continued education regarding posture, joint protection, positioning, etc.
Milestones to Progress to Phase IV:
- Achieved passive forward elevation within normal limits
- Achieved external rotation at all angles of abduction within normal limits
- Active forward elevation within normal limits with good mechanics
- Appropriate rotator cuff and scapular muscular performance for chest level activities
- Completion of Phase III activities without pain or difficulty
Phase IV – Return to Activity Phase (Approx. Week 24)
Goals:
- Continue stretching and passive range of motion as needed
- Continue all exercises from the aforementioned phases
- Maintain full non-painful active range of motion
- Return to full strenuous work activities
- Return to full recreational activities
What to Expect:
Heavy weight lifting and overhead athletic moves should resume 6 months following your operation or after being cleared by an orthopaedic specialist.
Speak with an Orthopaedic Specialist
Your adherence to post-operative guidelines following AC reconstruction directly impacts your outcomes. And while the importance of rehabilitation cannot be stressed enough, it is important to also understand that it is only one half of the equation. Both your recovery program as well as your choice of orthopaedic surgeon will ultimately determine the success of your joint reconstruction.
Dr. Robert Rolf is a board certified orthopaedic surgeon at Beacon Orthopaedics and Sports Medicine who provides extensive expertise in rotator cuff tears as well as other conditions related to the shoulder or elbow. For your convenience, Dr. Rolf meets with patients at Beacon’s Batesville, Lawrenceburg, or Northern Kentucky locations as well as Beacon West in Harrison, Ohio. Schedule an appointment online to meet with Dr. Rolf.
Exercises to Strengthen Your Hips
July 31, 2018
The hip is a large, deep ball and socket joint that joins many muscles, ligaments and tendons. These include the hip flexors, extensors, rotators and abductors, and adductors. These muscles allow you to move your knees toward your torso and bend at the waist. They are also necessary for nearly every movement that involves the lower body, including walking, running, and even sitting.
Strong hip muscles are especially important for athletes and active individuals. For baseball players, strong hip flexors can make the difference between an average swing and a game-winning hit. For soccer players, strong hip flexors improve your passing and goal shots. For runners, strong hip flexors provide a more powerful stride. And even if your goal is to just stay in shape, strong hips are necessary for many exercises including squat, deadlift, overhead press, and even bench press.
Even if you spend hours every week strengthening your back, there is no substitute for strong hip muscles. This article contains exercises that you perform at home in order to strengthen your hip flexors. It is important that you consult your physician before beginning any exercise program. Dr. Steve Hamilton, a board-certified hip specialist at Beacon Orthopaedics and Sports Medicine, can talk to you about exercises to strengthen your hip flexors. You can schedule an appointment with Dr. Hamilton online.
The Muscles of the Hip
The hip relies on a complex system of muscles, ligaments, and tendons to move through its full range of motion. Even an ordinarily simple movement requires the coordination of several muscles.
Hip muscles are categorized as either flexors, extensors, rotators, abductors, or adductors. Flexors allow the hip to bend at the waist; extensors allow the hip to straighten; rotators allow the hip to rotate; abductors allow the hip to move away from the midline of the body; and adductors allow the hip to move toward the midline of the body.
Hip muscles can also be categorized as prime movers or synergists. The role of primary movers is to initiate and control a movement. Synergists help facilitate the movement. Whether a muscle is categorized as a prime mover or a synergist depending on the movement.
Hip Flexors:
- Iliopsoas (Psoas and Iliacus)
- Rectus Femoris
- Pectineus
Hip Extensors:
- Gluteus maximus
- Semitendinosus
- Semimembranosus
- Biceps femoris
Hip Rotators and Abductors:
- Quadratus femoris
- Obturator internus
- Gemilli
- Gluteus medius
- Gluteus minimus
- Piriformis
- Sartorious
Hip Adductors:
- Adductor longus
- Adductor brevis
- Adductor magnus
- Obturator externus
- Gracilis
The Benefits of Hip Strengthening Exercises
Reduced Risk of Falls or Fractures
Approximately 1.6 million hip fractures occur worldwide each year, according to the International Osteoporosis Foundation. Fractures result from a variety of causes, including: Falling on a hard surface or from a great height; blunt trauma to the hip; diseases such as osteoporosis, which weakens bone.
A hip fracture is a life-changing event that causes chronic pain, reduced mobility, and disability. In fact, 40% of people with hip fractures are unable to walk independently and may become totally dependent on assistance. Even more alarming: Up to 1 in 5 patients die due to serious complications in the first year following a hip fracture. Research suggests that the risk of dying remains higher over the first five years. Less than half of those who survive regain their previous level of function. For all of these reasons, it is important that you do all you can do to prevent hip fractures.
Fortunately, the hip is surrounded by your hip flexors which support and protect the joint. By strengthening your hip flexors, you are increasing the amount of protection your joint has against a direct injury. Moreover, strengthening your hip flexors will reduce your risk of falls as well as the overall amount of stress placed on your joint by day to day activities.
Increased Hip Mobility
Stiff hips are not only painful but they can drastically reduce your range of motion. While hip stiffness can be caused by a variety of causes—including injuries such as sprains or chronic conditions such as arthritis—sitting for too long is a common culprit. Regularly lengthening and strengthening your hip muscles will help them remain limber and able to move.
Improved Back Health
The deepest hip flexor in the body, the psoas muscle, is directly connected to the lumbar spine. As a result, tightness in the psoas muscle not only causes hip pain but also stiffness and discomfort in the lower back. Regularly stretching can relieve stiffness and improve your back health.
Improved Posture
Weak hip muscles affect your posture in two ways. First, hip flexors that are not regularly stretched become shortened and pull you forward. Second, weak glutes muscles are not strong enough to pull you forward. As a result, you may tend to slouch. By strengthening your hip muscles, you can hold your body upright and maintain good posture.
Exercises to Strengthen Your Hips
- Straight Leg Raise
Directions:
- Lie on your back.
- Bend the knee of your uninvolved leg (the leg that will remain stationary) and put your foot on the floor.
- Slowly tighten the muscles of the involved leg (the leg that will move).
- Slowly lift the entire leg 12 to 18 inches off the floor.
- Hold for 3 to 5 seconds, then slowly lower the leg.
- Repeat 5 times, then change legs.
Variations
The straight leg raise is a versatile stretch. This version of the exercise is performed in order to improve hip flexion; however, variations can also be performed in order to improve hip extension, adduction, and abduction.
Extension: Lie on your stomach, straighten your knee, and slowly lift your entire leg towards the ceiling.
Adduction: Lie on your side, bending the opposite leg and placing the foot on the floor behind the involved leg. Straighten the involved knee and slowly raise the leg toward the ceiling.
Abduction: Lie on your side with the involved leg up and the bottom leg bent for balance. Lift your entire leg towards the ceiling.
- Clam Shell
Directions:
- Lie on your side, with your legs stacked and knees bent at a 45-degree angle.
- Rest your head on your lower arm and contract your core muscles.
- Raise your upper knee as high as you can while keeping your feet touching and without shifting your hips or pelvis. Keep your lower leg stationary.
- Pause and then lower your upper knee to the starting position.
- Repeat 20 times, then change sides.
- Glute Bridge
Directions:
- Lie on your back, with your knees bent, feet flat on the ground, and arms at your side with your palms down.
- Raise your hips off the ground until your knees, hips, and shoulders form a straight line.
- Hold the position before lowering your body to the starting position.
- Hip Hikes
Directions:
- Stand sideways at the edge of a small box or a step at least 4” high.
- Keep your hips squared and your shoulders level.
- Slowly lower one leg off the side of the box, keeping both legs straight. Your waistline should dip down toward the free leg.
- Raise your free hip up so your waistline is tilted up toward the free leg, then drop the leg down.
- Repeat 20 times, then change sides.
Talk to a Hip Specialist
You don’t have to dedicate a full workout each week to your hips, but these exercises should be incorporated into your regular routine. Common strength training exercises—such as squats and deadlifts—as well as mind and body activities—such as yoga and tai chi—also provide opportunities to strengthen your hip muscles.
It’s important that you talk to a physician before starting an exercise program. Dr. Steve Hamilton at Beacon Orthopaedics and Sports Medicine not only specializes in the hip, but also provides world-class sports medicine. Dr. Hamilton can diagnose and treat an existing hip condition or work with you to develop a personalized exercise program to prevent future hip injuries. Whether you are a college or high school athlete, or just someone who likes to live an active lifestyle, Dr. Hamilton can help you. Schedule an appointment with Dr. Hamilton online.
Total Shoulder Replacement or Reverse Shoulder Replacement
July 30, 2018
Total Shoulder Replacement or Reverse Shoulder Replacement
Shoulder arthroplasty, often called a total shoulder replacement, is a well-established surgery for treating severe pain and stiffness. In fact, approximately 53,000 people in the U.S. have shoulder replacement surgery each year in order to regain comfort and function, according to the Agency for Healthcare Research and Quality. And while the majority of these procedures would be considered standard replacements, patients may be surprised to know that a “reverse” replacement is also an option. In some situations, a reverse shoulder replacement may benefit a patient more than a standard procedure.
At Beacon Orthopaedics and Sports Medicine, our shoulder specialists have performed numerous total shoulder replacements and reverse shoulder replacements. If you are experiencing shoulder pain and stiffness that limits your activities during the day and keeps you awake at night, you should talk to a specialist about your options. Here is information about total shoulder replacements and reverse shoulder replacements to help guide your discussion.
Q: What is a total shoulder replacement?
In a healthy shoulder, the head of the upper arm bone (humerus) fits into a shallow socket in the scapula. In shoulder replacement surgery the damaged portion of the humerus is removed and replaced with a smooth metal ball attached to a stem. This artificial component, called a prothesis, will either replace the “ball” of the joint or both the “ball” and “socket.”
Q: What is a reverse shoulder replacement?
In reverse shoulder replacement surgery, the damaged portions of the shoulder are also replaced with a prosthesis made from metal and plastic. However, unlike a standard replacement, the artificial component is placed on the socket side of the joint. The socket is then placed on the arm side where it is supported by a metal stem. Thus, the prosthesis is reverse of where its natural counterparts would be located within the body.
Reverse shoulder replacement works best for patients with cuff tear arthropathy or a detached rotator cuff. The reverse prosthesis allows the patient to use their deltoid muscles instead of their deteriorated or detached rotator cuff tendons in order to lift their arm.
Q: What are the benefits of shoulder replacement surgery?
First and foremost, the purpose of shoulder surgery is to relieve chronic pain and restore mobility so patients can resume normal living. Additionally, an orthopaedic surgeon may recommend a shoulder replacement in order to treat the following conditions:
- Osteoarthritis
- Rheumatoid Arthritis
- Post-traumatic Arthritis
- Rotator Cuff Tear Arthropathy
- Avascular Necrosis
- Severe Fractures
- Bone Tumors
In recent years, advancements in prosthetic designs have allowed patients to resume active lifestyles following surgery. Patients can often return to baseball, golf, swimming, or many of the other activities they enjoy.
Q: How successful is shoulder replacement surgery?
Both total shoulder replacement and reverse shoulder replacement have been shown to be highly effective. As with all forms of surgery, however, the effectiveness of the procedure depends on the overall health of the patient, their participation in physical therapy, and the expertise of the orthopaedic surgeon. Patients can improve their outcomes by choosing an experienced orthopaedic surgeon and adhering to their treatment plan.
Q: What are the potential risks of shoulder surgery?
Shoulder replacements are considered as safe as hip and knee replacement surgeries. Of course, as with any joint replacement surgery, there are associated risks. The most common complication is the dislocation of the prosthesis, with dislocations being more likely to occur among reverse shoulder replacements. Fortunately, a dislocation can be managed by placing the arm back into the proper location and keeping the arm immobile for a period of time.
Shoulder replacement surgery also carries risks associated with other forms of surgery, including:
- Infection
- Fracture
- Nerve or blood vessel damage
- Joint stiffness or instability
- Loosening of the prothesis
- Dislocation
Although rare, other complications may occur. An experienced orthopaedic surgeon can talk to you about these complications and discuss your individual level of risk. In some instances, additional surgery may also be necessary.
Q: How long does it take to recover from shoulder surgery?
For the first 7-14 days following surgery, you will need someone to assist you with your daily activities at home as well as transportation. You should also expect your arm to be in a sling for the first 3-6 weeks and to participate in physical therapy for the first 8-12 weeks.
After about 6 weeks following your surgery, you may resume driving with the permission of your surgeon. You may also be cleared to return to work depending on how much physical activity is required.
After 1-2 months you may resume lifting heavier objects above the shoulder level.
For most patients, shoulder surgery typically requires 3-6 months for a full recovery.
Q: Who is a candidate for shoulder replacement surgery?
The typical shoulder replacement patient is 60-80 years old. It’s important to note, however, that younger patients may also require surgery. Candidates for total shoulder replacements typically have debilitating, chronic pain or severely restricted joint mobility that interferes with daily activities. And while severe osteoarthritis, rheumatoid arthritis, or another form of the disease are common among patients, shoulder arthritis is not the only condition that may require surgery in order to treat.
Is Shoulder Replacement Appropriate for You?
Every patient’s situation is different and an experienced orthopaedic surgeon whether a total shoulder replacement or reverse shoulder replacement is appropriate for you. If you experience chronic pain and have not achieved relief with conservative, non-surgical treatments, contact Beacon Orthopaedics and Sports Medicine today to schedule an appointment with Dr. Rolf.
Rotator Cuff Tear and Surgery
July 24, 2018
In this article, the experts at Beacon Orthopaedics explore the range of symptoms involved with rotator cuff tears, the necessary treatments to relieve patient symptoms—and, more specifically, the benefits of pursuing Superior Capsular Reconstruction using allografts to repair irreparable rotator cuff tears versus the more common treatment options.
The Rotator Cuff and Shoulder Stability

Your shoulder joint is the most mobile joint in your body. However, no matter the level of mobility within the shoulder, its lack of strong ligaments leaves your shoulder reliant on its surrounding muscles to maintain stability—in which your rotator cuff plays a critical role.
Rotator cuff tears are common, at times hard to detect, and among the more difficult injuries to treat.
When it comes to properly treating rotator cuff tears, physicians make their diagnosis on a per-patient basis. Symptoms vary between patients:
- Some experience severe shoulder weakness and are unable to raise their arm
- Some experience pain over the top of the shoulder but can still raise their arm
- Some experience no pain and experience functional limitations of the arm
- Some experience pain that descends down the arm—sometimes even down to the elbow
However, once diagnosis is reached, the path to recovery is still uncertain. In most cases, physicians first suggest non-surgical treatments for rotator cuff repairs, such as physical therapy, anti-inflammatory medications, or cortisone injections, because surgical treatments have a higher likelihood of either causing more damage to the torn tendons, or need of a revision surgery over time.
Before surgical treatments are planned for patients, your physician must discuss the following to be sure surgery is the best option:
- Your past and current symptoms
- Damages due to your rotator cuff tear
- Size and location of your tear
- Your activity level
- And all other treatments that have been attempted in your case
Solutions for Irreparable Rotator Cuff Tears
Shoulder functionality with an irreparable rotator cuff tear ranges from little to none.
Rotator cuff injuries—where the tendons at the ends of the rotator cuff muscles become torn and result in pain and limited shoulder mobility—frequently occur following a trauma to the shoulder joint or through general wear and tear on tendons within the rotator cuff over time.
If the tendons tear chronically, the connected muscle involutes and is replaced by fat and scar tissue, making the muscle too stiff to contract with enough force to rotate the humeral head on the socket effectively—resulting in restricted shoulder mobility.
When conservative measures fail and patients continue to experience pain, surgery is the next logical step. However, patients diagnosed with irreparable rotator cuff tears are typically met with very limited options for treatment.
Surgical procedures such as reverse shoulder replacement—where the ball and socket structure of the shoulder joint is reversed—don’t fully address the problem faced by patients with irreparable rotator cuff tears. Even though this procedure reverses which muscles support shoulder stability, shifting from the rotator cuff muscles to the deltoid muscles, this method often leads to required revision surgeries down the line for some patients.
Arthroscopic SCR using Allografts as an Alternative Solution for Irreparable Tears
Dr. Rolf at Beacon Orthopaedics, performs arthroscopic superior capsular reconstructions using allografts as an alternative surgical procedure to aid in shoulder stability and improve shoulder function despite the occurrence of irreparable rotator cuff tears.
Superior Capsular Reconstruction (SCR)—an arthroscopic procedure where a graft is secured to the glenoid and greater tuberosity—makes use of allografts to strengthen and reconstruct the superior capsule to ensure that patients regain the ability to maintain the natural mechanics of the shoulder.
What is an Allograft?
An allograft is tissue taken from one person for transplantation into another—including bone, tendons, ligaments, skin and heart valves. Donation is always voluntary and requires consent, from either the donor in question before death or the donor’s family post-mortem. After authorized consent is obtained, potential donors are thoroughly screened for risk factors and medical conditions that would rule out donation.
Procedures where allografts are used:
- Shoulder repair
- ACL repair
- Joint reconstruction in the knee and ankle
- Meniscal replacement
- Reconstruction due to cancer or trauma
- Ridge augmentation in dental procedures
- Spinal fusion
- Urological procedures
Why Use Allografts?
The preference of allografts over autografts is the ability to keep the treatment limited to one surgery versus requiring two. When surgeons use an allograft, it is already pre-screened for risk factors, so there is no need to retrieve a graft from another part of your body, and get that autograft ready to use for your procedure.
When receiving an allograft implant, be sure to ask your surgeon about tissue preparation and sterilization.
Currently Experiencing Shoulder Pain or Instability?
Consult a physician now. Dr. Robert Rolf, one of the physicians at Beacon Orthopaedics and Sports Medicine, received extensive training in advanced arthroscopic techniques for shoulder instability and rotator cuff tears and has world class experience in complex shoulder reconstructive procedures including tendon transfers, shoulder replacement, and reverse shoulder replacement procedures. If you are reading this article to figure out if you might have a rotator cuff tear, or are unsure of which treatment method might be best for the specific symptoms you’re experiencing, scheduling an appointment with Dr. Rolf will provide more information for your particular case.
Frequently Asked Questions: AC Joint Injuries
July 24, 2018
AC joint injuries are common among those who participate in competitive athletics. Two of the most common ways people injure their AC joint is by falling on an outstretched arm or running directly into something.
In this article, Dr. Robert Rolf of Beacon Orthopaedics and Sports Medicine will explore AC joint injuries and some of the most frequently asked questions by patients. If you are experiencing any of the symptoms discussed in this article, schedule an appointment today.
What is the AC joint, and what symptoms should I look for to know it’s an AC joint injury?
Your shoulder is formed at the junction of the clavicle, the scapula, and the humerus. The joint between the end of the scapula (the acromion) and the clavicle is called the acromioclavicular joint (AC joint)—one of the important functional joints that allows a full range of movement in the shoulder joint held together by three ligaments which are acromioclavicular, coracoclavicular, and the coracoacromial ligaments.
Some of the signs and symptoms of AC injury are:
- Pain on the top of the shoulder
- Pain when lying on the involved side
- Pain increases with heavy lifting or overhead and across body movements
- Swelling and bruising along the shoulder
- Tenderness over the AC joint
- Decreased range of motion and stability
- Decreased strength
- A visible bump on the top of the shoulder
- A popping sound or catching sensation
What are the Most Common Causes of AC Joint Pain?
Chronic irritation from repetitive overhead motions:
- Baseball
- Weightlifting
- Volleyball
- Basketball
Contact sports with high-risk for falls and collisions:
- Football
- Wrestling
- Rugby
- Biking
- Snow sports
- Hockey
What are the different types of AC joint injuries?
Type I: where the force applied to the acromioclavicular and coracoclavicular ligaments is too mild to tear them. This will result in only a sprain of the AC joint, and will hurt but not show any evidence of an acromioclavicular joint dislocation.
Type II: where heavier force is applied to the shoulder—disrupting the AC ligaments but leaving the coracoclavicular ligaments intact (but sprained). When these injuries occur, the lateral clavicle becomes more prominent.
Type III: where the force applied to the shoulder completely disrupts the AC ligaments and coracoclavicular ligaments—leading to complete separation of the clavicle and the resulting protrusion or “bump.”
Type IV: where there is posterior displacement of the clavicle, buttonholing through the trapezius muscle.
Type V: where the clavicle is widely displaced as a result of disruption of muscle attachments.
Type VI (rare): where there is inferior displacement of the distal clavicle below the acromial process or the coracoid process.
Can Physical Therapy Help?
Once an AC joint injury is officially diagnosed, your physician will work with you to develop an individualized plan of action to start your recovery. Most patients with AC joint injuries will start to feel better within a few days or a week of the injury—but it can take at least six weeks for the AC ligaments to fully heal. During that time, it’s crucial to take the pressure off of the AC joint to protect from overstretching the immature scar tissue. While it’s helpful to use a sling, tape or a shoulder brace to de-load your AC joint, physical therapy will be the key to most AC joint injury recovery plans.
Physical Therapy Treatment Goals for AC Joint Injury:
- Range of Motion – regain ability to move without pain.
- Strength Training – regain the strength in the shoulder to better prevent re-injury.
- Pain Management – reduce the amount of residual pain as you go about your normal activities.
- Functional Training – increase your ability to move your shoulder correctly without putting undue pressure on your AC joint.
Who Should I Talk to About My Recovery Options?
Dr. Rolf of Beacon Orthopaedics received extensive training in advanced arthroscopic techniques and world-class experience in complex shoulder reconstructive procedures for tendon transfers, shoulder replacement, and reverse shoulder replacement procedures. If you think you might have sustained an AC joint injury, schedule an appointment today to speak with Dr. Rolf about your options. His experience and passion for sports medicine will ensure that you return to your favorite activities stronger and better than ever.
MACI Procedure for Knee Rejuvenation
July 23, 2018
Dr. Razzano spent some time explaining the MACI procedure on the WING radio station (ESPN 1410) in Dayton, OH.
Afternoon show co-hosts Justin Kinner and Mark Schlemmer got the chance to ask some questions to Dr. Andrew Razzano, the only physician in Greater Dayton to perform the FDA-approved MACI procedure. The MACI procedure involves taking a patient’s own cells, growing them in a lab, and then implanting them back into the patient to regrow cartilage.
Patient can usually expect to return to normal activity within about 3 months and within about 6 months they can return to running and cutting or higher level sports. This is a good procedure to restore or replace cartilage, especially after a joint has been cleaned up multiple times or has lost cartilage due to over-use or an injury.
Right now, the MACI procedure works best for people who have lost cartilage in their knee. Dr. Razzano hopes to see the scope of application broaden to include shoulder, hip, and ankle applications as well, even though right now it is only approved for knee.
Listen to the full interview here:
Audio Transcription
Kinner and Schlemmer here on 1410 ESPN Radio. We really appreciate the time with Solomon Wilcots, former Cincinnati Bengal if you missed that interview, it will be up on the website shortly at wingam.com. That was a great interview. We touched on a ton of great stuff. Talked about the Browns, talked about the Bengals, talked about some other NFL headlines. But we closed the interview talking about a new knee procedure that is performed by Dr. Andrew Razzano here in the Dayton area. He is an orthopedic surgeon from Beacon Orthopaedics here in Dayton. We’re joined by him now. Dr. Andrew Razzano, we appreciate your time. How are you doing?
“I’m doing great. How are you guys doing?”
“Very well, thank you. Doctor, first of all, one thing that we talked about with Solomon to close out the interview was this new procedure that we just talked about, called MACI (M-A-C-I). Just tell us a little bit about it and how it differs from other standard knee procedures. What separates this one, and why this is something to look into.”
“Well, it’s a great procedure. It’s based off of another procedure called ACI, and it’s made it easier for surgeons to perform it. But basically, it stands alone because we’re taking your own cells and growing them in a lab, and then being able to reimplant them in your knee. So, you’re having living cells in your knee that are yours. So it really differs from having donor cells or cells that are partially living, in that they are your own living, growing cells. We know they’re viable. We know it works. It has a great track record. They used to do it in Europe before it transitioned to the United States, and it’s been performing very well for us. Now, again, what better way to go than your own cells?”
“Doctor, how soon do most of the patients have it done, how soon are they back to normal activities?”
“You know, normal activity comes within probably three months of the surgery. You’re back doing normal day-to-day things. By about six months, they’re doing more running and cutting activities. And then, by the six to nine-month mark, they’re getting back into athletics, you know. And again, this is a FDA-approved procedure that gets people back to their daily activities but also their athletic activities.”
“If I’ve had a previous knee surgery and still having issues with it, can I have this procedure done?”
“Absolutely. I mean, there are certain indications where we may have to deviate. But a lot of times this is a good answer. And a lot of people may go in for simple scopes and clean-outs of their knee, and then they get to a point in time where they need something a little bit more in-depth that actually brings back cartilage to that knee. Instead of just kind of cleaning up any of the frayed or loose cartilage, you need to replace some of it. And that brings back a more normal joint, gets you back to your normal activities.”
“What are some of the common activities that lead to some of these issues? I mean, obviously with high school athletics just around the corner, football obviously, volleyball. What are some of the more common injuries that you see and which of those would correlate with this type of procedure?”
“Well, most of these procedures are done for cartilage injuries. We have the cartilage that coats the end of your bone, your articular cartilage. We have people that will shear off a piece of it or damage it in a collision sport or a repetitive injury. Repetitive injuries are more weekend warriors, and some of the impact injuries are football players, may be associated with an ACL tear or meniscus tear. And as we deal with those injuries now we have another option to deal with cartilage injuries associated with them.”
“Doctor, I’m getting a person texting in, wanting to know what about if they have really dry joints or a lot of arthritis. Can this also help that?”
“It can help with specific areas of arthritis. And that’s what arthritis is–it’s purely the loss of an area of cartilage. So if you’ve lost this area of cartilage, a lot of times we can go in and place this new cartilage, your own cartilage that’s regrown back into that area that doesn’t have cartilage or is devoid of cartilage. If it’s your entire knee that has no cartilage, those are different procedures. But focal areas, this is an excellent option for an area of arthritic change or loss of cartilage that we can replace it.”
“I know this is strictly for the knee, but will this one day move into, say, elbows or shoulders? I’m thinking of baseball specifically. Will one day this, I guess, be able to be expanded?”
“Absolutely. I think so. I think we’re getting very close to that now, it’s just getting it approved. It works very well for the knee. We keep using it and expanding horizons for this product, and may see it one day used in shoulders, elbows, and ankles as well.”
“You say you perform this procedure here in Dayton. How rare is this type of procedure right now throughout the United States. Obviously, it’s available here in Dayton, but just how rare is this procedure and where else (I don’t want to say where else can you get it), but is this going to be a place where a lot of people from outside this area come for this procedure as well?”
“I think so, yeah. I think that it’s something that once you are comfortable performing it, people start to see the outcomes and they start to come and ask for this procedure and details about it. I’ve had people come from out of state. I’ve had people come from northeast Ohio and ask about it. There are certain physicians that do perform this around the country, but it’s fairly new as far as MACI is concerned. Again, it branches from ACI. Now, with MACI, it’s been FDA approved for about over a year. It’s been used in Europe. It has an excellent track record in Europe and I think people are starting to see that it is very, very beneficial to them, their life, their lifestyle. So I’m having more and more patients come down and ask about it. We had two last week, we have one coming up next Thursday. So it’s very beneficial and we’re seeing patients have great success with it.”
“If there’s one athlete that people could associate a name with, that’s had this procedure done and made a pretty strong recovery, is there anybody out there you could point to?”
“Well, Solomon Wilcots. He did great.”
“When’s he coming back to the Bengals?”
“We need him! We need him soon. You know, obviously, I can’t talk about some of the major athletes we’ve done this on, major league athletes. I want to. But I saw one hit a game-winning double two weeks ago, for a team not in this state. But he was nine months out. So he did excellent.”
“So this isn’t anything Andrew Lark has been involved in, I know his shoulder rehab and all that. But is this kind of similar to what he’s doing?”
“You know, he has some different injuries to his shoulders. It was related to his labrum, most likely his biceps, tendons, which is slightly different than the cartilage that coats your bone. That’s more of a rim of cushioning cartilage that adds stability to the shoulder. But we do have a lot of athletes. We’ve had a lot of Reds players that have defective cartilage in their shoulder that we do different procedures for. Now that this is available, this is something that I think we will look at in the future for that.”
“We really appreciate you coming on and telling us more about this and Solomon Wilcots did a tremendous job, too, in previewing this. But just if people are interested in learning more about this procedure and more about what you guys do, where can they go to get more of that information?”
“BeaconOrtho.com. If you go online and go to BeaconOrtho.com, you’ll see many, many different options. All of our surgeons are listed, and then you can see, basically, the articular cartilage restoration procedures we do, which is MACI, as well as many other options. You can also call 937-354-3700. We have somebody that answers the phone 24/7.”
“I’ve got people texting pretty often right now, with the arthritis and just what you can do.”
“Well, hey, I’m still in office now and they can stop on by right now. We’re here.”
“Dr. Andrew Razzano is an orthopedic surgeon at Beacon Orthopaedics here in Dayton. Doctor, thank you so much for your time today, we appreciate it. Have a great weekend.”
Frequently Asked Questions About Hip Arthroscopy
July 20, 2018
Arthroscopy is a surgical technique that has revolutionized the way that complex hip conditions are treated. For femoroacetabular impingement (FAI), also called hip impingement syndrome, an arthroscopic repair provides an effective and minimally-invasive alternative to traditional hip surgery. An arthroscopic procedure can also be an appropriate treatment for other common hip problems, including cartilage damage, labral tears, loose bodies, tendonitis, and bursitis. Often, patients of an arthroscopic surgery experience less postoperative pain and a faster recovery than those who receive a traditional procedure.
Arthroscopy has become a routine procedure. Despite all of its benefits, however, it is not an appropriate treatment for every condition or patient. The risk of a complication needs to be seriously considered and it is important to discuss your particular health factors with your surgeon.
This article provides answers to frequently asked questions about hip arthroscopy. For a better understanding of arthroscopy and to determine if surgery is the appropriate treatment for your hip pain or stiffness, schedule an appointment with a hip specialist.
What is Hip Arthroscopy?
Arthroscopic hip surgery is a minimally-invasive procedure that involves two to three small incisions, a high definition camera, and specialized instruments to work inside the hip joint.
The procedure begins with a small incision in the hip that is about 1 cm long. The surgeon then inserts a small camera, called an arthroscope, through the incision. The camera feeds video to a nearby monitor, providing the surgeon with an interior view of the joint. The surgeon will then perform one or two additional incisions in order to insert the specialized instruments they will use to repair the joint. The surgeon can reshape, remove, and stabilize the various components of the hip without fully exposing the joint. The surgery typically takes about two hours or less.
What Conditions Does Hip Arthroscopy Treat?
Hip arthroscopy can be used to surgically treat femoroacetabular impingement (FAI), or hip impingement syndrome. Arthroscopy is used to treat:
- Abnormalities of the femoral head: The head of the femur is reshaped and made smooth, allowing it to rotate through its full range of motion.
- Abnormalities of the acetabulum: The hip socket is reshaped, allowing the femoral head to fit more securely and rotate through its full range of motion.
- Labral tears: Torn labrum is reattached, repaired, and stabilized.
- Ligamentum Teres Tears: The ligamentum teres can be trimmed and stabilized.
- Bone cysts: Holes in the femoral head or acetabulum are removed or filled with a bone graft.
In addition to FAI, other conditions that can be treated by hip arthroscopy include:
- Cartilage damage
- Loose bodies
- Labral tears
- Iliopsoas tendinitis
- Trochanteric bursitis
- Synovial disease
- Adhesive capsulitis
- Joint sepsis
- Osteonecrosis
Hip arthroscopy can be performed if there are no apparent signs of arthritis. If moderate to severe arthritis is present, the surgeon may recommend a partial or total hip replacement instead.
What are the Advantages of Hip Arthroscopy?
Less Tissue Damage
Arthroscopic surgery preserves muscles in three ways. First, the surgeon only makes a small number of incisions that are each approximately 1 cm long. Second, the incisions are made on the front side of the hip where there is naturally less muscle. Finally, the procedure is performed with highly specialized instruments that allow the surgeon to work between tissue. The surgeon does not need to cut or remove tissue in order to access the joint.
These aspects of arthroscopic surgery are vastly different from traditional hip surgery. A traditional procedure involves a large incision that is approximately 10-12 inches long. Moreover, muscles and tendons are detached from bones and the femoral head is dislocated from the hip socket in order to have a complete view of the joint.
Less Postoperative Pain
Patients of arthroscopic surgery usually experience less pain because there is less tissue that needs to heal. These patients also require less pain medication.
Faster Recovery
Recovery time depends on the type of hip arthroscopy performed. If the purpose of surgery is to remove torn pieces of cartilage or foreign bodies from the hip, the patient may be able to place their full weight on the joint after two or three days. Alternatively, if the purpose of surgery is to repair the anatomical structures of the joint, the patient will often be able to resume activities within 3 to 4 weeks. Those who work less physically demanding jobs often return to work sooner. Patients of traditional surgery may need up to 8 weeks in order to return to activities.
Shorter Hospital Stay
At Beacon Orthopaedics and Sports Medicine, hip arthroscopy is performed in an outpatient setting. Outpatient hip replacement, also called a same-day hip replacement, allows the patient to receive surgery and return home within 24 hours of their surgery. Patients can not only recover in the comfort of their own home but they are also able to avoid the cost of a hospital stay.
What are the Risks of Hip Arthroscopy?
The risk of complications from hip arthroscopy is low and many of its potential complications are transient. However, it’s important for patients to understand the following conditions that can result from surgery:
- Bleeding
- Infection
- Blood vessel and nerve damage
- Blood clots and pulmonary embolism
- Fluid build-up in the body
- Extra bone around the hip
In general, the risk of a complication increases with age and a history of smoking. Although rare, serious complications can occur such as the loss of limb function or anesthesia complications that can lead to death. Your physician will provide a comprehensive evaluation of your health in order to determine your level of risk.
Who is a Candidate for Hip Arthroscopy?
Candidates for arthroscopic hip surgery suffer from severe pain or experience decreased mobility that limits their ability to live a normal life. Candidates typically have FAI, a labral tear (which may or may not be related to FAI), hip dysplasia, loose bodies in the hip area, or another condition that leads to hip pain and loss of function.
Candidates for hip arthroscopy range in age from late teens to people in their 50’s and 60’s. Patients who are young and healthy, in particular, tend to be good candidates because they have less tissue surrounding the joint. Because the hip joint is located deep within the body, minimal tissue makes it easier for the surgeon to operate.
Hip arthroscopy is not appropriate for patients with moderate or severe arthritis. Instead, the best surgical treatment is a partial or total hip replacement.
It is important to note that surgery is not appropriate for every patient. It is also considered a method of last resort. Your physician will first recommend conservative treatments, including physical therapy, to help you manage your hip pain, swelling, and stiffness. If you are not able to achieve significant pain relief and mobility, your physician may conduct a comprehensive orthopaedic evaluation to determine if surgery is the appropriate treatment for you.
Key Points
- Arthroscopic hip surgery is a minimally invasive procedure. At Beacon Orthopaedics, you are able to return home within 24 hours of their procedure.
- Hip arthroscopy involves less tissue damage, less postoperative pain, and faster recovery. The advantages of an arthroscopic procedure are ideal for athletes and professionals who need to return to their activities quickly.
- Hip arthroscopy is appropriate when there is no or very mild arthritis. Moderate or severe arthritis cannot be treated with hip arthroplasty.
- Your choice of surgeon will significantly impact your outcomes. Arthroscopy is a technically demanding procedure.
Additional Reading
Talk to a Hip Specialist
The sooner a condition is treated, the higher the probability of success. With time, an untreated condition worsens leading to irreversible cartilage damage and the development of arthritis.
Dr. Steve Hamilton is a board-certified hip surgeon at Beacon Orthopaedics and Sports Medicine who has performed a significant number of minimally-invasive procedures. He will determine if you are a candidate for arthroscopic hip surgery and talk candidly about what you can expect.
Schedule an appointment with Dr. Hamilton to discuss your options. For your convenience, he is available at Beacon East, Beacon West, or Summit Woods in Ohio or at Beacon’s Northern Kentucky location.
How to Adjust Your Body Mechanics to Reduce Hip Injuries
July 20, 2018
Every time you walk, run, jump, carry, or bend at the waist, you apply stress to your hip bones and muscles. Stress is also applied to your hips when you are stationary. This is because your hips are the foundation and base of support for holding your body in an upright position. While sudden, direct trauma to the hip joint can cause injuries, many hip injuries gradually develop over time from chronic overuse. Body mechanics play a role in the development of hip sprains, which are the stretching and tearing of ligaments, as well as strains, which is the stretching and tearing of muscles.
What Are Body Mechanics?
Body mechanics, also called biomechanics, refers to the way our bodies move. It includes all of the skeletal, muscular, and joint actions that are required in order to complete a task. Proper body mechanics minimizes the amount of stress that is placed on the body. Conversely, poor body mechanics puts excessive stress on the body.
In order to achieve proper body mechanics, you must be intentional about the way you move your body and also develop muscles that are strong enough to support your movements. This article contains information about how to adjust your body mechanics in order to reduce hip sprains and strains.
The Hip’s Function
The hip is the largest ball-and-socket joint in the body. The smooth, rounded head of the femur (thigh bone) fits into the acetabulum (hip socket). In a healthy hip, the femoral head can smoothly rotate within the acetabulum. The joint also consists of ligaments, which function like elastic bands that hold the bones in place, and muscles that lengthen and shorten, causing it to move. Cartilage lines the joint, preventing friction between bones. Labrum, which is a special type of cartilage, also helps secure the femoral head in the hip socket.
A healthy hip is vital for normal activities. The hips allow you to move your legs forward, backward, to the side, across one another, or in circles. The hips also support your upper body both when you are stationary (e.g. sitting or sleeping) and when you are in motion (e.g. running or jumping). Hip injuries can interfere with normal activities throughout the day and prevent restful sleep at night.
Running with Proper Body Mechanics
When we imagine a runner demonstrating “good form”, it’s natural to describe the runner as moving forwards or backward. Avoiding hip injuries while running, however, has less to do with forward-backward movement and more to do with side-to-side motions.
Proper Running Technique
Running with proper body mechanics involves the hips in two primary ways:
- Pelvic Drop: Proper running form starts with your back straight and your pelvis level. During the stance phase of a stride, the body is supported by only one leg. When one leg is planted, the pelvis tilts down towards the other side of the body and stresses the hips. Aim to keep your hips at or below 12 degrees.
- Pelvic Rotation: Your pelvis rotates in the direction of your rear leg as it swings, potentially adding 1 to 4 inches to each stride. Over long distances, a longer rearward stride reduces the overall impact on your hips, knees, and lower back. Conversely, avoid rotating your hips too far and consequently over-striding. Aim to keep your hips at or below 15 degrees.
Proper running form also involves:
- Feet that are straight and knees that are relaxed.
- Keeping your arms to your sides with a 90° angle.
- Keeping your arms and shoulders relaxed.
- Landing midfoot first and pushing from the big toe.
- Landing quickly and lightly.
- Keeping your body’s weight slightly forward.
While practice can make proper body mechanics second nature, it is recommended that you periodically check your posture any time you run.
Jumping with Proper Mechanics
Over the years, athletic conditioning has placed greater emphasis on plyometrics, also known as jump training. Plyometrics can help an athlete train for basketball, volleyball, tennis, or any other sport that requires explosive jumps. While athletes are able to jump higher and farther than ever before, greater force and distance creates more opportunities for injury. Proper jumping form will not only help prevent hip sprains and strains, but it may even improve your performance.
Proper Jumping Technique
Jumping with proper body mechanics involves five phases:
- Loading: Proper jumping mechanics starts in a quarter squat position. Position your hips over your knees, and your knees over your feet. You will load force into your glutes, hamstrings, quads, back extensors, and calves as you prepare to jump. As you brace your core muscles, your weight shifts to the balls of your feet and your arms swing back.
- Initiation: As you start the jump, you’ll explosively contract the extensor muscles in your hips and legs while simultaneously opening up the hip flexors. The forceful movement of your hips, knees, and ankles at the same time is called “triple extension.”
- Extension: The hips and shoulders open up while the arms swing forward, creating the maximum possible momentum. At the highest point of the jump, your body will be fully extended.
- Descent: As your body prepares for landing, your hips hinge, knees flex, and ankles plantarflex.
- Absorption: When you land, your joints should be in line, closely resembling the starting position or the bottom of a squat.
These mechanics will vary based on the type of jump being performed. A physical therapist can work with you to develop proper form for broad jumps, side jumps, 180-degree jumps, and other variants.
Additional Considerations
The performance of quad dominant v. glute dominate athletes has become an important discussion in sports medicine. Quad dominant athletes tend to use their quads to shift their weight forward when jumping, transferring enormous pressure to their knees. Athletes who use the quadricep muscles as the primary source of movement also have difficulty achieving a full hip extension.
The glutes are the most powerful muscle group in the lower body. When jumping and landing, you want to utilize a glute dominant position that allows for triple extension. This will not only help you achieve a more explosive jump but also circumvent the additional knee and hip stress that is common among quad dominant athletes.
If you primarily rely on your quadriceps for jumping, consider working with a physical therapist. While some athletes are just naturally prone to using their quadriceps, others may use their quads to compensate for weak glute muscles. A physical therapist will teach you proper jumping technique and closely supervise your movements as you practice proper form.
Lifting with Proper Mechanics
Lifting an object that is in an inert state, otherwise called “dead weight”, can seem like a simple task, especially if it is a routine part of your job or exercise program. However, lifting any load from the ground engages multiple regions of the body, including the hips, legs, lower back, and core muscles. Safe lifting technique not only limits twisting at the hip that can potentially cause strains or sprains, but it also lowers your risk of a back injury.
Proper Lifting Technique
Lifting with proper body mechanics involves five phases:
- Evaluate: Evaluate whether or not you can safely lift and transport the load. If it is safe to move, stand close to the load with your feet shoulder-width apart and your toes pointed outward.
- Squat: Lower your body by bending your knees and flexing your hips. Keep your back straight.
- Pull: Take hold of the load, pulling it close to your body. Ensure that you have a firm grasp.
- Brace: Tighten your stomach muscles. Your back should remain straight.
- Lift: Rise straight up, lifting with your legs. Your leg muscles should provide the power that is necessary for the lift, not your back. Do not let your hips rotate.
Employ a similar technique when setting down the load. Bend your knees, flex your hips, and keep your back straight.
You should always evaluate the weight of a load and any potential hazards in your path before attempting to lift the load. If a load seems too heavy or unwieldy to move to the desired location, ask for assistance or use a tool that is designed for moving objects.
Talk to a Hip Specialist
The hip is subject to natural wear and tear. While proper body mechanics can lower your risk of a sudden injury and slow the progression of an existing tear, the physical demands of competitive sports and otherwise active lifestyles will still lead to occasional sprains and strains. When an injury occurs, talk to a hip specialist.
Dr. Steve Hamilton is a board-certified hip specialist at Beacon Orthopaedics and Sports Medicine. He has treated countless hip injuries, helping high school and college athletes successfully return to their sport. He also works closely with a team of physical therapists in order to help you prevent future injuries. Dr. Hamilton will help you achieve your best performance on the field.
Schedule an appointment with Dr. Hamilton for treatment. For your convenience, he is available at Beacon East, Beacon West, or Summit Woods in Ohio or at Beacon’s Northern Kentucky location.
Pincer, Cam and Combined Hip Impingement
July 19, 2018
The hip is the largest ball-and-socket joint in the body. The ball-shaped head of the femur (thigh bone) fits into the cup-shaped acetabular socket (hip socket). In a healthy hip, both the femoral head and the socket are lined with a thin layer of cartilage that cushions the bones and prevents them from rubbing against each other. The rim of the socket is also lined with labrum, which is an additional layer of cartilage that secures the femoral head in place.
During movement, if the head of the femur makes abnormal contact with the hip socket, it can cause pain and the soft tissue to become pinched and compressed. Over time, impingement leads to irreversible cartilage damage and labral damage. It may also lead to osteoarthritis.
FAI affects people of all ages, including adolescents and young adults. In fact, the condition has been increasingly recognized as the cause of pain in young, active individuals. The symptoms of impingement are commonly seen in athletes, especially those who participate in baseball, soccer, lacrosse, golf, and other sports that involve repetitive hip rotation.
This article will help you understand the types of hip impingement that can occur, how the condition develops, how doctors diagnose the condition, and what treatment options are available.
Types of Hip Impingement
FAI occurs when an abnormality of the femoral head or the hip socket prevent normal movement. There are two main types of hip impingement:
Cam impingement occurs when the femoral head is not perfectly round and cannot rotate smoothly inside the acetabulum. It often results from a bump formed from excess bone growth at the end of the femur. During movement, the bump grinds the cartilage inside the acetabulum.
Pincer impingement occurs when the acetabulum is excessively deep or covers too much of the femoral head. In the case of the latter, it often results from excess bone growth that extends out over the normal rim. The overhang can impinge the neck of the femur and tear labrum.
When both conditions exist at the same time, it is called combined impingement.
Symptoms
The most common symptoms of FAI are:
- Pain in the hip, groin, or lower back
- Stiffness in the thigh, hip, or groin
- Inability to flex the hip beyond a right angle
Symptoms are typically mild at first and worsen over time. Pain will worsen both during activity (e.g. running, jumping, or turning) as well as during long periods of rest. If left untreated, hip impingement may lead to osteoarthritis.
People with hip impingement may not experience symptoms. In fact, it is possible for some people with an impingement to live active lives and never experience a problem. However, when symptoms do develop, it means that condition has already reached the point where cartilage or labrum has been damaged.
If you experience the symptoms of hip impingement, it is recommended that you talk to a hip specialist. Early treatment can not only help you relieve immediate pain and stiffness but also prevent further damage.
Causes
FAI is caused by either a structural abnormality that is present at birth or one that forms during adolescent development.
It is important to note that a structural abnormality alone will not cause impingement. The symptoms of impingement result from friction between the femoral head and the socket. The hip must be provoked in order for friction to occur. This is why athletes with a hip abnormality, especially those who repetitively use their hips, often experience impingement.
Treatment
Nonsurgical Treatment
Non-surgical, non-invasive treatments are recommended for everyone with FAI. While these treatments do not resolve the underlying cause of the condition, they can help relieve symptoms and potentially slow the worsening of pain.
Activity Modification
Limit or avoid activities that repeated rotate or flex the hip. This includes daily habits—such as sitting with your knees together, crossing your legs, or sleeping on your side—as well as many sports. If you must participate in sports that stress your hip, make sure to take periodic breaks and receive adequate rest between games.
Non-Steroidal Anti-Inflammatory Drugs (NSAIDs)
Non-steroidal anti-inflammatory drugs (NSAIDs) such as ibuprofen (e.g. Advil) or naproxen (e.g. Aleve) can help relieve hip pain caused by impingement. These over-the-counter medications inhibit prostaglandins in the body, which contribute to inflammation.
Corticosteroid Injections
Corticosteroids are potent anti-inflammatory medications that can relieve pain when injected directly into the hip joint. Typically, a small amount of anesthetic is injected in addition to the corticosteroid. The anesthetic provides immediate relief that lasts a few hours while it may take two to three days for the corticosteroid to take effect.
Most patients experience some pain relief from corticosteroids. The relief can last for a few weeks to a few months. Injections are administered at regular intervals in order to lower the risk of side effects.
Physical Therapy
Physical therapy is a multi-pronged treatment that addresses your muscle strength, flexibility, joint mobility, posture, and gait (the way you walk). A comprehensive physical therapy program focuses on ways to relieve your pain, restore hip function, reduce stress on your hip, and avoid future injuries. Physical therapy should be a compliment to stretches and exercises that you perform on your own.
Surgical Treatment
Surgery addresses the structural abnormality that causes FAI. Surgery may be performed in order to cut or remove bone tissue, remove loose pieces of the labrum, or to repair labral tears by reattaching the labrum to the bone.
Surgery can be performed either arthroscopically or with an open incision.
Arthroscopic Hip Surgery
Arthroscopic hip surgery is a minimally-invasive surgery in which an orthopaedic surgeon inserts a small camera, called an arthroscope, through a small incision in the hip. The camera feeds an interior view of the joint to a nearby video monitor. After the surgeon has clearly identified the problem, they will insert small surgical instruments through a separate incision in order to make the repairs. The surgeon can trim, reshape, remove, and stabilize the different components of the hip without fully exposing the joint. The surgery typically takes about two hours or less.
Candidates for arthroscopic surgery tend to be younger and in otherwise good health. Due to the nature of the surgery, patients typically return home within 24 hours of the procedure, experience less post-operative pain, and recover faster. Learn more about the advantages of an arthroscopic procedure.
Traditional Hip Surgery
Open surgery, also known as traditional surgery, begins a single long incision that is approximately 7 to 10 inches long. Next, certain muscles and tendons must be cut in order to access the upper thigh bone. Then, the femoral head is dislocated from the hip socket in order to expose all of the parts of the joint. The surgeon reshapes, removes, and stabilizes the different components of the joint, secures the femoral head back into the socket, and closes the incision. The open approach typically requires a few hours to perform.
A surgeon may recommend open surgery, also known as traditional surgery, if the patient is older or shows signs of hip arthritis prior to surgery.
Additional Information
- Detecting and Treating Femoroacetabular Impingement (FAI)
- Frequently Asked Questions about Hip Pain: Femoroacetabular Impingement (FAI)
- An Examination of Hip Labral Tears: Symptoms, Treatments, and Recovery
Talk to a Hip Specialist
Only an orthopaedist can properly diagnosis hip impingement. Dr. Steve Hamilton and Dr. Drew Burleson at Beacon Orthopaedics and Sports Medicine are sports medicine physicians and orthopaedic surgeons who specialize in hip treatments. They can conduct a full examination of your hip, provide an accurate diagnosis, and recommend the appropriate treatment. If you experience hip pain or stiffness of any kind, schedule an appointment with Dr. Hamilton or Dr. Drew Burleson today.
How Active Can I Be After Joint Replacement?
July 18, 2018
A combined 280,000 joint replacement surgeries were performed in 2016, according to the American Joint Replacement Registry. While the statistics for 2017 have not been released as of this article, the numbers are expected to increase continuing a trend that began in 2012.
As life expectancies continue to rise, more people will experience conditions like arthritis and osteoporosis that damages their joints. Consequently, more people will turn to surgeons to have artificial joints put in to relieve their pain—pain that often keeps them from active lives.
Artificial joints are remarkably resilient, and it’s rare that a knee or hip replacement doesn’t last a patient the rest of their life. But care has to be taken not to put undue stress on the artificial joint, as this can wear it out much more quickly.
This article provides a list of approved activities following joint replacement surgery. This article also contains activities that require precautions as well as activities to avoid.
Activities That Are Encouraged
Yoga
Yoga is all about gentle, controlled motion and being in the moment. It will also keep your muscles flexible and strong. Because of that, yoga is the perfect post-surgery activity because it inherently decreases your risk of an injury.
Depending on whether your surgery was performed anteriorly or posteriorly, certain movements may be restricted so be sure to consult with your doctor before beginning any sort of program.
Weight Lifting
Patients are often most surprised to learn that they are not only permitted to lift weights but are encouraged to lift weights after receiving a joint replacement. In fact, lifting weights is the best thing a patient can do for the prolonged life of their artificial joint.
When done with proper form, weight lifting—also called resistance training—strengthens muscles and increases bone density, all while being relatively easy on the joints. With that said, improper form can severely damage joints, so it is imperative that you use proper form to ensure the longevity of your artificial joint.
Walking
Walking is great for your hips but patients need to be conscious of their body mechanics. Walking is a complex process that involves more than just your leg and foot—your head, shoulders, arms, spine, and hips are also engaged.
In order to walk properly, you need to walk with one leg extended in front of the other. Then, as your heel on your forward leg touches the ground, your knee should be slightly bent. This will allow your body weight to be shifted to the foot while your bent knee will absorb the shock of the step. As your leg continues forward, your knee straightens. Lifting your heel off of the ground transfers all of the force of the step to the ball of your foot. As your rear foot forcefully pushes off from the toes, you will push your body forward. Finally, the rear leg will swing forward becoming the forward leg and foot.
Proper body mechanics when walking takes into account even the most minute detail. It is a skill that you can develop over time with the help of a physical therapist.
Aside from proper form, patients of joint replacements should also remember that while walking is an excellent activity, it is not a replacement for other exercises. Walking, alongside stretching and resistance training, are essential to maintaining healthy joints.
Golf
Many people are happy to learn that they can return to golf after a hip or knee replacement; however, there are precautions that you will need to take. Knee and hip replacement patients should avoid wearing spiked shoes on the course. Spiked shoes fix the leg in place and cause torque during the swing, which will put additional stress on artificial joints.
Golfers should make certain that they have permission from their physician before they return to the green.
Bowling
Bowling, generally speaking, is easy on the knees and hips. So long as the patient has spent adequate time recovering from their joint replacement and has completed prescribed physical therapy, there should be absolutely no problem with bowling. In fact, many bowlers report feeling much better about their game after a joint replacement because they no longer have pain that interferes with their performance.
Cycling
Cycling is one of the best sources of low-impact anaerobic exercise, and with a little care, joint replacement patients can bike to their hearts’ content. However, both professional cyclists as well as hobbyists need to be wary of falling or landing on their artificial joint. Otherwise, patients are encouraged to bike as soon as recovery is completed.
Activities in Between
Running
Of all post-joint-replacement activities, running requires the most precaution. This is because running is a high-impact activity that puts intense repeated stress on the joint—the exact kind that is most likely to make a joint fail.
The truth of the matter is that the effects of high-impact activity on joint replacements are not well studied. The decision to resume running after a hip or knee replacement should be made on a case-by-case basis, and only after a comprehensive discussion with your physician regarding your personal health factors and individual level of risk. For a more definite answer, patients will need to consult their physician.
Doubles Tennis
While aggressive singles tennis should be avoided after joint replacement, doubles tennis is usually acceptable. That’s because playing tennis with a partner significantly decreases the amount of running and pivoting both players have to do. Of course, this ceases to be true if a doubles match becomes too intense and competitive. The key is to find a level of competition that is not only safe but enjoyable.
Hiking
Hiking—with restrictions—is perfectly fine after joint surgery. Keep to flat, nonskid terrain in order to avoid falling on your artificial joint. Hiking sticks can also be used to absorb some of the stress placed on the hip and knee joints.
Skiing
Skiing is much the same as hiking. With some precaution, patients should be able to ski with no problems.
Activities That You Shouldn’t Do
Any Activity Involving Aggressive Pivoting
Racquetball, singles tennis, and basketball are all examples of sports that utilize aggressive pivoting. These sports emphasize keeping one leg planted on the ground and using it as a pivot point to turn the rest of the body. Even without an artificial joint, pivoting is dangerous and often leads to injuries of the knee joint.
High Impact Lifts
High impact lifts, such as the clean jerk, places a tremendous amount of stress on the knees and hips. Even with proper form, these Olympic-style lifts should be avoided by individuals with artificial joints.
Wondering if Joint Replacement is Right for You?
While having a joint replaced is a commitment, it’s one that patients are glad they have made. Almost everyone who receives a joint replacement reports being at or beyond their pre-surgery levels of pain and strength only 9 months after the surgery.
If you are considering joint replacement surgery, Dr. Haleem Chaudhary at Beacon Orthopaedics and Sports Medicine can provide you with guidance. Dr. Chaudhary is a board-certified orthopaedic surgeon with expertise in both hip and knee replacements. In fact, he is specially trained in minimally invasive techniques that lessen post-op complications and speed up recovery.
Dr. Chaudhary is committed to helping you live the active life you want to live. Schedule an appointment to learn more.
ACL Tears and Treatments
July 13, 2018
An ACL (Anterior Cruciate Ligament) tear can be a devastating injury to an athlete or to anyone else who lives an active lifestyle. Dr. Andrew Razzano offers successful treatment options for ACL tears as well as other types of damage to the knee. Contact our Dayton office for an appointment so you can get back to your activities sooner.

The anterior cruciate ligament, or ACL, runs along the middle of the knee and prevents the shin bone from shifting forward causing instability to the knee joint. This is sometimes referred to as a “blown” knee. If the ligament receives extensive damage, the odds are high that other parts of the knee may have also been injured.
Treatment options may include bracing and physical therapy as well as surgical reconstruction of the damaged ligament.
For additional information, please watch this video:
If you need to discuss treatment options for correcting an ACL tear, contact Dr. Andrew Razzano of Beacon Orthopaedics & Sports Medicine to schedule a consultation.
What to Expect When Your Doctor Recommends Rotator Cuff Surgery
July 13, 2018
Rotator cuff surgery repairs damaged shoulders, specifically damage caused by injuries. The injury may or not be associated with sports, but the damage is often extensive. Dr. Andrew Razzano works with the staff of Beacon Orthopaedics & Sports Medicine in Dayton, Ohio. Together, they offer effective treatment options for shoulder injuries that are caused by participation in athletics or a variety of other activities.
What does the rotator cuff consist of?
The rotator cuff is a group of muscles that support and strengthen the shoulder joint. The cuff is responsible for much of the shoulder’s movements and range of motion. The teres minor, subscapularis, supraspinatus, and infraspinatus make up the “cuff,” which surrounds the actual shoulder joint.
The cuff itself protects the joint and allows for freedom of movement in almost every direction. If the rotator cuff is injured in any way, its range of motion decreases dramatically. Mobility and flexibility will also be limited until the cuff heals. If the damage is extensive, surgery may be needed to restore the cuff to its original form, allowing it to function more efficiently.
How long does a rotator cuff injury take to heal?
The rotator cuff can sometimes take from eight to 12 weeks to heal. The shoulder is one of the most versatile joints in the body. It can move in almost every direction while lifting or guiding other objects. The shoulder must also support the weight of the arm at all times.
After an injury, it can be tough to keep the shoulder immobile for the entire recovery time. Even small movements can reinjure the area and produce inflammation and scar tissue. If you have received any shoulder injury, you must carefully follow Dr. Razzano’s instructions. That includes attending physical therapy sessions and using the exercises that you learn while you’re at home.
Who is at risk for rotator cuff injuries?
Rotator cuff injuries often happen to athletes but are also likely to occur if you have a job that requires an excessive amount of physical strength and lifting. If you work as a mover or in the shipping and receiving industry, the constant lifting of heavy objects as you attempt to move them from place to place can weaken the shoulder joint, making it a prime candidate for injury.
Injury to the rotator cuff can occur when the shoulder is stretched to its limit. It’s important to stretch the arms, shoulders, and upper back before performing any intense physical activity. This floods the area with additional oxygenated blood and allows it to function more effectively.
If you need to discuss treatment options for your shoulder injury, contact Dr. Andrew Razzano for a consultation at the Dayton office.
Total Shoulder Replacement Surgery
July 13, 2018
When the damage to your shoulder is extensive and can’t be effectively repaired with rotator cuff surgery or other treatment options, Dr. Razzano and the staff of Beacon Orthopaedics offer shoulder replacement surgery as an alternative. If you live in the greater Dayton area, contact Dr. Razzano’s office to find out if shoulder replacement surgery is an option for you.
What is involved in a shoulder replacement surgery?
A shoulder replacement surgery is similar to a knee replacement procedure, with minor changes due to the joint being a ball and socket instead of a hinge.
Dr. Razzano replaces the head of the humerus with a metal ball the same size and shape as the bone that was removed. He also replaces the the socket portion of the joint with a smooth piece of plastic that’s similar in shape to what was removed.
Dr. Razzano then reattaches the connective tissues and muscles, and the shoulder is closed. The majority of ball and socket joint replacements are made of a combination of metal and plastic that allows for very fluid, smooth movement in almost every direction.
How long does a replacement surgery take to heal?
A shoulder replacement surgery takes approximately three months to heal fully. At that point, you can resume regular activities, but it’s important that you refrain from driving and other activities that cause stress or strain on the joint. While the bones will begin to heal rather quickly, it will take much longer for the connective tissue to be fully healed.
Physical therapy begins a few days after the procedure to help start the healing process. Minimal movement is important because it helps keep inflammation to a minimum and restores proper blood flow to the area. It’s important to remember that the more you move and stress the shoulder, the longer it may take for it heal.
Does a replacement surgery restrict mobility or range of motion?
A shoulder replacement surgery rarely limits your mobility. In fact, many people who have the procedure and allow it to heal correctly report that they regain much of the mobility and range of motion that they lost due to scar tissue and damage within the rotator cuff.
With physical therapy and proper exercise performed on a regular basis, you will gradually regain your ability to move your shoulder in each different direction. It may take time for the tissues to become accustomed to the movement, but once they are stronger and more resilient, your range of motion and flexibility will improve by leaps and bounds.
If you have questions about shoulder replacement surgery, contact Dr. Andrew Razzano to schedule an appointment at the Dayton office.
Shoulder Pain: Common Causes and Proven Solutions
July 13, 2018
Shoulder pain can be the result of a chronic illness such as arthritis or a sports-related injury. No matter what is causing your pain, there are treatment options available to help you restore normal movement and reduce your discomfort. Dr. Razzano works hand in hand with the staff of Beacon Orthopaedics & Sports Medicine to find positive solutions and effective treatment plans. If you live in the Dayton, Ohio area and would like to have your questions answered, Dr. Razzano encourages you to call and schedule a consultation.
What is tendonitis?
Tendonitis affects the tendons that allow the joint to function. When the tendons have been stressed or damaged in any way, they can become extremely inflamed and irritated. Tendonitis often occurs as the result of constant, repetitive movements of the joint, such as swinging a golf club or baseball bat.
If left untreated, the inflammation can cause unusual wear and tear on the ends of the bones within the joint. As the condition worsens, scar tissue can form, which limits your range of motion and flexibility. Treatment plans that include the use of anti-inflammatories and physical therapy can help reduce pain and discomfort as well as rebuild strength and improve range of motion.
When is surgery recommended?
Dr. Razzano only recommends surgery when the structural damage is so extensive that allowing the joint to heal naturally isn’t sufficient to restore proper form or function. In certain types of shoulder injuries, especially those that involve the rotator cuff, it’s difficult for the torn or stretched tendons and ligaments to heal correctly.
Dr. Razzano often considers joint replacement if the ends of the bones are damaged to the point at which they no longer move the way they’re supposed to. He can discuss your options with you and help to determine which course of treatment best suits your needs.
How is physical therapy beneficial for shoulder injuries?
The shoulder is one of the most used joints in the human body. After an injury, it can take much longer for a shoulder to heal, simply because of the stress that’s placed on it during the healing process. Regular physical therapy strengthens the muscles that move and support the joint. After a short period of restrictive movement, undergoing physical therapy will gently bring the joint back to its prior state through mild to moderate levels of exercise and stretches.
Physical therapy can help to prevent you from reinjuring the shoulder as well. After an injury, the shoulder can become stiff if it’s not used regularly. Physical therapy keeps freshly oxygenated blood circulating through the area, speeding up the healing process and reducing the amount of inflammation in the joint.
If you are experiencing shoulder pain, please contact Dr. Razzano in Dayton, OH to learn about treatment options and to set up an appointment.
Osteoarthritis: What is it and How is it Treated?
July 13, 2018
What is osteoarthritis?
Osteoarthritis affects millions of Americans each year and is thought to be the most commonly diagnosed form of arthritis. This type of arthritis is often associated with aging because it wears away the cartilage that protects the joints as a person ages.
This kind of arthritis affects many different joints but is most often found in the spine, hips, knees, and hands. It progresses over time and is often associated with a decrease in estrogen as a woman transitions through menopause. Even though the effects of osteoarthritis aren’t reversible, they can be slowed down with regular activity and various treatment options.
How does Dr. Razzano diagnose osteoarthritis?
Dr. Razzano uses several different tools to diagnose osteoarthritis. Both X-rays and MRIs are effective tools that can show the structure of the joint and where possible damage is occurring. Although cartilage isn’t visible, the narrowing between the bones of the joint can indicate its absence. An MRI does show cartilage but is only used to verify the condition of soft tissues and other structures in the joint.
Dr. Razzano uses blood tests and joint fluid analysis to rule out osteoarthritis. These tests, along with your symptoms and degree of flexibility or range of motion, can indicate whether or not osteoarthritis is present.
What are common treatment methods?
Over-the-counter anti-inflammatories and pain medications are the most common forms of treatment. While stronger pain medications are prescribed if the condition is severe, it’s been proven that many treatment options can prevent the condition from progressing to the point of being severe if patients follow through with treatments as recommended by Dr. Razzano.
He also encourages regular exercise that keeps the joints flexible. Tai chi, yoga, Pilates, swimming, and walking are just a few of the non-weight-bearing exercises that will keep pressure off of the joints while improving strength and maintaining maximum range of motion and flexibility.
Physical therapy is also beneficial, especially if you’ve received an injury or have had surgery to repair damage to the affected joint. If you need more information about treatment options for osteoarthritis, please contact Dr. Razzano to make an appointment at the Dayton office.
How to Prepare for Rotator Cuff Surgery: Everything You Need to Know
July 12, 2018
Rotator cuff surgeries have been on the rise in the United States. While surgical techniques have changed and most patients do very well, full recovery after rotator cuff repair can take 4-6 months. Your activities after surgery will be limited, too.
There are several things Dr. Razzano and his skilled team want you to know before rotator cuff surgery. But first, here’s a review of the basics.
What is the rotator cuff?
A rotator cuff is a group of muscles and tendons that form a cuff over the shoulder joint. This cuff keeps your arm safely in the joint and able to move easily. An injury or overuse of your shoulder joint can cause the tendons to tear.
Common surgical techniques used
There are three different surgical techniques commonly used for shoulder surgery. Dr. Razzano chooses the best technique based on the condition of your shoulder and other pertinent health information.
Open repair
One large incision is made for an open repair. This type of surgery is used for large or complex tears.
Arthroscopy
This surgery uses a small lens and lighting system, known as an arthroscope, to see inside your shoulder. Dr. Razzano makes a small incision to fix the tear with this system.
Mini-open repair
In this type of surgery, any damaged tissue or bone spurs are removed or repaired using an arthroscope. A medium-sized incision is made to repair the rotator cuff.
How to prepare for rotator cuff surgery
Before your surgery, our staff at Dr. Razzano’s office needs some information from you to help make your surgery go smoothly. Here are a few things we may want to know:
Medications
We’ll need a list of all medicines you take, including prescription, over the counter, vitamins, and herbals. You may be asked to stop taking certain medications, like blood thinners.
Ask Dr. Razzano which medications you should take the day of your surgery.
Health conditions
Dr. Razzano asks you for a full health history. Common conditions you need to tell him about include diabetes and heart disease.
Lifestyle
Let us know if you smoke because it can slow down healing in the bones and skin after surgery. You should also let him know if you drink more than two alcoholic drinks each day, as this can affect your overall health.
Sickness
Being sick just before or during surgery can lead to complications. Be sure to let us know if you have a cold, flu, herpes outbreak, or other concerning changes in your health up to two weeks before your surgery.
Prepare your home
When you come home after surgery, you won’t feel your best. You’ll have some pain and need to wear a sling for a few weeks. You may move a bit slowly after surgery and will be limited in the things you can do around your house. Here are few things you can do to prepare your home:
- Prepare meals ahead for 1-2 weeks and freeze them in containers. Buy easy-to-make or ready-to-eat foods like salads, cereals, fruits, and nuts.
- Practice doing daily self-care tasks like brushing your teeth or fixing your breakfast with one arm before surgery. You may feel silly doing it, but this will be a handy skill to have after surgery.
- If you don’t have grab bars in your shower, consider installing them before surgery so they can help you maintain your balance while showering. A detachable shower head works great when you are limited to only one hand, too.
- Have plenty of clean easy-to-wear clothing ready for after surgery. Break out the sweatpants, t-shirts, and slip-on shoes.
- After surgery ice will be your friend. Buy plenty of ice packs or consider buying or renting an electric ice pack. Your insurance may even cover this, so be sure to check with Dr. Razzano’s staff.
- You may find that sleeping in bed is not comfortable for the first few weeks. Some patients sleep in recliners as the upright position puts less pressure on the shoulder. If you don’t have a recliner, consider borrowing one from a friend or family member.
Dr. Razzano specializes in surgeries of the shoulder and does everything he can to prepare you for your surgery and recovery period. If you have questions before your shoulder surgery, give our office a call any time or book by clicking the “schedule appointment” button at the top of the webpage.
Five Ways to Protect Your Knees While Exercising
July 12, 2018
As two of the most complex joints in your body, your knees are built to withstand an enormous amount of pressure: They support 80% of your body weight when you stand and absorb up to one-and-a-half times your weight when you walk.
Although your knees are inherently strong, the everyday stress of having to perform under pressure leaves them prone to injury as well as a variety of wear-and-tear conditions, including degenerative arthritis.
Chronic knee pain may be a common problem among adults, especially with advancing age, but that doesn’t make it a foregone conclusion. Staying physically active and maintaining a healthy body weight are two of the best ways to keep your knees strong and healthy as you age, provided you follow a knee-friendly workout routine.
Dr. Razzano shares the following strategies that can help you protect your knees from injury and excessive wear and tear when you exercise.
Wear the right shoes
Before you hop on the treadmill or head into your next cardio dance class, take a good look at your favorite pair of workout shoes. Are they comfortable and supportive, or are they past their prime?
The negative effects of old, worn-out athletic shoes aren’t limited to your feet and ankles. In fact, because your feet, ankles, knees, and hips form a powerful kinetic chain that shapes and directs your overall body mechanics, wearing worn-out shoes can quickly lead to knee pain or exacerbate an existing problem.
Athletic shoes fall into two general categories — those that are designed for stability, and those that provide neutral support. Stability shoes contain a dense, cushioned heel and midsole that help control motion and prevent overpronation, or the tendency to roll the foot inward as it strikes the ground. While neutral shoes also offer cushioning, shock absorption, and support, they aren’t designed to correct overpronation.
To find out which type of athletic shoe is best for you, bring your old shoes to a store that specializes in athletic footwear. After looking for abnormal wear patterns on your old shoes and analyzing the way you walk, an experienced staff person can pinpoint biomechanical issues and help you find the best pair of shoes for your feet.
Warm up before you work out
Just as you wouldn’t grab the heaviest dumbbell on your first day of strength training or go for a 20-mile run in your first week of marathon training, you shouldn’t force your muscles, tendons, ligaments, and joints to work out before warming them up.
A proper warm-up is one of the most underrated features of a safe and effective exercise program. Besides increasing your body temperature and promoting blood flow to help loosen your muscles, a quick warm-up also helps lubricate and prepare your joints for exercise-related stress.
Simply walking or marching in place for five minutes before your workout begins is all it takes to reduce your risk of knee injury and prevent postexercise joint stiffness.
Avoid excessive stress and strain
If there’s nothing you like more than to crank up the resistance during your indoor cycling class, it’s time to take a step back and consider how your favorite workout may be affecting your knees.
Any activity that places excessive stress or strain on your knees increases your risk of injury and long-term joint pain, particularly if that activity has long been a part of your normal workout routine.
Even when performed properly, deep lunges, full squats, or leg extensions can be hard on your knees, as can taking extra-large steps on your gym’s stair or climbing machine. Running downhill or running on very hard or extra-soft surfaces is also rough on your knee joints.
Suddenly increasing the duration or intensity of your workouts can also place undue strain on your knees.
Learn proper form and technique
No matter what type of exercise your workouts include, proper form and technique are essential for protecting your joints. Proper form requires understanding what it feels like to maintain good posture and alignment, while proper technique means learning how to perform an exercise safely and correctly.
Runners can protect their knees from stress and injury by learning the best way to land each step, as well as how to efficiently propel their weight against gravity to move forward with ease. Likewise, cyclists can protect their knees by positioning their feet correctly on the pedals and learning how to engage both their quadriceps and their hamstrings for efficient pedaling.
Whether you’re a runner, cyclist, yoga enthusiast, or you simply like to hop on the elliptical, take time to improve your posture and learn the proper techniques for your favorite activities.
Create a well-rounded routine
Nothing puts more pressure on your knees than a one-dimensional workout routine that stresses your joints in the same way over and over again. You can avoid this common pitfall by creating a well-rounded fitness approach that emphasizes cross-training and provides ample recovery time.
If you’re an avid runner, or you regularly attend high-impact circuit training classes, you can give your knees a break by alternating these joint-intensive workouts with low-impact alternatives like swimming, cycling, Pilates, or yoga.
Besides giving your knees some much-needed recovery, cross-training also helps ensure the muscles around your knees are equally strong and flexible for optimal joint stability.
To learn more about the many ways you can keep your knees strong and healthy for years to come, call our office in Miamisburg, Ohio, or use our convenient online booking feature to schedule an appointment.
Kyphoplasty and Vertebral Compression Fractures
July 6, 2018
- What is Osteoporosis? How is it diagnosed? What are the potential complications? What treatments are available?
Osteoporosis is a disease that affects women more than men and is most often seen after the age of 50 in postmenopausal females. Risk factors for osteoporosis include a diet lacking in Calcium and Vitamin-D, certain medications such as corticosteroids, excessive alcohol consumption, and smoking. There is no cure for this bone disease that causes thinning of bones and can make them weak enough to results in fractures (breaks) of the hip, wrist, and spine. Worldwide, 1 in 3 women and 1 in 8 men over the age of 50 has osteoporosis
If you have this disease, or are at risk for it, you can learn more about its prevention, possible consequences, and treatment from your physician or orthopaedic specialist. A specialized test known as a DEXA (Dual Energy X-ray Absorption) Bone Densitometry scan can be performed to determine the mineralization of your bone. This is a non-invasive test that takes specialized X-rays of your wrist, spine, and hip and then determined the density of your bone. There are three values that may be obtained from this study including normal, osteopenia (slight loss of bone density), and osteoporosis. In additions, you doctor should consider getting a blood test looking for the amount of Vitamin-D in your system to see if this may be a cause for decreased bone density.
Treatment includes a variety of medications and behavior modification. This includes low level weight bearing exercise, a diet rich in calcium and Vitamin-D, and cessation of smoking. Medications include over the counter vitamin supplements, prescription medications (Fosamax, Actonel, Boniva), and hormone replacement.
- What is a vertebral compression fracture?
Osteoporosis is the leading cause of vertebral compression fractures. This type of spine fracture may occur in the mid (thoracic) or lower (lumbar) back and can lead to a condition known as kyphosis, when the back becomes rounded or hunched because of the collapse of the front part of the vertebrae. In addition to the deformity, the fracture can cause a significant amount of pain and prevent the routine activities of daily living. Spinal fractures are the most common fracture; there are 700,000 spinal fractures per year in the U.S of only which one-third are diagnosed.
Vertebral compression fractures can be a debilitating and painful condition leading to a chronic painful condition and eventually causing other disturbances such as poor appetite, inability to breathe deeply, depression, loss of independence, and sleep difficulties. With one fracture, there is a very high risk for developing another fracture. In addition if ambulation is affected, there is a greater risk of falling and sustaining other injuries such as breaks of the hip or wrist.
In the past, these fractures used to be treated with bed rest, pain medication, bracing, and large surgeries all of which have potential complications and do not necessarily increase function. These all have a long recovery time. Recently a new minimally invasive surgical procedure may prevent the need for the above if you are considered a candidate for the procedure.
I had a patient recently that had a minimal fall and sustained an osteoporotic vertebral compression fracture. He was admitted to the hospital and was placed on a lot of pain medication. He subsequently had to be placed on home oxygen for breathing difficulties secondary to his emphysema and the pain of the fracture. The medication did not help him that much and he did not tolerate the brace well. He was subsequently referred to me and underwent Kyphoplasty, the minimally invasive fracture stabilization, and woke up from Anesthesia not requiring any oxygen and had complete pain relief. He is now two years after his procedure and doing extremely well. He resumed his normal activities within four weeks.
- What is Kyphosis and what is Kyphoplasty?
Kyphosis is a normal alignment that is found in the thoracic spine (middle between the neck and lower back) when it is between 20-40 degrees. However, beyond 40 degrees, this may be due to a deformity of the spine. Kyphosis in the elderly results from osteoporosis as the thin bones may crack (fracture) resulting in a deformity. Extreme Kyphosis can lead to a hunched back or a “dowager’s hump”.
Kyphon (www.kyphon.com), a company from Sunnyvale, California introduced a new technology in 2000 which allows physicians to restore the normal alignment of the vertebral body and create a cavity in the vertebral body in which bone cement is placed after the balloons are removed. This procedure (kyphoplasty) allows for restoration of anatomy as well as relief of painful compression fractures. The procedure is being performed in internationally and from the time of introduction till March 2006, over 245,000 fractures have been treated worldwide.
Balloon Kyphoplasty is a minimally invasive treatment option for patients with spinal fractures that provides:
– Significant reduction of pain
– Significant increase in mobility
– Significant improvement in quality of life
- What does the procedure involve?
The procedure takes approximately 30 minutes and is done in a minimally invasive way without the use of large incisions or blood loss. The procedure may be done under general anesthesia or local anesthesia with sedation depending on your medical conditions. Two small incisions are made and a pathway is created to the vertebral body. Through these tubes, the KyphX Xpander Inflatable Bone tamp (balloons) are inserted and are slowly inflated to restore the alignment of the bone and create a space in the vertebral body for placement of the cement after the balloon has been removed. You may have an overnight stay in the hospital for pain control, antibiotics, and physical therapy. You may experience some immediate pain relief and may or may not require the use of pain medications.
- What are the indications for the procedure?
The indications for this procedure is for pain as a result of an Osteoporotic vertebral compression fracture that is either acute or subacute if there is a failure of conservative treatment such as bracing and various medications. Your doctor will need to evaluate you and determine if you are a candidate for the surgical procedure. It will be determined by your history, physical examination, overall medical condition, type and location of the fracture, and various radiology studies including X-ray, MRI, and /or Bone Scan if you are a candidate for the procedure. Other indications include pain and fractures from diseases such as Multiple Myeloma or Metastatic Cancer.
Technologies for Spinal Safety
July 6, 2018
There are several technologies that are available in assisting the surgeon to accurately place hardware in the spine in addition visualization of the anatomy. These include neurological monitoring, the use of intra-operative X-ray, and the computer assisted spine surgery often known as spinal navigation.
Neurological monitoring involves checking the peripheral nerve, spinal cord, and brain function during a surgical procedure. A technician who specializes in monitoring the nerves places small needles into the various muscle groups and the scalp once the patient is asleep. Under anesthesia, the functions of the nerves can be watched on a computer monitor to make sure the hardware is not too close to a nerve, the spinal cord and brain function is safe, and patient positioning is safe.
Intra-operative X-ray has been used for a long time to help localize the proper area for surgery, placement of hardware, and improvement of a deformity. There is radiation exposure both to the patient and to the OR personnel. Precaution is taken to avoid excessive radiation exposure.
Computer assisted surgery is a technology that has been available for many years but with improved software and X-ray technology the interaction between anatomy and the physician has become more accurate. Current technology prevents the need for a pre-operative CT scan by utilizing intra-operative 3D imaging. An intra-operative 3D image is obtained of the operative field using a minimal amount of X-ray. This then communicates with an infrared camera so that a surgeon can see a digital roadmap of the spine. The surgeon is able to track in real time the position of surgical implants and instruments in relation to the patient’s anatomy for accurate placement of hardware. The surgeon can also plan the appropriate position, length, and diameter of the screws for patient safety. In addition, there is an overall reduction of X-ray exposure to the patient and OR personnel by decreasing the number of images necessary to place hardware. The surgeon can use this technology to treat a variety of spinal conditions including degenerative disc disease, spinal stenosis, scoliosis, spondylolisthesis, and fractures.
Robotic Surgery in the spine as well as the use of Predicitve Analytics and Artificial Intelligence is still in the infancy.
Surgical Options in Cervical Radiculopathy
July 6, 2018
There are several causes of cervical radiculopathy (nerve pain radiating from the neck to the arm or shoulder blade) including a herniated disc or stenosis (tightness around the nerve from arthritis or degenerative disc disease). The two options include the more common Anterior Cervical Discectomy and Fusion (ACDF) and the Posterior Cervical Laminoforaminotmy.
The posterior approach is done via the back of the neck and can be done minimally invasively and is designed for those patients with only radicular pain without substantial neck pain. It involves removal of a small portion of the lamina and the joint to open up the space around the nerve. This is a good procedure if a patient has stenosis caused by arthritis (bone spurs) but not a herniated disc. This procedure alone does not result in a fusion but it takes time for the muscle to heal in addition to the nerve.
The gold standard in treatment of cervical radiculopathy is the ACDF. This procedure allow for direct visualization of the disc, spinal cord, and exiting nerve in a safe approach without muscle damage. However, a fusion is performed in this procedure which some suggest may lead to future degeneration at the levels above of below although this has not been proven.
The spine is approached through the front of the neck down to the level of the disc, the disc is removed along with the herniation, and the disc is reconstructed with bone graft (cadaver bone or a patient’s own bone) or an interbody spacer filled with bone graft. Other options include using no plate at all or a self retaining device (spacer with screws). Studies have shown that allograft (cadaver bone) with the use of plate results in a 95% fusion rate for a one level fusion. This is the most successful procedure that is performed in spinal surgery with good to excellent results. In certain individuals, using a disc replacement may be an option depending on the symptoms, the type of pathology in the disc and the age of the patient.
Bone graft options in this type of procedure can be either taking bone from the iliac crest (hip) or cadaveric bone or bone graft substitutes. In a review of 120 patients from my fellowship that had bone taken from their iliac crest, 80% had significant pain in the “hip” up to 6 months after the procedure with approximately 50% still having pain one year after the procedure. There have been attempts to fill the void in the bone with other substances but this did not decrease the rate of pain. Cadaveric bone is machined to fit in the space in various sizes and angle and has shown a high rate of fusion with a plate. The last option is the use of a spacer that is filled with one of the many bone graft substitutes such as demineralized bone matrix or synthetic bone.
Spinal Stenosis: Diagnosis and Treatment Options
July 6, 2018
Spinal stenosis is a common entity found in patients above the age of 50 and can involve a multitude of symptoms from radicular (in the distribution of a specific nerve roots) to neurogenic claudications (back or leg pain worsened by walking variable distances and relieved with rest or bending forward). Symptoms and signs can vary between individuals and can be temporal in an individual patient. It can present with varying degrees of lower extremity weakness, pain, dysesthesias, and dysreflexia. Spinal stenosis can occur in various places within the spinal canal including centrally, and around the exiting nerves and can lead to the multitude of symptoms.
Spinal stenosis due to aging, wear, and tear is known as acquired stenosis and can be due to abnormalities in the disc (bulging/degeneration), facets (arthritis), instability (spondylolisthesis), and ligament hypertrophy. Neurogenic claudications as a symptom of spinal stenosis can be differed from vascular claudications in that the claudications distance is variable and there is relief with sitting or flexion with proximal to distal pain opposed to vascular claudications are distal to proximal. The classic patient with neurogenic claudications is one that can walk long distances in a store when they are bent over pushing a cart. Spinal stenosis is usually not confirmed based on physical examination rather it is based on history and radiological findings.
Radiographic findings that may indicate spinal stenosis include entities such as degenerative disc disease, decrease in the size of the foramen on the lateral view, or shifting of one vertebra on top of another (spondylolisthesis). MRI and CT myelogram are the standard studies that look for tightening of the nerves centrally, in the lateral recess, or in the foramen and is used as the basis for treatment.
Non-operative and operative measures are effective at treating this slow, progressive disease. In the early stages, symptoms may be treated with physical therapy, medication or epidural steroid injection to treat the inflammatory component of the pain. This does not change the stenosis found on the MRI but can treat symptoms.
Operative treatment for spinal stenosis should be reserved for patients with progressive pain, failure of conservative care, and the need for improvement in quality of life. Traditionally surgery involves a laminectomy (opening of the posterior elements of the spine to decompress the spinal sac and the nerve roots or taking off the back part of the spine) with or without a fusion depending on the stability. There are some newer techniques but the long term results are not yet known. Treatment is individualized based on the patient’s symptoms, radiological findings, and concurrent medical issues.
For more information about Beacon Spine, please look at our website at www.beaconortho.com, call 513-354-3700.
Cervical Spine Radiculopathy
July 6, 2018
Neck pain with radiation down the right or left arm is known as Cervical Radiculopathy or what people consider a “pinched nerve”. This can result in pain in the neck travelling down the shoulder, shoulder blade, arms, and hands resulting in pain, weakness, as well as numbness and/or tingling depending on how severe and location of the which is being “pinched”. This condition can be a result of traumatic incident (motor vehicle accident) or degenerative conditions (normal wear and tear) and is usually the result of compression or irritation of the spinal nerve root.
Cervical Spine Radiculopathy may be a result of a herniated disc, degenerative disc, or arthritis of the facet joint of the neck (spondylosis). Symptoms can be worsened with certain movements like turning of the neck or neck extension. Sometimes the symptoms are made better with stretching the shoulder and placing the hand above the head. Generally cervical radiculopathy will get better with time and most do not need surgery or any type of treatment at all although symptoms may re-occur in the future.
In patients, whose pain lasts for several weeks or there is progressive pain or weakness, a consultation with a spine specialist is necessary to find the root of the problem. A good history and physical examination will allow the physician to ascertain the problem and determine the next step in the treatment process. Often times, there is an overlap of shoulder conditions with cervical spine conditions that a physical exam can differentiate.
For those patients, that do no have significant weakness or debilitating pain, generally a short trial of medication along with physical therapy can help alleviate the pain. Medications such as anti-inflammatories, oral corticosteroids, and narcotics may be used in the short term. Physical therapy may also be useful including stretching and strengthening of the neck as well as traction and other modalities. A short trial of chiropractic care may be beneficial as well.
If the symptoms, do not improve with the conservative measure, the pain is debilitating, or there is weakness, an MRI of the cervical spine can be performed to further diagnose the problems. The MRI is useful to look at the soft tissues around the spine including the nerves, the joint surfaces, and the disc. X-rays are necessary to help determine the position of the resting spine, determine the size of the discs, and note whether there is a deformity or instability of the spine. These tests will help determine the necessary non-conservative measures. In those patients that can not get an MRI, a CT scan with dye (myelogram) is the best test to determine stenosis (tightness around the nerve) and a herniated disc. An EMG (electromyography) with nerve conduction studies can help look for nerve damage due to pressure on the spinal nerve roots or any other pathology such as a pinched nerve in the elbow (cubital tunnel syndrome) or wrist (carpal tunnel syndrome).
If conservative measures fail, an Epidural Steroid Injection (ESI) may be beneficial to decrease the inflammation around the nerve to decrease the nerve pain down the arm. The common misconception is that the epidural injection will “take away” the herniated disc or “melt” the arthritis. The ESI does not change the MRI but helps decrease swelling around the nerve to hopefully lessen the pain down the arm. Studies have shown that an ESI along with physical therapy has a 60-70% chance of good to excellent results in taking care of cervical radiculopathy. Epidurals usually do not help with weakness. The recommendation is to not have more than three epidural injections in a 6-12 month period and they do not have to be done in a series of 3.
If the conservative options fail, surgery may be indicated. The type of surgery is dependent on multiple factors including, the type of problem that you have (arthritis verses a herniated disc), a history of previous surgery, and other medical conditions. This may include an Anterior (Front) Cervical Discectomy and Fusion, a Posterior (Back) Decompression and Fusion, or Disc Replacement.
Cervical Myelopathy (spinal cord compression)
July 6, 2018
Cervical Myelopathy (spinal cord compression) is a clinical syndrome that results from the disruption or interruption of the normal signals transmitted from the brain through the spinal cord. This can cause symptoms in the arms, legs, and bowel and bladder function depending on the severity of the problem.
There are many potential causes of cervical myelopathy but the most common cause is what is known as cervical spondylotic myelopathy which is caused by arthritic and degenerative changes of the spine. This may also be seen in patients with a large herniated disc that pushes on the spinal cord or in patients with a condition known as congenital spinal stenosis (born with a smaller than average spinal canal) that develop disc bulging or arthritis.
The spinal canal is an enclosed tube through which the spinal cord runs from the brain down towards the lower back. There is fluid that surrounds the spinal cord which helps nourish and protect it from trauma. Over a period of time, the spinal canal may become narrowed due to degeneration of the discs, formation of bone spurs (osteophytes), bulging or herniated discs, and thickening of the surrounding ligaments of the spine. As a result of this, the spinal cord can be compressed and the resulting clinical signs of myelopathy can occur.
Clinical symptoms may include numbness or burning of the hands, arm and leg weakness (dragging of the leg), hand weakness and clumsiness, chest wall numbness, balance issues, and urinary urgency. Diagnosis is made with a physical examination including checking reflexes, watching the patient walk, and specific tests in addition to radiologic testing to confirm the diagnosis. Sometimes on an MRI, there can be actual changes seen in the spinal cord.
Treatment of myelopathy is aimed at preventing the symptoms from getting worse and involves a surgical procedure. Often times, a disability that develops may not get better even with a surgery to take pressure off the spine. Surgery is performed in patients that have developing symptoms and radiographic studies to confirm the diagnosis. The exact procedure is determined based on the pathology causing the spinal cord compression.
Fireworks Safety
July 3, 2018
If fireworks are legal to buy where you live and you choose to use them, be sure to follow the following safety tips:
- Never use fireworks while impaired by drugs or alcohol
- Never allow young children to handle fireworks
- Older children should use them only under close adult supervision
- Anyone using fireworks or standing nearby should wear protective eyewear
- Never light them indoors
- Only use them away from people, houses and flammable material
- Only light one device at a time and maintain a safe distance after lighting
- Never ignite devices in a container
- Do not try to re-light or handle malfunctioning fireworks
- Soak unused fireworks in water for a few hours before discarding
- Keep a bucket of water nearby to fully extinguish fireworks that don’t go off or in case of fire
Better yet, grab a blanket and a patch of lawn, kick back and let the experts handle the show.
Source: https://www.nsc.org/home-safety/tools-resources/seasonal-safety/summer/fireworks
What are Pinched Nerves in the Spine?
June 26, 2018
Dr. Ian Rodway, a fellowship trained spine surgeon, addresses pinched nerves in the spine:
Nerves are an important part of the nervous system, delivering signals throughout your body from the brain through the spinal cord. Nerves can be compared to highways that deliver signals from the brain, through the spine, and out to your muscles, skin, and joints.
There are two types of nerves. The first are within the brain and spinal cord, which help comprise your central nervous system. The second type of nerves are termed peripheral nerves, and although they begin at the spinal cord, these nerves spread throughout the body. The peripheral nerves are what allow signals to travel out to muscles, organs, and extremities.

How is a pinched nerve recognized?
In short, a pinched nerve is under pressure, usually from nearby bone or cartilage. If enough pressure is applied to the nerve, it will be unable to carry accurate signals to and from the brain. This often causes sensations like numbness, tingling, or pain. Since nerves are an integral part of muscle movement, a pinched nerve can also result in loss of movement.
Since the central nervous system nerves run through the spine, pinched nerves commonly occur in the thoracic, lumbar, and cervical areas. The spinal vertebrae surround and protect the nerve roots, but when a disc begins to bulge or slip the resulting pressure can cause nerves to fail.
How to treat a pinched nerve:
Pinched nerves in the neck are common and can cause pain, numbness, or weakness in the arm and even as far as the hand or fingers. Although sometimes caused by an injury, they often develop over time without an obvious injury. Because the symptoms radiate through the shoulders and arms, patients often believe they have a shoulder problem. Unfortunately, trying to treat the shoulder won’t work if the root of the problem is a pinched nerve in the spine.
If the pain is persistent, a history and physical can often differentiate between a shoulder and a neck issue, and may lead to further testing, such as an MRI. This will help provide an accurate diagnosis and recommendation by your specialist.
Nerves in the neck can be pinched acutely by herniated discs. More chronic onset of symptoms can be due to arthritis, and bone spurs that develop over time.
Treatment usually starts with anti-inflammatory medication and physical therapy to help realign the bone or cartilage that is adding pressure to the nerve.
Sometimes platelet injections or steroids can be injected strategically to treat radiating pain. Surgery is only reserved for severe symptoms that persist despite conservative treatment. If you are a good candidate for therapy or injections, those are almost always recommended before surgery.
At Beacon Orthopaedics, we offer comprehensive spinal diagnostic and treatment options, including x-ray and MRI, physical therapy, injections and ortho-biologics, and even surgical procedures all under one roof.
Comparing Standard and Gender-Specific Knee Replacements in Women
June 14, 2018
Knee replacement surgery is considered among the best treatments for end-stage arthritis of the knee. A successful knee replacement relieves pain and restores near-full range of motion to a severely damaged knee.
When performing a total knee replacement, the surgeon must reproduce their patient’s anatomy as closely as possible. Because the anatomy of men and women’s knees vary quite a lot, it has led to the creation of gender-specific knee prosthetics. The goal of these new gender-specific prosthetics is to match the patient’s anatomy as closely as possible and minimize the risk of any complications.
However, the use of gender-specific knee replacements is still relatively new and there is no definitive answer if these types of prosthetics are more suitable than traditional replacements.
This article will provide information on the potential benefits and harms of gender-specific knee replacements.
The Differences Between Male and Female Knees
Gender-specific knee implants were developed in order to accommodate the natural anatomical differences between men and women’s knees. These differences include:
Q Angle
Q angle is the measurement of the angle between the quadriceps muscles and the patella tendon. It determines whether your knees are normal, pushed inwards, or pushed outwards.
A popular argument for gender-specific knee replacements is that men and women typically have different Q angles; however, some research has shown that this difference has been overstated in the past. In fact, some researchers theorize that the difference in angle has more to do with height than sex.
Femoral Condylar Height
The femoral condyles are the two round projections at the bottom of the femur. In the past, it was theorized that women had shorter femoral condylars than men. While research has disproven this theory, studies have confirmed that women and men have a different ML:AP aspect ratio.
ML:AP aspect ratio, also called the distal femoral aspect ratio and anteroposterior dimension, refers to the dimensions of the bottom of the femur where it connects to the knee. Gender-specific prosthetics take into account the difference in ML:AP aspect ratio between men and women, providing various fits to accommodate these differences.
Arguments for Gender-Specific Knee Replacements
Many knee replacements in women “overhang” the bottom of the femur by around 3 millimeters. According to a study published in The Journal of Bone & Joint Surgery, this overhang “doubles the odds of clinically important knee pain two years after total knee arthroplasty.”
Due to the difference in ML:AP aspect ratio between genders, some physicians theorize that standard knee replacements in women overfill the patellofemoral compartment (the divot at the bottom of the femur where the kneecap sits) and cause knee pain through soft tissue irritation. Prosthetic knees designed for this difference in ML:AP aspect ratio can better accommodate female knee anatomy and remove the overhang that has been shown to cause pain. However, at this time, there is no conclusive data to support this theory.
Arguments Against Gender-Specific Knee Replacements
Multiple peer-reviewed studies have shown that there is no significant difference in the longevity and function of gender-specific knee prosthetics compared to traditional knee prosthetics.
Moreover, an article published in Knee Surgery & Related Research specifically states that while gender-specific knee replacements do reduce femoral overhang, that reduction does not provide any measurable benefits 3-4 years after surgery.
Studies have also shown that height is a much better predictor of knee anatomy than gender. In other words, using gender as the basis for categorizing knee replacements has the potential to be extremely misleading. Also, some doctors are concerned that if knee prosthetics become gendered, men or women could reject the proper sizing for them because it was meant for the opposite sex. For example, a man may opt for a male-intended prosthetic despite a female-intended one being a better fit.
Trust Beacon for Your Knee Replacement
While it is not clear if gender-specific knee prosthetics provide improve a patient’s outcomes, the skill of the surgeon remains the most important predictor of knee replacement success. Choose a surgeon who is fellowship trained, meaning they have expertise in a particular type of joint replacement.
Dr. Haleem Chaudhary at Beacon Orthopaedics and Sports Medicine is fellowship trained in joint reconstruction from the Anderson Orthopaedic Research Institute in Alexandria, Virginia. In addition, he specializes in both full and unicondylar knee replacements. If you believe a knee replacement would be right for you, schedule an appointment with Dr. Chaudhary today.
Hip Pain, Bursitis, and Athletes
June 14, 2018
There is no one part of the body that contributes so much to an athlete’s strength, balance, and speed than the hips. The hips are quite literally the foundation upon which an athlete builds their strength. Healthy hips are essential to a successful career in sports.
Competitive athlete or not, an injured hip means activities that are typically taken for granted, such as simply squatting or bending down, become painful or outright impossible.
Nobody knows this better than Dr. Haleem Chaudhary, a joint expert at Beacon Orthopaedics and Sports Medicine. Dr. Chaudhary is a fellowship-trained joint reconstruction expert who replaces hundreds of hips each year. He fully understands the impact of a bursitis on athletes, especially collegiate and professional athletes.
This article provides information that will help you identify the signs and symptoms of bursitis as well as conservative forms of treatment.
What are Bursae?
Bursae are fluid-filled sacs located in joints. Bursae act as gliding surfaces to reduce friction between moving bones. They can be found in the body wherever there is a joint.
There are 4 bursae on each side of the hip, but this article will only focus on the 2 major ones: the trochanteric (located on the outside point of the hip) and iliopsoas bursae (located on the inside of the hip near the groin).
Bursitis occurs when bursa become inflamed, infected, and painful.
Symptoms of Bursitis
Deep, aching pain located:
- In the hip/outer thigh
- Over the outside of the hip/thigh
- On one side of the groin
Hip pain that becomes worse when:
- Lying on one’s side
- Exercising
- Pressing on the hip
- Pressing on the groin
- Rising from a deep sitting position, such as when exiting a car
- Hips are stiff
- Walking up stairs
What Causes Bursitis?
The most common hip bursitis causes are:
- A sudden hip injury or trauma, such as a fall
- Repetitive pressure on the hip, such as when running
- Rheumatoid arthritis
- Muscle imbalances that put too much pressure on one side of the hip
Bursitis is most likely to result from a sudden injury or repetitive pressure, especially among athletes.
Nonsurgical Treatments
Occasionally, bursitis requires a surgery where the doctor makes an incision and cuts away part of the swollen bursa. Most of the time, however, nonsurgical treatments are effective. The following is a list of treatments for bursitis.
Rest
As many cases of bursitis are caused by overworking/overtraining, rest is both a simple and effective solution. Oftentimes, the condition will go away on its own. Once bursitis has healed, athletes will have to take extra care not to overwork themselves in order to avoid repeat episodes of inflammation.
Ice Only
For bursitis pain that has begun in the past 24 hours, athletes can apply ice to the afflicted area for 15 minutes at a time. After an hour has passed, ice can be applied for another 15 minutes.
Do not apply ice directly to the skin, as this can cause frostbite. Instead, cover the ice or ice pack in a towel before applying to the skin.
Ice and Moist Heat
For bursitis pain that has been present for 48 hours or more, alternate ice packs and moist heat. Apply ice for 15 minutes, followed by 15 minutes of moist heat using a wet towel. You may utilize this method once or twice a day.
Moist heat is preferred over dry heat because it penetrates deeper than dry heat and has been shown to provide more relief from bursitis pain.
Avoid Acid-forming Foods
Bursitis that lasts for months at a time (or even years) is may be caused by calcium deposits near joints. Eating foods that cause the body’s pH level to become more acidic will slow or prevent the build up of calcium deposits. These foods include:
- Meat
- Grains
- Beans (Pinto, navy, mung, black, garbanzo, red, white, adzuki and broad beans)
- Cheese
- Most Nuts
- Coffee
- White Vinegar
- Apple Cider Vinegar
Dimethylsulfoxide (DMSO) Supplements
DMSO, which is a clear, colorless liquid, is another way to treat bursitis. When applied as an ointment, DMSO passes through the skin and provides relief from pain and swelling. It is also available as an oral supplement.
What to Do After Recovery
Stretches
To help prevent future episodes of bursitis, athletes should stretch both before and after exercising. Stretching will loosen the muscles and decrease stress on the hips.
Gluteal Stretch
To perform this stretch, lie on your back with both knees bent. Bring one leg up and rest the top of the ankle just behind the knee of the opposite leg. Then, grasp the knee that is not bent and pull it towards your chest. Ideally, you will feel a stretch along the buttocks of the injured side and possibly along the outside of the hip. Hold for 15-30 seconds, then repeat on the other side.
Standing Iliotibial Band Stretch
Cross one leg in front of the other, then bend down and reach towards the inside of your back foot, making sure not to bend your knees.
Hold for 15-30 seconds, then repeat on the other side.
Side-Leaning Iliotibial Band Stretch
Stand sideways near a wall, placing your hand on it for support. Place a hand on the wall for support. Cross the leg furthest from the wall over the other leg, making sure to keep the leg closest to the wall flat on the floor.
Next, lean your hips into the wall. Hold the stretch for 30 seconds, then switch sides if necessary.
Clam Exercise
Lie on one side with your knees bent and your feet together. You can put your arm under your head for support. Slowly, raise your top leg towards the ceiling while keeping your heels pressed together. Hold for 2 seconds then lower slowly. Do 2 sets of 15 reps.
Side Plank
Lie on your side with your arm at a 90º angle. Next, prop yourself up with your abs and hips, putting all of your weight on your forearm and ankles. Hold this position for at least 15 seconds, then slowly lower yourself back to the ground with your hips.
Forearm Plank
Lie on your stomach and rest all your weight on your forearms. With your legs straight, lift your hips off the floor until your body is as close to a straight line as you can get. Use your forearms and toes to support yourself and be sure to flex your abs. Hold for 15 seconds, then slowly lower yourself back to the ground.
Receive a Hip Examination
While this article provides a short list of treatments for bursitis, it is not a condition that you must treat on your own—you can turn to the experts at Beacon Orthopaedics for help. At Beacon Orthopaedics and Sports Medicine, our mission is to help you live your healthiest life. Our staff of board certified orthopedists can accurately diagnose and treat hip bursitis, as well as other conditions, so you can continue an active lifestyle.
If you have experienced any of the symptoms listed above, schedule an appointment with Dr. Haleem Chaudhary at Beacon Orthopaedics. Dr. Chaudhary will ensure that your hips remain healthy for years to come.
Is My Shoulder Pain from Arthritis or Bursitis?
June 14, 2018
Your shoulders are packed with bones, muscles, tendons, and ligaments. Shoulder pain can develop from a variety of conditions that affect one—if not many—of these structures. While this can make it difficult to pinpoint the exact source of your shoulder pain, an accurate diagnosis and proper treatment are the key to recovery.
Arthritis and bursitis are two of the most common causes of shoulder pain; however, they can be difficult to differentiate. The following article will help you determine if your shoulder pain is caused by arthritis or bursitis.
What is Shoulder Arthritis?
Arthritis is derived from the Greek word, “arthron”, which means joint and the Latin suffix “itis”, meaning inflammation. In the past, arthritis was defined by inflammation in one or more of the body’s joints. Today, arthritis has come to describe any disease that wears away cartilage, which is the smooth tissue that covers the ends of bones where they meet and reduces friction. Arthritis affects not only joints, but also muscles, tendons, and ligaments.
The three most common forms of shoulder arthritis are: osteoarthritis, which is a degenerative joint disease; post-traumatic arthritis, which is a disease that results from an injury; and rheumatoid arthritis, which is an autoimmune disease. Joint pain and limited range of motion are characteristic of every form of the disease. Additional symptoms will depend on the exact type of arthritis affecting your shoulder.
Symptoms of Shoulder Arthritis
Shoulder arthritis may cause any of the following symptoms:
- Shoulder pain that gradually becomes worse with time
- Shoulder pain that becomes worse after a period of inactivity (e.g. sleep)
- Shoulder pain with certain motions (e.g. reaching overhead)
- Shoulder tenderness and sensitivity to pressure
- Shoulder stiffness or loss of motion
- Swelling in the shoulder joint
- Muscle weakness in the shoulder
- Popping, crunching, or catching sensation in the shoulder
Osteoarthritis
Osteoarthritis—sometimes called “wear and tear arthritis” or degenerative joint disease—is the form of arthritis that is most likely to affect the shoulder, in addition to being the most common chronic joint condition overall. It is a degenerative condition that destroys the smooth articular cartilage of the shoulder, leading to pain, swelling, and immobility. In the final stages of osteoarthritis, cartilage is fully worn away and bone rubs against bone.
The risk for osteoarthritis rises steeply after age 50 in men and age 40 in women. Repetitive, occupation-related injury and physical shoulder trauma can also contribute to the development of the disease. And, as with other forms of arthritis, genetics play an important role in the development of osteoarthritis.
Post-Traumatic Arthritis
Post-traumatic arthritis is a specific form of osteoarthritis that may occur if cartilage is damaged during an injury. Sports, military, or automobile accidents can all lead to the type of injuries that result in post-traumatic arthritis; however, so can a fall or a traumatic blow to the shoulder. Chronic overuse of the shoulder as well as excess body weight can also accelerate the progression of the disease.
Rheumatoid Arthritis
Rheumatoid arthritis is an autoimmune disease that occurs when the body’s immune system mistakenly attacks the synovium membrane, which lines the cavities of joints and other structures. If left untreated, rheumatoid arthritis will eventually damage adjacent cartilage and bone, resulting in pain, swelling, inflammation, and loss of function. It is also symmetrical, meaning that it usually affects both shoulders.
It is important to note that rheumatoid arthritis can develop, progress, and worsen with minimal or no apparent symptoms. Moreover, because characteristics of the rheumatoid arthritis overlap with other conditions, it is possible for it to be misdiagnosed, allowing the disease to progress further and delaying the appropriate treatment.
What is Shoulder Bursitis?
Bursitis occurs when the bursa, a fluid-filled sac that protects the outside of a joint, becomes inflamed. While it can be caused by acute trauma to the shoulder, it is more likely to result from chronic overuse of the joint. Moreover, because the structures of the shoulder are closely packed together, inflammation that begins in one of the five bursae in joint will eventually impact the others. Therefore, shoulder bursitis is often not only the result of an injury but also likely to create additional complications.
Symptoms of Shoulder Bursitis
Shoulder bursitis may cause any of the following symptoms:
- Shoulder pain located at the top and outside of the joint
- Shoulder pain that is triggered by movement or repetitive motion
- Shoulder pain that gradually becomes worse
- Shoulder tenderness and sensitivity to pressure
- Shoulder redness and warmth
- Muscle weakness in the shoulder
- Fever (if caused by an infection)
The subacromial bursa is the largest bursa in the body and is highly susceptible to bursitis. It is located below the acromion, the large bony projection on the scapula (shoulder blade). This is why the majority of pain associated with shoulder bursitis occurs at the top and outside of the joint and radiates down the arm. It should also be noted that, although bursitis is the result of inflamed soft tissue, visible swelling is rare. Shoulder bursae do not have to be much thicker than normal to cause pain and so it is unlikely that you will have any visible signs aside from some minor redness.
Athletes, first and foremost, face the greatest risk of developing bursitis. This is particularly true of baseball pitchers, tennis players, and swimmers. Their greater than average risk is the result of not only their activities on the field but also from hours of repetitive, physically demanding training all year round. Moreover, the risk of bursitis is not limited to collegiate and professional athletes. Rapid growth, decreased flexibility, training errors, and overspecialization in one sport or activity can also contribute to a young athlete’s risk of developing bursitis.
Manual laborers, especially those who use their shoulder to perform overhead motions, are also prone to develop bursitis. This includes, but is not limited to, construction workers, factory workers, and painters.
Even hobbies and household chores can lead to bursitis if the shoulder is not given adequate rest. Examples include cleaning, gardening, and hanging clothes to dry. It is important to take note of what activities at home involve your shoulder and make an effort to space them apart.
Is it Arthritis or Bursitis?
In the most general sense, arthritis is a long-lasting condition that affects bones and cartilage while bursitis is a transient condition that affects bursae, tendons, ligaments, and muscles.
Arthritis |
Bursitis |
|
|
|
|
|
|
|
|
|
|
Talk to a Shoulder Specialist
Dr. Robert Rolf is a board-certified shoulder specialist at Beacon Orthopaedics and Sports Medicine who can accurately diagnose your shoulder pain as arthritis or bursitis. He will talk to you about your symptoms, perform a comprehensive physical examination, and prescribe the appropriate treatment. You can schedule an appointment online to meet with Dr. Rolf.
Proper Batting Mechanics to Avoid Hip Injuries in Baseball
June 14, 2018
Batting is an extraordinary display of body mechanics, power, and timing. Each time a batter goes to swing, they load a tremendous amount of momentum to the backside of their body in the hopes of achieving an explosive hit. While the amount of force that is transferred from the ground to the player’s leg, to their hips, and ultimately to their hands cannot be physically seen, the sight of a baseball being launched off of a bat at 100mph is nothing short of incredible.
High school, collegiate, and professional baseball players must repeat this cycle thousands of times over the course of their career. The amount of stress that batting places on their hips, when repeated over and over, can lead to sudden, painful injuries such as strains or chronic conditions such as tendonitis.
Unfortunately, the stress of overuse is far too often compounded by poor body mechanics. Many batters use techniques that increase their risk of a hip injury. In fact, in some cases, the batter may have never been taught proper technique in the first place.
This article will explain proper baseball hitting mechanics that will not only lower your risk of a hip injury but also lead to more home runs.
Proper Body Batting Mechanics
Stance
Your stance is the foundation for your swing. While every player has their own unique style, every stance utilizes the same muscles and mechanics to build load. Regardless of which stance you use, it is important that you pay close attention to the distance between your feet, foot position, knee bend, shoulder level, and hand grip. A proper stance at the start of your swing will help you safely and efficiently transfer energy from the back of your leg to your hips later.
Feet Distance and Position
Position your feet a little more than shoulder width apart, with your toes slightly pointing in. This provides the lower half of your body with the room it will need later in the swing. It will also shift the weight of your body to the balls of your feet and off of your heels. Concentrate your body weight on the ball of the inside foot, in particular, since the impact of the hit begins where the foot connects to the ground.
Take caution not to point your toes out, especially if it is a habit that you have developed. Pointing your toes out will shift the weight of your body onto your heels and result in a weaker swing. Additionally, a stance that is too wide will also diminish your hitting power.
Knee Bend
Bend your knees slightly so you are comfortable and so the rest of your body is stacked up and down. Your hips should be stacked over your knees and your shoulders should be stacked over your hips. Keep your eyes parallel to the ground and your shoulders level.
Keep your body as vertical as possible and do not bend at the hip. A vertical position allows you to rotate faster and generate more force in your swing.
Shoulder Level
Position your shoulders to be level with one another. Avoid dropping your back shoulder below the front shoulder. Conversely, avoid any stance that causes your shoulders to be “uphill”, meaning the front shoulder is higher than the back shoulder. Imbalanced shoulders can cause problems in the load, path, and stride associated with a swing.
Grip
Keep a firm grip on the bat at all times. Your hands should not be too far above your back shoulder or too close to your waist.
Hip Movement
The energy for a swing starts in the back leg and is transferred up to the hip and ultimately into the hands. While a proper stance allows more potential energy to be stored up for a swing, the hips are the direct source of hitting power.
Cocking the Hips
The most important movement of the hip—the cocking of the hips—occurs during the load phase of a swing, after the backward rotation of the spine but before the cocking of the wrists. It occurs simultaneously with the beginning of the timing step.
Your hips should cock as you move your lead foot to stride, turning your front knee to help the hips rotate back. When you cock your hips, you rotate the hips away from the pitcher and toward the catcher. The action should be driven by the momentum that is created by the backward movement of your shoulders and arms, the rotation of your spine, and the shifting of your body weight to the back leg. Another way of thinking about this movement is that you’re opening your hips while you shift your body weight. Your hips should open before your shoulders.
All too often, baseball players make the mistake of just swinging their hands while their hips remain stationary. Another common mistake is letting the front hip do all of the work. These mistakes not only create less power but frequently result in hip strains, sprains, tendonitis, bursitis, and other injuries. Moreover, poor form is rarely isolated to just one phase of a swing. A hitter who does not properly use their hips is often making other mistakes that can harm their legs, knees, feet, and ankles.
Practicing Proper Body Mechanics
The square stance is often the first stance a player learns and is arguably the easiest stance to learn proper batting mechanics with because it involves the least amount of movement. Once you master proper body mechanics with the square stance, you can apply your technique to other stances. Ideally, your stance should make you feel stable, comfortable, and confident at the plate.
If you are uncertain if you are performing the correct movements at the correct time, consider talking to a hip specialist or physical therapist who specializes in sports medicine. A specialist can demonstrate the proper mechanics to you and can ensure that you perform each movement correctly.
Talk to a Hip Specialist
Proper batting technique is perhaps one of the hardest concepts to teach in baseball. For many of us, our batting habits began at an early age. By the time we are in high school or college, it is not only difficult to learn new habits, but we are often coping with the pain and damage caused by years of improper mechanics.
Ultimately, proper batting technique will propel you ahead of the competition and help you enjoy a long sports career. Dr. Steve Hamilton at Beacon Orthopaedics and Sports Medicine knows this first hand because he has helped a countless number of high school and college athletes prevent injury, improve their technique, and achieve even greater success in their sport than ever before. You can rely on Dr. Hamilton for top quality sports medicine.
Schedule an appointment with Dr. Hamilton to discuss ways you can prevent hip injuries or for the treatment of an existing injury.
Questions Athletes Should Ask Before Knee Replacement Surgery
June 14, 2018
For the ordinary patient, knee replacement surgery can allow them to return to a comfortable lifestyle; However, many patients who still compete athletically at an advanced age may question their post-surgery abilities.
Surgery of any kind is a major event, and for athletes it can be particularly daunting. How long until I can return to competing? Will I be able to return to my original level of performance? How long will the artificial knee joint last? These questions, of course, are in addition to all of the typical questions that any patient would ask prior to knee replacement surgery.
Fortunately, knee replacement surgery is not only a highly effective treatment but also one that has become routine, especially for treating severe knee arthritis and other conditions that would otherwise end an athlete’s career. While surgery is not appropriate for every patient, it can be extremely beneficial for those who are suitable candidates.
To ensure that you receive the best long-term outcomes, it is important that you ask the right questions about both the surgery and your surgeon. The type of surgery you receive, as well who and where you receive treatment, are all factors that will determine your return to competition.
This article contains a list of questions that athletes should ask their physician regarding knee replacement.
What are the benefits of a knee replacement in terms of pain relief, function and mobility?
First and foremost, the purpose of knee replacement surgery, which is also called knee arthroplasty, is to relieve chronic, debilitating joint pain and restore essential joint function. During the procedure, the surgeon removes painful, diseased tissue with an artificial joint called a prosthetic. The artificial joint relieves pain, restores the patient’s mobility, and provides better shock absorption during movement. All of these benefits contribute to an overall improvement in the patient’s quality of life.
Patients who would benefit the most from a knee replacement have significant or irreversible joint damage caused by end-stage osteoarthritis, rheumatoid arthritis, post-traumatic arthritis. Moreover, surgery is sometimes needed to repair a patella fracture (broken kneecap), which is the most common form of knee fracture.
What will happen if I don’t have a knee replacement now?
Arthritis is a progressive disease and there is no cure. While conservative treatments can slow the progression of arthritis, symptoms will become worse with each passing day. Surgery is necessary to remove arthritic tissue and effectively stop the spread of the disease.
Moderate arthritis causes joint pain, inflammation, swelling, and muscle weakness that can limit physical activities. During later stages of arthritis, the cartilage that typically prevents bones from rubbing against one another is completely worn away. The affected joint may also fill with inflammatory fluids that cause additional pain, swelling, and stiffness. These factors lead to loss of joint function and disability.
In the case of fractures, pieces of bone may be displaced, or out of place. A surgeon will need to manually position the pieces back into place so the bone can heal correctly. If left untreated, the bone will heal in the wrong of position or develop a deformity. Similar to late-stage arthritis, severe fractures can lead to loss of joint function and disability. The patient will not experience improvements until they receive surgery.
What can I expect during knee replacement surgery?
In general, knee replacement surgery is performed in eight steps.
Step 1: Make an incision in the knee.
Step 2: Rotate the patella (knee cap) to view the knee joint.
Step 3: Remove damaged bone and cartilage from the femur (thigh bone) and shape it for the implant.
Step 4: Implant the metal femoral component.
Step 5: Remove damaged bone and cartilage from the tibia (shinbone) and shape it for the implant.
Step 6: Re-adjust the patella and fit it with an additional plastic piece.
Step 7: Close the incision, apply a bandage, and prepare the patient for recovery.
It is important to note that the exact details of your procedure will depend on whether it is a total knee replacement or a partial knee replacement. For a better idea of what to expect, learn more about choosing between total or partial knee replacement.
Knee replacement surgery may also be performed as an outpatient surgery, which is also called same-day surgery, allowing patients to return home in less than 24 hours after their procedure. Beacon Orthopaedics and Sports Medicine, for example, performs all surgeries in an outpatient setting. While the steps of the procedure remain the same, it places a greater emphasis on pre-surgery preparations. As a result, patients can expect to save on the cost that is typically associated with a hospital stay and spend more of their time recovering in the comfort of their own home.
What can I expect during recovery and rehabilitation from knee replacement surgery?
Recovery is a gradual process and most patients require at least 12 weeks in order to achieve a full recovery. The surgeon will prescribe a comprehensive recovery program that includes precautions and physical therapy. Precautions limit or prohibit activities that can potentially damage the knee implant. Physical therapy has three purposes:
- Reduce post-operative pain
- Strengthen muscles, reduce stiffness, and restore range of motion in the knee
- Educate the patient in regards to proper body mechanics and knee preservation
It must be stressed that a strict adherence to these guidelines will ensure the fastest recovery and best long-term outcomes.
Rehabilitation begins within 24 hours of surgery. A physical therapist will teach patients how to get in and out of bed, how to walk with an assistive device, and exercises that will strengthen their muscles. A nurse will train the patient how to change their bandage as well as how to dress, bathe, and use the toilet with limited knee function. In the case of outpatient surgery, these lessons often begin prior to surgery.
While the recovery process will vary by patient, there are typical milestones.
Week 1-3: Patients will experience some discomfort at the surgical site and will need to RICE the surgical leg when immobile. Patients will be mobile via a rolling walker and will gradually progress to using a single crutch or cane as they near the end of the third week.
Weeks 4-6: Patients will experience a significant decrease in pain and swelling. Patients will be able to perform normal activities (maybe with the assistance of a cane for long periods) around their home more easily and most are able to drive an automobile.
Weeks 7-11: Patients may return to basic activities that require physical exertion, such as gardening, walking, etc., without the use of an assistive device.
Week 12 and Beyond: Patients who have been diligent about physical therapy may be cleared by their physician for swimming, bicycling, golf, and other athletic activities.
Conservative, at-home treatments may be used to aid the recovery process. For a list of treatments, refer to Beacon’s comprehensive recovery protocol for knee injuries.
Will I be able to return to my sport?
This, of course, is the question that every athlete must prior to a knee replacement.
Fortunately, athletes can take assurance in knowing that knee replacement surgery is a routine orthopaedic procedure. Each year, approximately 700,000 knee replacement procedures are performed in the U.S. Many athletes return to a near pre-injury level of performance with proper adherence to their recovery program.
Aside from physical therapy, the skill of the operating surgeon will have the greatest impact on a patient’s outcomes. In other words, a patient’s choice in orthopaedist will determine not only if they can return to sports but also what level of competition. To that end, it is critical that athletes select a knee surgeon who specializes in sports medicine.
Recommended Reading
- Know When You Need Surgery: Conditions Treated by Knee Replacements
- Knee Surgery: Choosing Between Total or Partial Knee Replacement
- The Benefits of Partial Knee Replacements
- Comprehensive Recovery Protocol: Knee Injuries
Talk to a Knee Replacement Specialist
This article provides you with a list questions that you should your orthopaedist when discussing knee hip replacement surgery. The next step is to schedule an appointment with a knee specialist.
Dr. Haleem Chaudhary at Beacon Orthopaedics and Sports Medicine is a board-certified orthopaedic surgeon with expertise in total knee replacement, partial knee replacement, kneecap replacement, and revision knee replacement. Dr. Chaudhary is also well-experienced in minimally invasive techniques, which are ideal for athletes who must quickly resume competition. Schedule an appointment and rest assured that you will receive expert care.
The Most Common Hip Injuries in Athletes
June 13, 2018
Fortunately, it takes a considerable amount of force to seriously damage a healthy hip. The large muscles of the thighs, lower back, and buttocks all help protect the hip from injuries. So, when a hip injury does occur, it is more likely to be caused by chronic overuse of the joint and its associated muscles rather than a direct, traumatic injury.
Hip inflammation and injury is very common in athletes such as cyclists, runners, swimmers, baseball players, and golfers. High-performance athletes, especially those who compete in professional and college sports, must take extra precaution to avoid injuries. In the most severe instances, a hip injury can lead to debilitating pain, loss of hip function, and—for athletes, in particular—the end of an athletic career.
This article contains a list of common hip injuries in athletes. If you experience the signs and symptoms of any of the conditions listed below, it is recommended that you talk to a hip specialist.
Sprains and Strains
A sprain is a stretching or a tear in ligaments. By contrast, a strain is a stretching or a tear in muscles. Sprains and strains are classified into three grades depending on their severity:
- Grade I – Mild stretching or microscopic tears accompanied by mild pain. The joint functions normally.
- Grade II – Moderate stretching or tears accompanied by pain. The hip may periodically give out while standing or walking.
- Grade III – The ligament, muscle, or tendon is completely torn. The hip can no longer bear weight.
Signs and symptoms of a hip sprain or strain include:
- Hip pain, tenderness, and weakness, especially when walking or climbing stairs
- Hip swelling, inflammation, and bruising
- Muscle spasms in the hip
- A limp while walking
- A visible muscle deformity (in severe sprains or strains)
The symptoms of hip sprains and strains will vary based on their severity.
The majority of sprains and strains start as microscopic tears. Chronic overuse of the hip causes these tears to gradually increase in size until the ligament, muscle, or tendon ruptures, or completely tears from the bone. Hip sprains and strains are common in sports that require repetitive use of the lower body, such as cycling, running, swimming, baseball, and golf.
Low-grade sprains and strains are often so mild that they don’t require treatment from an orthopaedist. In these instances, simply taking a break from activities that stress your hips for a few weeks may be all you need. Cold therapy can also help relieve symptoms and speed up the recovery process. However, if your pain and swelling doesn’t subside after a few weeks, or if your hip interferes with your ability to complete everyday activities, schedule an appointment with a hip specialist.
Tendonitis and Tendinosis
Hip tendonitis is inflammation of any of the hip tendons, or the strong fibrous tissue that attaches muscle to a bone. Tendonitis occurs when the body’s immune system increases the flow of blood to an injured tendon, causing inflammation in the joint.
Hip tendinosis is the non-inflammatory degeneration of a tendon. Tendinosis degrades the tendon, causing changes in the structure or composition of the tendon.
Similar to strains and sprains, tendonitis and tendinosis are frequently caused by overuse of the hip. Both conditions can also be caused by acute physical trauma, although this is less common. Long-distance runners, swimmers, baseball players, tennis players, and golfers have a higher than average risk of these conditions.
Signs and symptoms of hip tendonitis and tendinosis include:
- Pain in the hip, back, or leg
- Hip pain that gradually develops over time
- Hip stiffness, swelling, and inflammation
- Heat and redness around the tendon
- Visible lumps along the tendon
Both tendonitis and tendinosis can be treated with RICE (rest, ice, compression, and elevation) and physical therapy. You can also lower your risk of recurrent injuries by adequately stretching before exercise and strengthening the muscles in your hips, legs, and lower back.
It is important to note that NSAIDs (non-steroidal anti-inflammatory drugs), such as ibuprofen and naproxen, as well as cortisone injections, are suitable treatments for tendonitis but not for tendinosis. This is because tendinosis is non-inflammatory and NSAIDs will not help tendons heal. In fact, some experts advise against using NSAIDs to treat tendinosis because they inhibit the growth of callogen, which is necessary for tendon healing.
It should also be stressed that tendonitis and tendinosis heal at different rates. Tendonitis typically heals in about 6 weeks with proper treatment. Tendonosis typically heals after 3-6 months. If you experience the signs and symptoms of these conditions, schedule an appointment with an orthopaedist. A hip expert will ensure that your condition is accurately diagnosed and that you receive the appropriate treatment.
Bursitis
Hip bursitis is inflammation of bursae, which are fluid-filled sacs that cushion muscles, tendons, and ligaments against bone. Similar to other inflammatory conditions, bursitis is commonly caused by chronic overuse of a joint. Although less likely, bursitis can also occur from acute trauma or infection.
The trochanteric bursa and the iliopsoas bursa are the two major bursae located in the hip. The trochanteric bursa is located on the bony tip of the hip called the greater trochanter. The iliopsoas bursa is located on the inside, or groin side, of the hip. This is why bursitis pain is felt in the hip or thigh, outside the hip or thigh, or on one side of the groin.
Signs and symptoms of hip bursitis include:
- Hip pain and stiffness that becomes worse with repetitive motions
- Pain when pressing on the hip or groin
- Pain when lying on one’s side
- Pain when walking up stairs
- Pain when rising from a deep sitting position
The symptoms of bursitis only last for a few weeks if the hip is allowed to rest. Similar to the treatment of tendonitis, RICE can help manage symptoms while the body heals itself. Strengthening your hip, leg, and back muscles can also help prevent future episodes of bursitis.
Iliopsoas Tendinitis
The iliopsoas muscle, which consists of the psoas major muscle and the iliacus muscle, are the primary hip flexor. The psoas major originates in the lumbar (lower) region of the back and attaches to the femur (thigh bone). The iliacus originates in the pelvis and also attaches to the femur. Because both muscles function together, they are collectively referred to as the iliopsoas muscle. The iliopsoas muscle allows you to walk, sit up straight, and rotate your thigh laterally.
Iliopsoas tendonitis, is caused by repetitive use of the hip. It causes inflammation of the iliopsoas muscles and leads to the gradual development of hip pain. Iliopsoas tendonitis is common among long-distance runners, bicyclists, and athletes who regularly squat.
Talk to a Specialist
Hip injuries are a reality of sports. Fortunately, many hip injuries can be prevented by simply reducing the amount of stress placed on the joint. Strengthening the muscles surrounding your hips, adequately stretching before exercise, and maintaining proper body mechanics both during your workouts and on the field can also help reduce your risk of an injury.
Dr. Steve Hamilton is a board-certified hip specialist at Beacon Orthopaedics and Sports Medicine who can treat you for any of these common conditions. Dr. Hamilton can also diagnose and treat labral tears, osteoarthritis, post-traumatic arthritis, and fractures. Schedule an appointment to meet with Dr. Hamilton for an evaluation and treatment plan that is personalized to you.
Issues Around the Hip: From Tendonitis to Bursitis
June 13, 2018
The hip is the largest ball-and-socket joint in the body. Its functions are twofold: it supports and stabilizes the body along with facilitating movement of the upper leg.
To an athlete, the hip is indispensable. Even less active sports, such as golf, depend on a healthy hip for maximum efficiency. Unfortunately, since athletes depend so much on their hips, they are more prone to injuring a hip due to their increased physical activity.
Dr. Hamilton at Beacon Orthopaedics & Sports Medicine is no stranger to hip problems in athletes. He specializes in, among other orthopaedic surgeries, minimally invasive hip repair. The following article contains information from Dr. Hamilton regarding common hip complications and what actions athletes can take to prevent injuries.
Anatomy of the Hip
In the most general sense, the hip joint is a ball-and-socket joint that is formed where the thigh bone (femur) meets the three bones of the pelvis: the ilium, the ischium, and the pubis. The femur has a spherical tip that fits into the socket formed by the hipbone.
Bony Structures:
Trochanter
The trochanter is a spur on the femur just before the ball of the femur forms.
Ischium
The ischium is the curved bone forming the base of each half of the pelvis.
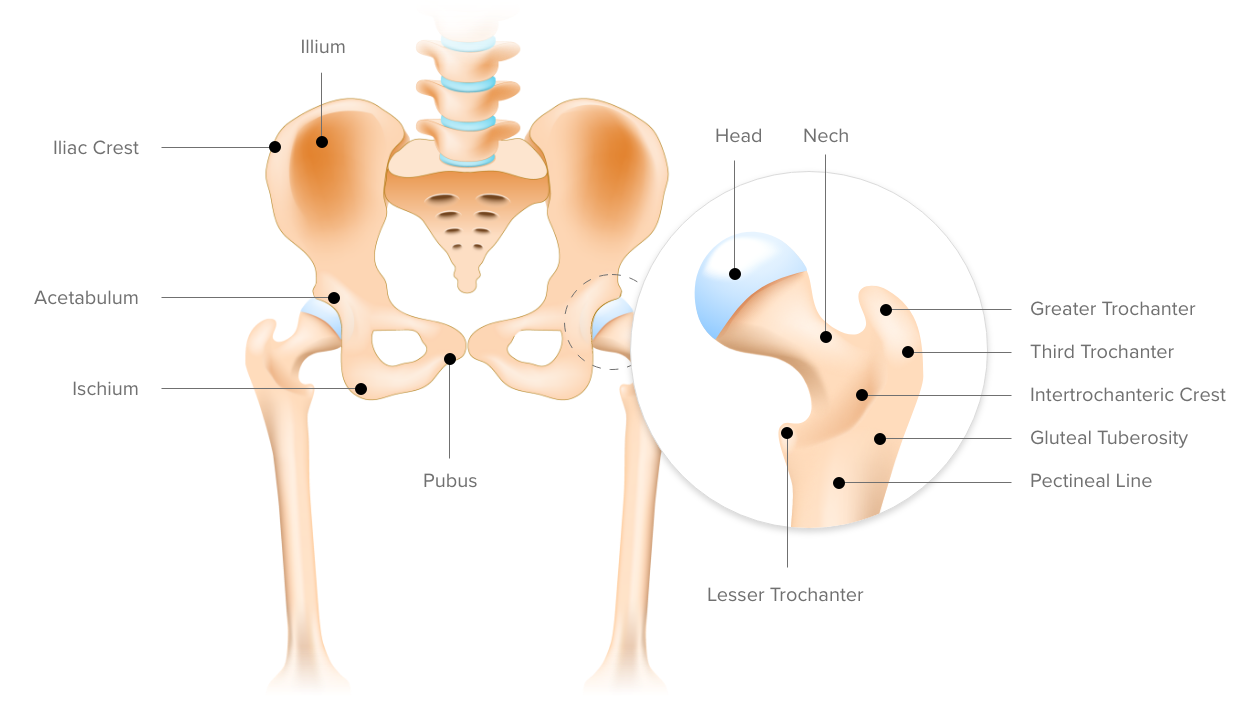
Muscles:
Iliopsoas
The iliopsoas muscle is a powerful hip flexor that runs across the top of the hip joint and works to pull the knee up and off the ground. It’s made up of two muscles: the psoas and iliacus. These muscles run from the lower spine and pelvis, join together, then attach by a tendon to the upper thigh.
The iliopsoas is a workaholic muscle. Throughout the day it’s constantly activated by forward motions like walking, running and leg lifting. It also picks up the slack when weaker muscles can’t perform their movements effectively, which lead to overworking and injury.
Rectus femoris
The rectus femoris is of the four quadriceps muscles that attach to the kneecap (patella). It helps to extend the knee and flex the hip.
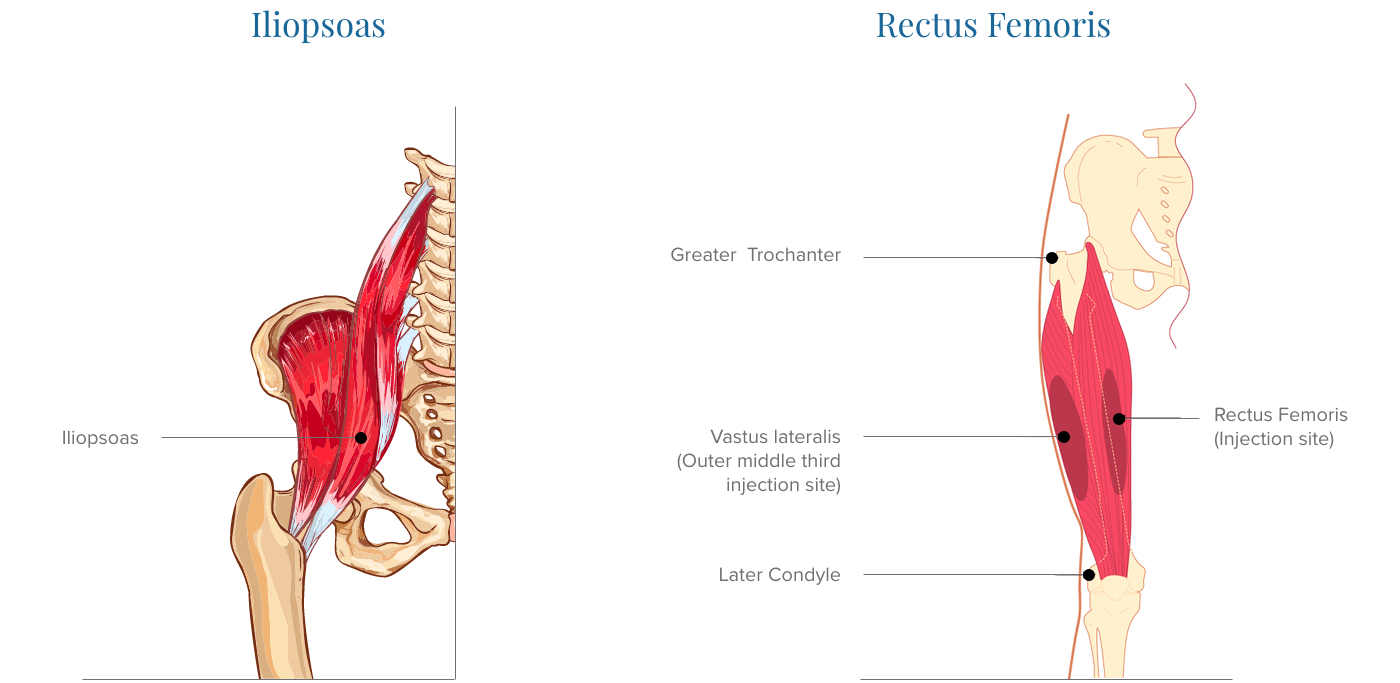
Sartorius
The sartorius is the longest muscle in the human body. It runs down the entire length of the front of the thigh. It assists with hip flexion, abduction, and lateral rotation of the hip, along with flexion of the knee.
Aside
The iliopsoas, rectus femoris, and sartorius are the three biggest/most important muscles of the hip flexors. These muscles, unsurprisingly, are responsible for the action of flexing the hip joint.
Piriformis
The piriformis is a small muscle that runs from the sacrum to the outside of the hip.
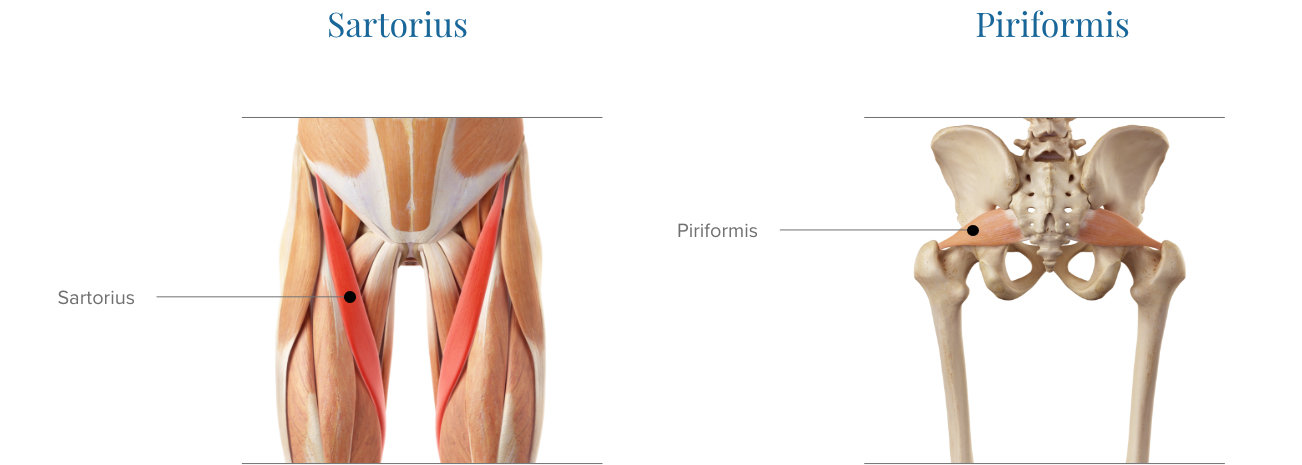
Bursae:
Bursae are sacs filled with an egg-white-like substance called synovial fluid. Bursae typically act as lubricators between bones and other structures, such as muscles or ligaments, but they also reduce friction between tendons, ligaments, and muscles. Bursae are named after the bone they envelop.
Trochanteric bursa
It is of the two major bursae of the hip. It is located on the outside point of the femur, called the greater trochanter.
Ischial bursa
It is located in the upper buttock area. It’s a deep bursa located over the ischium and lies between the M. gluteus maximus and the ischial tuberosity.
Common Hip Conditions
Iliopsoas Syndrome
Oftentimes, pain felt in the lower back, hip, and thigh actually has its origin at the iliopsoas muscle, earning the muscle the nickname “hidden prankster.” When either the iliopsoas bursa or the tendon connecting the iliopsoas to the upper thigh get inflamed, it becomes painful to use the muscle, which causes pain to be felt in the front of the hip whenever the leg is raised. A snapping or clicking sensation may also be felt during movement. Iliopsoas syndrome is most likely to affect track and field athletes, cyclists, triathletes, dancers, and tennis players due to their repetitive hip movements.
Hip Bursitis
Hip bursitis is a condition where one or more of the hip’s bursae become inflamed and painful. This pain is typically felt on the outside of the hip and later radiates down into the thigh.
Symptoms of hip bursitis also include joint pain/tenderness. Injured athletes will see swelling and feel warmth around the injured area. The pain is sharp at first, but later dulls and becomes achy. The pain is worst when getting out of a chair or bed, sitting for a long time, or after sleeping on the injured side.
Bursitis can either be acute or chronic. Acute bursitis is fast, flaring up and going away after mere hours (or in some cases, days). Chronic bursitis is slower and lasts longer—anywhere from a few days to several weeks. It can also return unexpectedly after a few weeks or months without any pain.
What Causes Hip Bursitis?
- Rheumatoid arthritis
- Gout
- Pseudo gout
- A sudden hip injury
- Diabetes
- Bone spurs (bony growths on top of normal bone) on the hip
- Spine problems (like scoliosis)
Trochanteric bursitis
Trochanteric bursitis occurs near the top of the femus, and it causes pain and tenderness of the outer hip and thigh. One of the more unfortunate side effects of trochanteric bursitis is that those who have it have a hard time laying on the afflicted side, which makes sleep very difficult. Excessive walking, exercise, or stair climbing often makes the painful symptoms worse. The most common causes of trochanteric bursitis are sudden hip injuries, bad posture, or extra stress (typically caused by arthritis, excess weight or uneven leg lengths)
Ischial bursitis
The ischial bursa is located in the upper buttock area. Ischial bursitis can cause dull pain in this area that is most noticeable when climbing uphill. The pain sometimes occurs after prolonged sitting on hard surfaces, which has earned the condition the nicknames “weaver’s bottom” and “tailor’s bottom.” Ischial bursitis is most commonly caused by sitting on a hard surface for a long time. The hard surface presses against the ischial bursa, causing irritation and eventually bursitis.
Piriformis Syndrome
Despite being such a small muscle, the piriformis can cause massive problems when inflamed or overused. Because the piriformis runs over the sciatic nerve, it tends to put pressure on the nerve, which causes extreme pain around the gluteus and posterior hip area when the piriformis swells or spasms. Long distance running and prolonged sitting are the two most common reasons one develops piriformis syndrome.
Hip Flexor Injuries
A hip flexor injury occurs when one (or more) of the hip flexor muscles are torn. The iliopsoas is the one that is most commonly injured, though. The amount of pain felt and how much functionality is lost depends entirely on how many muscle fibers are torn. When a small number of fibers get torn, function mostly stays the same (despite it still being painful). If enough fibers are torn, though, the injury becomes much more painful and is accompanied by a severe loss of function in the leg.
Pain from hip flexor injuries is typically felt in front of the hip/groin area and might also be accompanied by bruising, muscle spasms, and tenderness. Hip flexor injuries often make it difficult to walk normally.
While any athlete (or nonathlete) can wind up with a hip flexor injury, they are most common in athletes who do a lot of kicking, running, or jumping (which are all activities that engage the hip flexors).
Another common contributor to hip flexor injuries is weakness of the supporting muscles. When someone sits for long periods of time every day, the hip flexor muscles stay contracted for long periods of time, shortening and weakening them, making injuries far more likely.
Hip Flexor Tendonitis
Hip tendonitis is the inflammation of any tendon that’s a part of the hip flexors. It is typically accompanied by degeneration. The most common symptom of hip flexor tendonitis is pain that gradually develops over time. Often this pain will decrease after activity as the tendons get more blood and stretch out, though the pain frequently returns worse later.
Ways to Prevent Hip Injury
Because of the diversity of hip injuries and possible causes, it is impossible to completely prevent hip injuries, however, there are three actions that drastically reduce an athlete’s risk of developing a hip injury:
- Stop when fatigue sets in
- Take care to use proper biomechanics
- Warm up and stretch. (stretching isn’t effective at preventing injury unless a warm up routine is also present)
Exercises to Prevent Hip Pain
Because of the complexity of the hips and the different ways that different sport athletes use their bodies, it’s important to note that there is no catch-all hip pain prevention technique. But exercises, such as the following, can help relieve hip pain:
- Bridge with alternating hip flexion
- Abdominal crunches
- Single and double knee to chest (supine) figure four piriformis stretch
- Seated butterfly stretch
Dr. Hamilton is Your Local Hip Expert
If you’re an athlete who is concerned about their hips, reading this article was an important first step towards understanding and ultimately preventing hip damage. The next step, whether you’ve been injured or not, is to schedule an appointment with Dr. Hamilton at Beacon Orthopaedics & Sports Medicine. If you’re injured, Dr. Hamilton and his team of experts will walk you through exactly what needs to happen for you to get back to the field (or court, green, or ice). Dr. Hamilton can help you prevent future injuries so you can stay in the game longer and achieve your personal best in whatever sport you specialize in.
Shoulder Trauma and Recovery: Fractures
June 13, 2018
 Shoulder pain is far too common. Unfortunately, the discomfort of a stiff, painful shoulder is often made worse by the frustration of pinpointing its exact cause. The shoulder can be injured in a variety of ways, including dislocations, labral tears, rotator cuff tears, rotator cuff tendonitis, shoulder impingement, frozen shoulder, and shoulder osteoarthritis. This article will focus on shoulder fractures and will help you determine if your pain is caused by a broken bone.
It is important to keep in mind that only an orthopaedic specialist can diagnose your pain. Schedule an appointment with a shoulder specialist for an accurate diagnosis and comprehensive treatment.
Anatomy of the Shoulder
The shoulder is made up of 3 bones, including:
- The clavicle (collarbone) which is a long, thin bone that begins at the base of the neck and continues to the shoulder.
- The humerus (upper arm bone) which runs from the shoulder to the elbow.
- The scapula (shoulder blade) which is a triangle-shaped bone that connects the clavicle and humerus.
Shoulder fractures can affect any of these bones as well as nearby muscles, ligaments, and tendons.
Shoulder Fractures
Types of Shoulder Fractures
A fracture is a broken bone. It can range from a small crack, also known as a hairline fracture or a stress fracture, to a complete break in the bone. Breaks can occur in any of the three shoulder bones:
- Clavicle fractures are a common type of shoulder fracture. A break in the collarbone commonly occurs when a person falls on their shoulder or with their arm stretched out. A clavicle fracture is also typically associated with a bump or protrusion.
- Humerus fractures are also a common type of shoulder fracture. A break in the humerus is classified as either proximal humeral fractures or humerus shaft fractures based on whether the break occurs close to the shoulder joint or in middle portion of the bone respectively. A break in the humerus is often the result of a high-energy event, such as a direct blow to the shoulder or a traumatic motor vehicle accident. Proximal humeral fractures, in particular, are also common among the elderly who are suffering from osteoporosis
- Scapula fractures are very rare. This is primarily due to the joint’s mobility and the thick layers of muscles surrounding the bone. A heavy, blunt force—such as a high-speed vehicular accident or a fall from a great height—is typically required to break the scapula.
Moreover, fractures are described as either displaced or non-displaced. The majority of shoulder fractures are non-displaced, meaning that the bone fragments remain near their correct anatomic position. Displaced fractures, however, require a physician to manipulate the bone back to the correct position.
Symptoms of Shoulder Fractures
All shoulder fractures involve one or more of the following symptoms:
- Severe pain that often becomes worse with arm movement
- Swelling or bruising at the fracture site
- Deformity (such as a bump or protrusion) at the fracture site
- Inability to move the arm
- Grinding sensation when moving the shoulder
Complications Caused by Shoulder Fractures
The most common complications caused by shoulder fractures are:
- Poor shoulder function or immobilization occurs when the arm is unable to move through its full range of motion.
- Shoulder stiffness develops due to the limited movement following a fracture.
- Post-traumatic arthritis is a specific form of osteoarthritis that results from injury. Arthritis will continue to cause pain, swelling, stiffness, tenderness, and joint instability long after the fracture has healed.
Complications related to bone healing and alignment may also occur. These include:
- Malunion occurs when a bone heals in the wrong position.
- Delayed union refers to a fracture that takes longer than usual to heal.
- Nonunion refers to a fracture that fails to heal.
Inadequate immobilization of the shoulder, blood supply, and nutrition all contribute to a patient’s risk for these conditions. Use of tobacco or nicotine can further inhibit bone healing and increase a patient’s risk for complications.
It’s also important to understand that all fractures damage nerves, blood vessels, and soft tissue. Rotator cuff tears occasionally occur at the same time as a fracture. And, although rare, diminished blood supply to bones can lead to a serious, life-threatening complication called avascular necrosis. Avascular necrosis, also called osteonecrosis or aseptic necrosis, causes bones to become painful, weak, and eventually collapse. These conditions can further complicate a fracture and should be treated early.
Treatments for Shoulder Fractures
Conservative treatments are used to treat shoulder fractures, regardless of their severity. These treatments include:
- Immobilization to keep bone fragments together and in the correct anatomical position. A physician will typically recommend a sling, splint, or cast for 2 to 4 weeks. An immobilization device may be recommended for longer, depending on the location and severity of the fracture.
- Physical Therapy helps restore shoulder motion and strength. Physical therapy typically starts 2 to 3 weeks after the injury occurs.
- Nonsteroidal Anti-Inflammatory Drugs (NSAIDs) are used to relieve mild to moderately severe pain.
Many shoulder fractures heal in approximately four months with non-surgical treatment; however, some shoulder fractures require surgery in order to heal properly. Minimally-invasive shoulder fracture repair and shoulder replacement surgery are effective options for treating severe breaks and many possible complications.
Talk to a Shoulder Specialist
If you are experiencing pain in your shoulder, ask yourself these questions:
- Are you able to move your arm through its full range of motion?
- Are you able to successfully perform normal, everyday activities with your shoulder?
- Do you experience a sharp pain in your shoulder?
- Does the pain increase with movement?
- Does the pain persist through the night?
- Do you experience a grinding sensation in your shoulder?
- Do you notice an obvious deformity in your arm or shoulder?
These are signs of a serious shoulder injury.
Schedule an appointment with Dr. Robert Rolf if you are concerned that you may have a shoulder fracture. Dr. Rolf is a board-certified orthopaedic surgeon at Beacon Orthopaedics & Sports Medicine with expertise in shoulder reconstruction and replacement. Patients can meet with Dr. Rolf at Beacon’s Batesville, Lawrenceburg, or Northern Kentucky location as well as Beacon West in Harrision, Ohio. Dr. Rolf also offers Shoulder Talks at Beacon West. Visit Dr. Rolf’s page for more information on his free shoulder talk seminars or to schedule an appointment today.
Total Hip Replacement: From Surgery to Recovery
June 13, 2018
About 1/4th of Americans report having hip pain most of the time, according to the third National Health and Nutrition Examination Survey. While a significant number of respondents were over 60 years old, many were significantly younger than that.
Arthritis has long been the most common cause of hip pain. However, muscle imbalances—brought on by the stiffening of hip flexors after extended periods of sitting—are also wreaking havoc on Americans’ hips.
Hip pain tends to stick around, too. Many causes of hip pain irreparably damage the ball-and-socket joint of your hip. Since it’s almost impossible to avoid using your hip (you use it both when standing and sitting down), a damaged hip can mean a lifetime of painful movement—unless, that is, the hip is replaced.
Modern surgical techniques allow doctors to remove the damaged parts of the femur and ball and socket joint and replace them with an artificial ball and socket. In fact, Dr. Haleem Chaudhary at Beacon Orthopaedics & Sports Medicine is an expert at performing the procedure. He even worked to pioneer an anterior approach to the surgery.
If you are considering hip replacement surgery, the following article provides a timeline of what to expect during surgery. This timeline will also provide you with a sense of what recovery will be like.
Day of Surgery
On the day of the surgery, the patient will arrive at the hospital or Beacon’s surgery center about an hour before their scheduled surgery time. Once the patient arrives, the nurses will help them prepare for surgery.
Once they’re ready, the patient will be administered their pain management and anesthesia. They will quickly fall asleep.
The surgery will be performed once the patient is under anesthesia. A small incision will be made over the hip to expose the joint, the damaged, arthritic bone will be removed from the joint and an artificial ball and socket will be inserted.
After the procedure is completed, the surgeon will clean and dress the incision site. Then, the patient will be taken to the recovery room where they’ll wake up from the anesthesia. For more information about how the surgery is performed, visit Dr. Chaudhary’s physician page or check out this animation.
After Surgery
Within 24 hours of their surgery, patients will typically be able to stand and walk (with assistance).
Dr. Chaudhary recommends beginning physical therapy the day after surgery in order to facilitate recovery. At the start of physical therapy, therapists will teach the patient how to move safely in order to protect their new hip joint. Patients will have 2-3 physical therapy appointments over the course of 6-8 weeks.
Patients will also wear knee high compression hose on both legs, 24 hours/day for the first two weeks, to prevent blood clots. After the first two weeks, patients should wear compression hose only when they are up and moving around for an additional week.
Patients who have surgery at Beacon’s Surgery Center will leave the facility within 23 hours. Patients who have surgery at a hospital will typically stay about three days. A physician will determine whether or not a patient is ready to return home based on the following criteria:
- Get in and out of bed by themselves
- Have acceptable pain control
- Be able to eat, drink, and use the bathroom
- Be able to walk (using an assistive device) on a level surface and be able to climb up and down two or three stairs
- Be able to perform the exercises prescribed by the physical therapist at home
- Understand all instructions given by the doctors and therapists to prevent injury and ensure proper healing
Once home, patients will likely need some assistance with daily tasks. Beacon Orthopaedics encourages patients to arrange for a friend or family member to stay with them for the first few days/week to assist.
2 Weeks After Surgery
By this point, many patients are completely off of narcotic pain medication and are really progressing in physical therapy.
Most patients are able to drive by this point; however, others may need as much as eight weeks of recovery before they can resume driving. Before a patient can drive, they must be off narcotic pain medication while driving, and their reflexes and muscle strength should be returned to pre-surgery levels.
Work can also be resumed by this point, though more time may be required if the patient works a particularly labor-intensive job.
1.5 Months After Surgery
After about six weeks, patients should be able to put most of their full weight on their leg, which means they will also be able to return to light activity and maybe even walk without some sort of aid.
By this point, patients will be allowed to cross their legs again. This has been prohibited until the six-week mark because it pinches the hip joint and can damage the hip implant.
3+ Months After Surgery
By this point, most patients report that the mild swelling that has persisted up until this point has gone away. However, this is not always the case; sometimes the swelling takes up to six months to go away.
By this point, patients should have graduated from their physical therapy program. However, we recommend that patients continue doing their exercises, as they will further strengthen the hip and improve quality of life. Patients can return to many activities that require physical exertion with the approval of their physician.
85% of patients report that they have less pain and more mobility three months after hip replacement surgery than before it. This number increases even more after six months.
Think Total Hip Replacement is Right for You? Schedule a Consultation Today
The previous timeline is a generalization of the steps a patient will go through while recovering from total hip replacement. For more specific details about what you can expect at Beacon Orthopaedics & Sports medicine, schedule an appointment with Dr. Chaudhary today. He and his team will meet with you personally, describe the procedure, and answer any questions you might have.
Total Shoulder Replacement Recovery Plan
June 13, 2018
Total shoulder replacement surgery, also known as total shoulder arthroplasty, is an effective way of treating permanent joint damage caused by arthritis. It can relieve the severe pain and stiffness in a patient’s shoulder and allow them to return to sports they enjoy such as baseball, golf, or swimming.
While the long-term benefits of a shoulder replacement cannot be overstated, patients must also consider how a replacement will affect them during the months immediately following their procedure. Recovery does not happen overnight—it’s a gradual process. Patients must be willing to limit or modify their activities as they slowly regain shoulder strength and mobility. Moreover, participating in physical therapy will not only help ease shoulder pain and help restore shoulder function in the short-term, but it will also help the patient preserve their new joint for years to come.
This article provides general recovery guidelines for shoulder replacement surgery. It is important to note, however, that there are many types of shoulder replacement surgery, including:
- Total shoulder replacement (traditional shoulder arthroplasty)
- Reverse shoulder replacement (reverse total shoulder arthroplasty)
- Partial shoulder replacement (stemmed hemiarthroplasty)
- Shoulder resurfacing (resurfacing hemiarthroplasty).
The recovery guidelines that you will be expected to follow may vary based on the type of surgery you receive. For a detailed explanation of what you can expect, talk to a shoulder specialist.
Before Surgery
The majority of your recovery period will be spent at home. At Beacon Orthopaedics and Sports Medicine, total shoulder replacement is performed in an outpatient setting so patients return home even sooner. Since you will not be able to use your arm for several weeks, making preparations at home will make the recovery process a little smoother.
Equipment and Supplies
Take note of activities in your daily routine that require the use of your arm and plan accordingly. It is highly recommended that patients of total shoulder replacement surgery have:
- Detachable showerhead. You will need to keep your incision dry so a detachable showerhead is helpful. Moreover, you may consider a large waterproof bandage or a second sling that you can leave to dry between showers.
- Many patients find it helpful to sleep in a reclined position because it puts less strain on the shoulder. This can be achieved by bolstering your lower and mid back with pillows. You may also find it comfortable to prop your injured up on a pillow while sitting.
- Packaged or frozen food. You should continue to eat fresh meals when possible; however, having packaged or frozen food provides you with convenient options.
- Clothes that button or zip. Having clothes that you can button or zip, instead of pulling over your head, will make dressing a lot easier.
- Velcro strap shoes. Tying shoelaces with only one hand is inconvenient. Consider shoes that you can easily slip on and off.
In general, you should stock up on supplies that you use regularly. Most patients cannot drive for 6 to 8 weeks after surgery, so you may need to depend on others when supplies are low.
Assistance and Monitoring
Identify several family members and friends who will assist you during your recovery. These individuals will help you around the house and drive you where you need to go for the first several weeks after surgery. Expect to need a lot of assistance on both the day of your surgery as well as the immediate days following it, and gradually need less as you return to normal shoulder function.
After Surgery
Incision Care
Keep the bandage over your wound clean and dry. Your physician may restrict you from taking a shower for the first few days after your surgery; however, you may be advised to change the bandage every day. Do not shower until your physician gives you permission. When you do, let the water run over the incision and do not scrub.
Contact your physician immediately if you experience any of the following:
- Bleeding that soaks through your bandage and does not stop with applied pressure.
- Pain that does not go away with pain medicine.
- Moving or shifting in your new shoulder joint.
- Temperature higher than 101°F (38.3°C). This is a possible sign of an infection.
- Tenderness, redness, or pain in your calf, chest pain, and/or shortness of breath. These are all signs of a possible blood clot.
Precautions and Physical Therapy
In order to ensure a fast recovery and the best possible outcome, it is imperative that you adhere to the recovery plan outlined by your physician. The plan will include precautions to help protect your new joint as well as physical therapy to restore shoulder strength and mobility.
Recovery is a gradual process. Typically, it takes at least 4 – 6 months for a patient to return to their pre-injury level of activity. In some cases, it may take as long as 9 – 12 months to make a full recovery. In either case, it is important that you maintain realistic expectations about your progress. The following is a general recovery timeline for total shoulder replacement surgery. For a more specific timeline, see Dr. Rolf’s list of physical therapy protocols.
Phase I: Immediate Post-Surgical Phase (Weeks 1 – 4)
Precaution: Prevent the arm from moving with use of a sling
Your arm will continuously be in a sling for approximately the first four weeks following surgery. Always use the sling when you are walking or standing. If you are sitting or lying down, you can use a pillow to support your arm. You will gradually use your sling less as you near the end of the phase.
Precaution: No lifting or weight-bearing on the operated arm
During this phase, you will have no active range of motion (AROM) in your shoulder. In other words, you will not be able to move your shoulder on your own. At this time, a physical therapist will also begin working with you to restore passive range of motion (PROM) in your shoulder. PROM refers to your ability to move your shoulder with assistance.
Phase II: Early Strengthening Phase (Weeks 4 – 6)
Precaution: No heavy lifting or weight-bearing on the operated arm
Precaution: No sudden jerking movements in the operated arm
Your physical therapist will also begin exercises with you to gradually restore AROM in your shoulder. Typically, patients can lift objects no heavier than a coffee cup by this point.
Phase III: Moderate Strengthening Phase (Post-6 Weeks)
Precaution: No heavy lifting in excess of 5 lbs. with the operated arm
Precaution: No sudden jerking movements in the operated arm
Your physical therapist will continue to work with you to focus on gradually increasing shoulder strength, endurance, and functional mobility.
Phase IV: Advanced Strengthening Phase (Post-12 Weeks)
Precaution: Ensure gradual progression of shoulder strength
You should continue to exercise 3 – 5 times a week. At Beacon Orthopaedics, a physical therapist can create a customized routine of sport-specific training exercises for you. This will include ways to preserve your new joint for specific sports such as baseball or golf.
Talk to an Orthopaedic Specialist
Of course, recovery from a shoulder replacement does not happen in a vacuum—nor should it. While this article provides a broad overview of the many factors that influence your recovery, perhaps the two most important factors are your individual health and your choice of orthopaedic surgeon. Only a discussion with a qualified orthopaedist can answer those questions.
Dr. Robert Rolf is a board-certified orthopaedic surgeon at Beacon Orthopaedics and Sports Medicine who provides extensive expertise in total shoulder replacements. Dr. Rolf can provide a comprehensive examination of your health and discuss what you can expect during recovery. For your convenience, Dr. Rolf meets with patients at Beacon’s Batesville, Lawrenceburg, or Northern Kentucky locations as well as Beacon West in Harrison, Ohio. Schedule an appointment online to meet with Dr. Rolf.
Frequently Asked Questions about Anterior Approach Hip Replacement
June 13, 2018
Total hip replacement, also called hip arthroplasty, has become a widespread procedure in recent years due to its proven, long-term effectiveness in treating hip pain. In fact, the overall prevalence of the procedure, alongside methodological and technological innovations, has made hip replacement one of the most versatile surgeries that exist.
Today, there are several effective approaches to total hip replacement but the anterior approach is quickly becoming one of the most popular, especially among elite athletes and those who rely on their hip for their occupation. The anterior (from the front) approach provides a faster recovery, less post-operative pain, and much less limitation of motion (lower risk of dislocation).
This article will answer frequently asked questions about anterior approach hip replacement, particularly the differences between an anterior approach and traditional hip surgery.
What is the Anterior Approach for Hip Replacement Surgery?
Anterior hip replacement, also referred to as a direct anterior hip replacement and anterior supine intermuscular (ASI) hip replacement, involves an orthopaedic surgeon accessing the hip joint by entering through the front of the body and going through the hip muscles that stabilize the hip joint.
First, the surgeon will make a small incision approximately 3 to 5 inches long on the front of the upper thigh. Next, the surgeon will spread the muscles (not cut through them) surrounding the hip joint and then insert specially designed instruments, including a tiny camera called an arthroscope, into the natural space between them. By working between muscles, the anterior surgical approach can be performed without cutting tissue. After the surgeon gains access to the hip joint, they will resurface, remove, and replace the damaged bone. Finally, the surgeon will close the incision.
The surgery typically requires 1 to 2 hours as well as an additional 1 to 2 hours for preparations and recovery in the operating room.
What are the Advantages of an Anterior Approach?
An anterior approach provides the same long-term benefits as a traditional approach; however, it also provides a number of short-term benefits that are ideal for athletes and professionals who need to resume their activities quickly.
Less Damage to Muscles
Because there are fewer muscles on the front side of the hip, the surgeon does not need to cut or remove tissue in order to access the joint.
Compare this to a traditional hip replacement where the incision is made either at the back or the side of the hip. A traditional replacement requires muscles and tendons to be detached from the hip, leading to increased post-operative pain, delayed recovery, and higher risk of dislocation.
Less Postoperative Pain
Since the incision is relatively small and muscles are sparred during an anterior approach, patients experience less postoperative pain and often require less pain medication as well.
Faster Recovery
Naturally, patients are able to achieve a full recovery sooner because there’s less tissue that needs to heal in the first place. Total recovery time for an anterior approach is approximately four weeks which is about half of the time it takes with a traditional approach.
Shorter Hospital Stay
After traditional hip surgery, a patient will typically stay in a hospital for 3 to 5 days. At Beacon Orthopaedics and Sports Medicine, hip replacement surgery is performed in an outpatient setting. Outpatient hip replacement, also called a same-day hip replacement, allows the patient to receive surgery and return home in about 24 hours. Many patients prefer this for three reasons:
- The patient is able to recover in the comfort of their own home.
- The patient is able to avoid the cost of a hospital stay.
Lower Risk of Hip Dislocations
Since anterior hip replacement surgery does not disturb the muscles that hold the joint in place so there is a significantly lower risk of dislocations. This also means that there are fewer postoperative restrictions on what activities a patient can engage in.
What are the Risks of an Anterior Approach?
An anterior approach is not ideal for everyone. As with all forms of surgery, there are serious risks to consider, including:
- Bleeding
- Blood Clots
- Nerve Damage
- Infection
- Fracture
- Dislocation
- Change in Leg Length
Note that these complications can also occur during traditional hip replacement.
While the general risk of a complication increases with age and a history of smoking, it is also highly dependent on factors that must be evaluated on a case-by-case basis. To determine if an anterior approach is appropriate for you, schedule an appointment with Dr. Chaudhary.
Who is a Candidate for an Anterior Approach
In general, candidates for hip replacement surgery have pain and immobility that impair or prohibit everyday activities. Candidates for an anterior approach, in particular, tend to be younger and in otherwise good health apart from their hip problems. Moreover, candidates must be willing to participate in postoperative physical therapy. A physical therapist will not only help the patient regain hip strength and mobility but also teach them how to preserve their new joint.
An anterior approach may not be ideal for individuals who are obese or extremely muscular. This is because additional soft tissue can make it difficult for the surgeon to access the hip joint. It also may not be ideal for patients who have previously received a traditional hip replacement.
Key Points
- Anterior hip replacement is performed at the front of the hip. This differs from a posterior hip replacement which is performed from the back.
- Anterior hip replacement is minimally invasive. Since the incision is small and muscles are not cut, healing and recovery occur sooner.
- Anterior hip replacement provides additional short-term benefits. While the long-term results are typically the same as a traditional hip replacement, these short-term benefits are often ideal for professionals and athletes who must resume their activities quickly.
- The skill of your surgeon as well as postoperative physical therapy will significantly impact your outcomes.
- Anterior hip replacement is not suitable for all patients. Your physician will determine if you are a candidate for minimally invasive surgery.
Talk to an Orthopaedic Specialist
As with any surgery, the most important factor is not the approach used but the skill and the experience of the surgeon. Moreover, your participation in postoperative physical therapy will also have a significant impact on your recovery and help you preserve your new hip joint.
At Beacon Orthopaedics and Sports Medicine, we provide you the best in each of these areas ensuring you an optimal recovery. Dr. Haleem Chaudhary is a board-certified orthopaedic surgeon who specializes in joint reconstructions, replacements, and revisions. In fact, Dr. Chaudhary worked to pioneer anterior approach hip replacements in the Greater Cincinnati region. Dr. Chaudhary will work with you as well as a premiere team of physical therapists to put you on the fast track to recovery. Schedule an appointment with Dr. Chaudhary today.
Tendon Injuries in the Shoulder FAQ
June 13, 2018
The shoulder is the most flexible joint in the human body. It consists of the three bones: the clavicle (collarbone), the scapula (shoulder blade), and the humerus (upper arm bone). It also consists of four joints: the glenohumeral joint, acromioclavicular joint, sternoclavicular joint, and scapulothoracic joint. These structures allow you to move your arm up and down, in front of you, toward the back, and in circles. This wouldn’t be possible, however, without powerful tendons and muscles.
The rotator cuff is a group of four muscles and tendons that help move and stabilize the shoulder joint. The rotator cuff muscles include the:
- Supraspinatus which assists in moving the arm away from the midline of the body.
- Infraspinatus which assists in the external rotation of the arm.
- Subscapularis which assists in the internal rotation of the arm.
- Teres Minor which assists in the external rotation of the arm.
These tendons and muscles in the shoulder are subject to frequent stress each and every day. Activities at home (e.g. cleaning, painting, and gardening), activities at the workplace (e.g. lifting boxes), and recreational activities (e.g. golf, tennis, and swimming) can all contribute to a shoulder tendon injury.
What are the common muscle and tendon injuries in the shoulder?
The most common muscle and tendon injuries in the shoulder include:
- Rotator Cuff Tendinitis
- Shoulder Bursitis
- Shoulder Impingement Syndrome
- Rotator Cuff Tears
While these conditions are closely related, there are key differences among them.
Rotator cuff tendonitis and shoulder bursitis are both forms of soft tissue inflammation caused by either direct shoulder trauma or—more commonly—minor, repetitive trauma. In fact, inflammation due to overuse is so common, especially among athletes, that it is also called tennis shoulder, pitcher’s shoulder, and swimmer’s shoulder.
Tendonitis refers to inflammation of shoulder tendons while bursitis is inflammation of bursae, or the fluid-filled sacs that act as cushions within joints. Symptoms include pain, stiffness, swelling, and limited range of motion.
Shoulder impingement syndrome occurs when rotator cuff tendons are pinched between the upper arm bone and the shoulder blade. Consequently, this can also cause tendons to become inflamed leading to tendonitis or bursitis. It’s important to note, however, that while impingement is likely to lead to soft tissue inflammation, it can also occur without it.
Rotator cuff tears are classified in several ways depending on their cause and severity. Rotator cuff tears can either be traumatic (resulting suddenly from an injury), chronic (resulting from overuse), or degenerative (resulting from age-related tissue weakening). Moreover, a tear is classified as either a partial thickness tear (an incomplete tear) or a full thickness tear (a complete tear where the tendon is separated from the bone).
Who is at risk of a shoulder injury?
There are several factors that increase an individual’s risk. These include:
- While younger patients are subject to shoulder injuries, older patients face a higher risk due to the degenerative weakening of soft tissue as well as years of wear and tear. Degenerative disorders tend to begin at age 40 and become increasingly more common as people age.
- Prolonged use of the shoulder can cause small tears in soft tissue to gradually increase in size. This is especially common in occupations (e.g. painting) and sports (e.g. baseball) that require repetitive overhead movements.
- Smoking decreases the flow of blood and oxygen to soft tissue in the body. This makes tissue more susceptible to injury and slows the healing process. It also makes it difficult to build muscle that can prevent future injury.
Despite these risk factors, shoulder injuries are not limited to a specific demographic—accidents can happen to anyone. Falling on an outstretched arm or receiving a direct impact to the shoulder will cause an injury. It is crucial that you consult an orthopaedist following these incidents.
How do you know you have tendonitis or bursitis?
Rotator cuff tendonitis and bursitis share similar signs and symptoms. These include:
- Pain and swelling in the front of your shoulder
- Pain from raising or lowering your arm
- Shoulder stiffness and redness
- Loss of mobility and strength in the affected arm
- Pain that interferes with sleep
Patients with tendonitis may also experience a “clicking” sensation within their joint.
How do you know you have impingement?
Signs and symptoms of shoulder impingement include:
- Sudden pain when lifting your arm
- Constant ache in your arm
- Shoulder or arm weakness
- Pain that interferes with sleep
How do you know you have a rotator cuff tear?
Signs and symptoms of a rotator cuff tear include:
- Pain and swelling in the front of your shoulder
- Pain that continues to increase over time
Do shoulder injuries heal on their own?
Mild to moderate cases of tendonitis and bursitis can heal on their own with a combination of rest, conservative treatments, and patience. Mild tendonitis requires approximately 6-8 weeks to heal. Moderate tendonitis may require up to 12 weeks.
Rotator cuff tears are more difficult to generalize. This is primarily due to the fact that tears vary greatly in size, from microscopic injuries to complete ruptures in which the tendon is completely torn from the bone. Moreover, there is the possibility that the first injury leads to a secondary tear. It is best to consult a shoulder specialist if you suspect a torn muscle or tendon.
How do you treat shoulder injuries?
First and foremost, take a break from activities that repetitively stress your shoulder. Also, stop any activity that causes your tendons to flare up. If your occupation or sport requires you to use your shoulder, modify your activities to reduce the strain on your tendons as much as possible. In most cases, you will need to make long-term adjustments in order to avoid recurrent injury.
The RICE (rest, elevation, compression, and elevation) method can also help reduce symptoms and expedite recovery. The RICE method includes:
- Applying ice or a cold pack to your shoulder for 20 minutes every 3 to 4 hours
- Compress your shoulder with an elastic bandage
- Elevate your shoulder above the level of your heart when sitting or lying down
While the majority of shoulder injuries improve with conservative treatments, more severe injuries such as full-thickness rotator cuff tears do not heal on their own. These injuries require professional treatment from a shoulder specialist.
When should you see a shoulder specialist?
A healthy shoulder is vital for a number of occupations and sports, let alone everyday living. Unfortunately, shoulder tendons and muscles are highly susceptible to injuries that cause pain and disability. Moreover, certain conditions can occur without obvious signs or symptoms. Early diagnosis and treatment are key to maintaining an active lifestyle.
Dr. Robert Rolf at Beacon Orthopaedics & Sports Medicine is available to answer all of your questions regarding muscle and tendon injuries in the shoulder. You can attend one of Dr. Rolf’s monthly, free Shoulder Talks at Beacon West. Visit his page for a list of upcoming dates. You can also schedule an appointment with Dr. Rolf for a complete evaluation of your shoulder.
Non-Arthritic Hip Conditions
June 13, 2018
Hip pain is often thought to be a part of the natural aging process. This may be due in part to the prevalence of hip osteoarthritis, or “wear and tear” arthritis, that can occur as early as a patient’s 20s and continue to worsen with age. It most commonly begins in a patient’s 40s and 50s and affects most people by age 80.
While joint pain is commonly associated with degenerative, age-related arthritis, the fact of the matter is that hip pain is not limited to arthritis nor is it limited by age. Hip pain can occur at any age and as the result of a number of conditions.
Hip pain is never normal. Even a dull ache or an episode of inflexibility can be a sign of a more serious medical condition. The sooner you are diagnosed by an orthopaedist, the sooner you can start down the road to recovery. Here is a list of non-arthritic hip conditions that you can discuss with a hip specialist.
Hip Sprains / Strains
A sprain or strain refers to the stretching or tearing of soft issue. Specifically, a sprain refers to an injured ligament while a strain refers to an injured muscle or tendon.
A hip sprain or strain results from a direct and forceful impact to the hip, repetitive use of the joint, or stretching the hip beyond the range of motion that it is intended to tolerate. Both sprains and strains are classified according to their severity:
- Grade I – The ligament, muscle, or tendon features mild stretching and microscopic tears, but the hip continues to function normally.
- Grade II – The ligament, muscle, or tendon is partially torn, leading to periodic giving out of the hip while standing or walking.
- Grade III – The ligament, muscle, or tendon is completely torn or ruptured. The hip can no longer bear weight.
In the majority of cases, a hip sprain or strain may begin as a small tear that gradually worsens with prolonged use of the joint.
Symptoms of Hip Sprains / Strains
- Pain in the hip that results from sudden movement
- Pain in the hip that increases with activity
- Pain in the hip when moving your leg backwards
- Tenderness in the hip
- Swelling and bruising in the hip
Treatment for Hip Sprains / Strains
Mild and moderate sprains and strains (grade I and grade II) often resolve on their own within three to six weeks. RICE (rest, ice, compression, and elevation) can help relieve pain, reduce swelling, and expedite the healing process. RICE can also be used to treat other mild orthopaedic injuries, including knee injuries. Read Comprehensive Recovery Protocol: Knee Injuries for more information.
Severe sprains and strains (grade III) typically require surgery followed by a rehabilitation program. The length of time that an individual need in order to recover depends on several factors, including the type of procedure they received, their participation in a rehabilitation program, and their overall health prior to their injury.
Hip Fractures
A hip fracture is a break in the bones and cartilage that compose the hip joint. Most hip fractures are caused by falls—such as slipping on ice—although the type of direct, traumatic blows to the hip that occur within a number of sports can also cause bones to break. While the severity of a fracture will depend on the extent of the break, hip fractures commonly cause pain and immobility. If left untreated, a hip fracture can lead to additional conditions and possibly life-threatening complications.
It’s worth noting that not all fractures are caused by physical trauma. Osteoporosis is a disease that weakens bones, causing them to break more easily. For individuals with severely weakened bones, a hip fracture may result from simply standing and twisting. Osteoporosis typically develops after age 30, when the body starts breaking down bone faster than it replaces it. Dietary deficiencies and family history of the disease also play a role in the development of osteoporosis.
While a fracture in itself is a non-arthritic condition, a break in a bone can lead to post-traumatic arthritis. Post-traumatic arthritis is a specific form of osteoarthritis. It is estimated that up to 15% of individuals diagnosed with the disease may have developed it as the result of an injury. In other words, the impact of a fracture can last long after the bone has healed. Even a relatively minor fall needs to be taken seriously and discussed with an orthopaedist.
Symptoms of Hip Fractures
- Severe pain in the hip or pelvic area
- Inability to put weight on your hip
- Difficulty walking
- Swelling and bruising in the hip
- One leg that appears shorter than the other
Treatment for Hip Fractures
Most hip fractures often require a joint repair or replacement. If surgery is not appropriate for a patient, an orthopaedist will utilize traction. Traction is a technique that involves pulleys and weights that slowly and gently pull on a fractured body part. The goal of traction is to guide the body part back into the proper position and hold it steady while the body heals.
Hip Bursitis
The hip consists of two major bursae, which are lubricated cushions located between bones and soft tissue. The trochanteric bursa is located on the side of the hip, adjacent to the edges of the femur (thighbone). The ischial bursa is located on the inside of the hip, adjacent to the pelvic bone. Hip bursitis is the inflammation and irritation of either of these two bursae. Inflammation is often caused by trauma or strain. Although less common, inflammation can also be caused by a bacterial infection or other conditions such as gout.
Symptoms of Hip Bursitis
The symptoms of hip bursitis depend on which bursa is affected.
Trochanteric Bursitis:
- Pain on the outside of the hip and thigh
- Pain in the hip that increases with activity
- Pain when lying on the affected side
- Swelling or stiffness in the hip
Ischial Bursitis:
- Pain in the upper buttock
- Pain that increases with activity, particularly climbing up stairs
- Swelling or stiffness in the hip
Treatment of Hip Bursitis
Like sprains and strains, non-infectious hip bursitis can be treated with rest, ice, compression, and elevation. Moreover, exercise and weight reduction can ease pain and prevent recurrence.
If the inflammation is caused by an infection, your orthopaedist will recommend an antibiotic medication. In other instances, orthopaedist may administer a cortisone injection. Inflamed bursae rarely require surgical removal.
Hip Tendonitis
The hip consists of several different tendons that connect muscles to bones, including the groin, hip flexors, glute tendons and hamstrings. The iliotibial band—which is a thick band of connective tissue that can either be classified as either a tendon, a ligament, or an area of thickened fascia—also runs along the hip and thigh. When these bands are healthy, they move easily when their respective muscle contracts.
Hip tendonitis occurs when one of these tendons become inflamed or irritated. An inflamed hip tendon causes acute pain and tenderness, making it difficult to move the joint. Moreover, using the hip irritates them further, causing more inflammation and pain.
Tendonitis is commonly caused by the overuse of a tendon. Gymnasts, runners and cyclists, in particular, face a higher risk of hip tendonitis due to the repetitive use of their lower bodies. In less extreme circumstances, tendonitis may result from poor posture and body mechanics that put unnecessary stress on tendons. And, although less common, tendonitis can also result from an acute, direct injury to the joint.
Symptoms of Hip Tendonitis
- Pain in the hip that increases with repetitive motion
- Swelling or redness around the hip
- Stiffness and tightness in the hip
- Limited range of motion in the hip joint
Treatment of Hip Tendonitis
Individuals with hip tendonitis should take a break from activities, especially those that involve the joint. Rest, ice, compression, and elevation can also help reduce symptoms. It is important to remain patient during this time and to avoid pushing the body unnecessarily. Tendons, in general, receive less blood flow consequently making them slow to heal.
Stretching before activities, enhancing the strength and flexibility of hip and leg muscles, good posture, and maintaining a healthy weight will help prevent injury.
Talk to a Hip Specialist
While sprains, strains, fractures, bursitis, and tendonitis are all relatively common, there are a number of non-arthritic conditions that cause hip pain and stiffness. These include labral tears and femoroacetabula impingement (FAI), avascular necrosis, and bone tumors. Only a hip specialist has the expertise to accurately diagnose your condition and provide a treatment plan personalized to you.
Dr. Steve Hamilton at Beacon Orthopaedics and Sports Medicine is one of the most recognized hip specialists in Greater Cincinnati and Northern Kentucky. You can schedule an appointment online to meet with Dr. Hamilton. For your convenience, he is available at Beacon East, Beacon West, or Summits Woods in Ohio or at Beacon’s Northern Kentucky location.
Hip Preservation Surgery: Conditions and Treatments
June 13, 2018
The hip, similar to other areas of the body, is subject to congenital, developmental, and post-traumatic conditions. If left untreated, these conditions can lead to pain, arthritis, and potentially a hip replacement early in life. The goal of hip preservation is to prevent or delay the early onset of arthritis or the need for a joint replacement.
Hip preservation treats a full spectrum of hip disorders, including but not limited to: labral tears, hip impingement, hip dysplasia, and osteoarthritis. Candidates for hip preservation include newborns up to people age 45. Young athletes whose activities involve extreme hip motions—such as golf, hockey, gymnastics, soccer, long distance running, or cycling—would benefit from preservation techniques, in particular. Hip preservation is rapidly evolving and the latest arthroscopic techniques allow for a broad range of patients, including high-performance athletes, to maintain normal hip function.
This article contains a list of conditions that can be addressed with hip preservation surgery. Please note that this is only intended as a guide. Only a qualified orthopaedic specialist can accurately diagnose your condition and recommend a treatment plan. For a comprehensive evaluation of your hip pain, schedule an appointment with Dr. Steve Hamilton at Beacon Orthopaedics & Sports Medicine.
Conditions Treated by Hip Preservation
Labral Tears
The hip is a ball and socket joint. The head of the femur (thigh bone) forms a ball that fits into cup-shaped socket of the acetabulum (socket). The labrum is fibrocartilage (rubbery tissue) that lines the rim of the socket and provides a seal that helps keep the femur in position. This cartilage can be torn from the joint, causing pain or ache in the groin or deep in the buttock region. It can also cause the leg to feel like it is “catching” or “clicking” in the hip socket as it moves.
A labral tear can result from a single instance of acute trauma—such as a fall—or years of repetitive minor injuries. It is important to note that a tear can occur even if no pain is experienced so it is important to consult an orthopaedist following an injury or if you engage in activities that repetitively use your hip.
Some tears, especially those that cause severe pain or involve a clicking sensation, require surgery to reattach the labrum and occasionally remove torn sections.
Femoroacetabular Impingement (FAI)
Femoroacetabular impingement (FAI), also known as hip impingement, is a condition in which a structural abnormality in the hip joint causes harmful friction between the femoral head and the acetabulum. Hip impingement is classified into three types depending on the location of the abnormality:
- Cam impingement occurs when excessive bone growth occurs at the edge of the femoral head. The growth causes a bump which can prevent the femoral head from fully rotating in its socket and also cause it wear down hip cartilage.
- Pincer impingement occurs when excessive bone growth occurs at the edge of the hip’s socket. The growth causes an overhang which can prevent the femoral head from fully rotating and also pinch the hip’s labrum. In fact, the vast majority of labral tears are caused by FAI.
- Combined impingement occurs when both pincer and cam impingement is present.
Many cases of FAI can be treated with arthroscopic surgery. During the procedure, the surgeon will trim or shave the abnormal bone growth. Only severe cases of FAI require open surgery.
Hip Dysplasia
Hip dysplasia is characterized by general hip instability and a higher risk of dislocation caused by a hip socket that is too shallow to support the ball of the hip. The condition can either be bilateral, meaning that both hip joints are affected, or unilateral, meaning that only one joint shows deformity. In the case of unilateral dysplasia, the left hip is more likely to be affected.
Hip dysplasia can damage the cartilage lining the joint as well as the rim of the socket, causing the hip to eventually wear out and become arthritic. Patients with dysplasia who experience pain are candidates for preservative surgery. Periacetabular osteotomy (PAO), in particular, has been shown to be effective in preserving the longevity of the hip in both youth and adults. The surgery includes a series of small cuts around the acetabulum, and rarely the upper femur, to better position the ball of the hip joint.
Osteoarthritis
Osteoarthritis, or “wear and tear” arthritis, is commonly associated with patients who are middle age or older. Post-traumatic arthritis, however, is becoming increasingly common among younger patients. Post-traumatic arthritis is a specific form of osteoarthritis that results from an injury and causes the cartilage in the hip joint to gradually wear away over time. Athletes, in particular, face a significantly higher risk of sustaining an injury that triggers the onset of the disease. Of course, these types of injuries are not limited to athletes. Slipping on ice or an automobile accident can also harm the hip joint. It is crucial to see an orthopaedist following any of these types of injuries.
There is no cure for osteoarthritis and it gradually worsens over time. Physical therapy, medications, and injections can help a patient manage their symptoms, especially if treatment is started early. If left untreated, osteoarthritis can lead to a number of serious complications, including bone spurs, damaged tendons and ligaments, and osteonecrosis.
Treatments Associated with Hip Preservation
Hip preservation involves multi-disciplinary techniques, including:
- Physical therapy
- Anti-inflammatories
- Injections
- Arthroscopy
Physical therapy is a crucial component of any treatment plan. Physical therapy helps strengthen muscles, increase flexibility, restore range of motion in the joint, and can help ease pain. A physical therapist will also teach patients proper body mechanics and ways to modify their activities in order to reduce their pain and prevent further injury.
Anti-inflammatories, or non-steroidal anti-inflammatory drugs (NSAIDS), are used to treat mild to moderate pain and inflammation. Injections, although commonly used to establish a diagnosis, can also be used to alleviate pain for certain conditions.
In some instances, surgery may be required. Periacetabular osteotomy, femoral osteotomy, acetabuloplasty, osteochondroplasty, and abductor repairs have all been shown to be effective in preserving the hip. An orthopaedic surgeon will determine when surgery is needed and recommend the appropriate procedure.
Diagnosing Hip Pain
The symptoms associated with these conditions can begin relatively mild and remain undetected for years. In fact, some adults never know they have a hip problem until severe pain develops. By this point, it may be too late to preserve the joint and a hip replacement becomes necessary.
Early diagnosis and treatment are key for preserving the hip joint and can prevent future joint damage. If you have experienced a direct injury to your hip or if you experience severe pain and a loss of mobility in the joint, it’s crucial that you see a hip specialist for a professional evaluation.
Schedule an appointment with Dr. Hamilton at Beacon Orthopaedics & Sports Medicine for a comprehensive evaluation of your hip. For your convenience, Dr. Hamilton meets with patients at Beacon East, Beacon West, or Summit Woods in Ohio or at Beacon’s Northern Kentucky location.
FAQ Shoulder Fractures: Clavicle, Proximal, Humerus, Scapular
June 11, 2018
Any high-energy impact to the shoulder can cause a fracture in the bone; these types of impacts include falling, colliding with a wall, body-on-body collisions in sports, or acute trauma from a motor vehicle accident to name a few. Shoulder fractures commonly involve the clavicle (collar bone), the proximal humerus (top of the upper arm bone), or the scapula (shoulder blade). In this article, the shoulder experts at Beacon Orthopaedics will explore the different types of fractures, what to look for, and answer some of the most frequently asked questions we’ve heard from patients.
Dr. Robert Rolf of Beacon Orthopaedics and Sports Medicine has a passion for helping patients regain mobility, remove pain, and strengthen their joints to resume their favorite activities sooner. If you’ve recently discovered symptoms mirroring those illustrated in this article, schedule an appointment today to speak with Dr. Rolf about your options for treatment and recovery.
What are the different types of shoulder fractures?
Clavicle Fractures: Fractures along the long, thin bone that begins at the base of the neck and extends out to the shoulder—these can occur at any age as the result of a fall, a collision in contact sports, or a motor vehicle accident.
Proximal Humerus Fractures: Fractures along the top of the long bone that runs from the elbow to the shoulder—either at or just below the humeral head. These fractures can also occur at any age, but your risk increases with age and the onset of osteoporosis in the shoulder.
Scapula Fractures: Scapula fractures are rare, because a larger impact is required to fracture the scapula—the flat triangular bone located in your upper back. These shoulder fractures usually result from a bad collision in a contact sport or automobile accident. Patients who have sustained this type of fracture are more likely to also have sustained nerve injuries, rib fractures, or lung injuries.
What are the signs of a fractured shoulder?
General Findings, Signs and Symptoms of Shoulder Fractures:
- Sharp or aching pain
- Swelling and bruising
- Loss of range of motion in shoulder
- A grinding sensation when the shoulder is moved
- Discoloration on the skin and/or hematoma
Clavicle Fracture Findings:
- Bruising and discoloration
- Swelling around the middle or along the collarbone area
- An area along the collarbone area that may reveal a bump (the prominent ends of the fracture under the skin)
- Shoulder range of motion is limited, but not completely lost
Proximal Humerus Fracture Findings:
- Severe swelling around the shoulder
- Very limited movement of the shoulder
- Severe pain during shoulder movement
Scapular Fracture Findings:
- Pain during shoulder movement
- Severe swelling and bruising around the back of the shoulder
- Scrapes around the affected area
What do you do to treat a shoulder fracture?
Treatment Options
Non-displaced fractures require a sling to immobilize your shoulder until the fracture is stable enough to regain full mobility. If your arm is moved too much too early, this will not only delay the healing process, but it will result in residual stiffness in your arm, further loss of mobility, and running the risk of dislodging the fracture fragments further.
If your shoulder fracture has a large percentage of displaced bone fragments, surgical procedures may be necessary. Surgery could entail anything from reforming the bone using wires or pins or a plate that will reconnect the displaced bones to total shoulder joint replacement.
How to Know You Need Surgery
- Have you sustained a compound fracture that has broken the bone so it pierces your skin?
- Has your fracture severely displaced bone fragments within the affected area?
- Has your fractured caused a misalignment in your shoulder socket?
- Have you fractured more than one shoulder bone?
If you have answered yes to any of the above questions, schedule an appointment immediately to get a consultation.
How long does it take for a shoulder fracture or break take to heal?
If the shoulder injury was not severe, there is fairly rapid improvement and return of function after the first 4 to 6 weeks.
After a more severe fracture, your quality of life can be greatly affected for months, depending on your participation in the recovery plan set for you by your physician. Most shoulder injuries whether treated surgically or non-surgically will require a period of immobilization followed by rehabilitation of the joint. If you don’t comply to the guidelines, you risk bone fragment displacement and an elongated recovery timeline (or risk the need for surgery).
Your Rehabilitation Plan Could Include:
- Range of Motion Exercises
- Strength Exercises
- Manual Therapy
- Modalities
- Functional Training
Schedule a Consultation with a Shoulder Specialist
If you are experiencing any of the symptoms discussed in this article, schedule an appointment today and Dr. Rolf of Beacon Orthopaedics and Sports Medicine will work with you to create a detailed treatment plan to get you back to the activities you love most.
Comprehensive Recovery Protocol: Knee Injuries
June 6, 2018
The knee joint is one the largest and most complex joints in the human body. It consists of four bones: The femur (thigh bone), the tibia (shin bone), the fibula (outer shin bone) and the patella (kneecap). Various ligaments, muscles, and tendons are also involved in order to hold the joint together and allow it to move through its full range of motion. Because the structures of the knee are highly interconnected, an injury to one area of the joint can affect the other areas as well.
Fortunately, not all injuries require surgical intervention. The treatment for your injury will depend on its severity. Mild to moderate injuries can be treated at home with conservative methods. Severe injuries, by contrast, should be evaluated by an orthopaedist who will recommend a specific form of treatment.
The following information will help you identify whether conservative treatments are appropriate for your injury, the types of treatments that you can utilize, and when you should contact an orthopaedic specialist.
Mild to Moderate Injuries
While the knee is susceptible for many forms of injury—including sprains and strains, ligament tears, fractures, and inflammation—some instances are so mild that they don’t even require a visit to an orthopaedist. Many mild to moderate knee injuries resolve on their own with rest and time.
Conservative forms of treatment are often appropriate for the following injuries.
Low Grade Sprains and Strains:
When the knee is moved through a greater range of motion than it was meant to tolerate, the tissue that holds it in place will be stretched or torn. Sprains refer to the stretching and tearing of ligaments. Strains refer to the stretching or tearing of a muscle or tendon. These types of injuries are classified according to a grading system. The two classifications for minor sprains and strains are:
- Grade I – The ligament, muscle, or tendon features mild stretching and microscopic tears, but the knee continues to function normally.
- Grade II – The ligament, muscle, or tendon is partially torn, leading to periodic giving out of the knee while standing or walking.
Stress Fractures: While acute, direct trauma such as a fall can cause any of the four bones associated with the knee to break, stress fractures are also relatively common. A stress fracture is a small crack in a bone that is caused by overuse. Both athletes, as well as those in certain professions, are susceptible to this form of injury. The vast majority of stress fractures will heal on their own with rest within 6 to 8 weeks. During this time, conservative treatments can help ease painful swelling and expedite the recovery process.
Treatment for Mild to Moderate Injuries
While a mild to moderate knee injury may heal on its own, RICE (rest, ice, compression, and elevation) can help expedite healing and reduce painful swelling.
RICE Method for Injuries
Rest the Knee: Stop, change, or take a break from unnecessary activities that put weight on your knee. You may need to use crutches for a short time in order to avoid further injury.
Ice the Knee: Apply ice or a cold pack to the knee immediately following an injury in order to prevent or minimize swelling. Place a towel between the ice or cold pack and your skin. Do not apply ice directly your skin. You can continue to apply ice for up to 30 minutes at a time every 3 to 4 hours in order to reduce swelling.
Compress the Knee: Wrap the injured knee with an elastic bandage, ensuring that it is moderately tight. Wrapping the knee will decrease swelling; however, wrapping it too tightly will cause more swelling below the affected area.
Elevate the Knee: Elevate the knee on a pillow when you are sitting or lying down. Try to keep the knee above the level of your heart to help minimize swelling.
Stretches for Knee Pain
Taking time off from sports and exercise can help minor injuries heal but it can also cause the muscles and tendons that connect the knee to become weak and tight. Stiff muscles can cause pain and so it’s important to still keep your hips, glutes, hamstrings, calves, and quads limber even if you’re taking a break from your ordinary activities.
While it may seem counterintuitive, stretching your knee when you have a mild or moderate injury can provide you with some relief. As always, it’s important that you talk to your orthopaedist or physical therapist before starting any exercise program. Moreover, it’s important that you only perform stretches that are pain-free. Do not continue a stretch if it causes you pain.
Supine Hamstring Stretch
Step 1: Lie flat on your back on the floor or a mat adjacent to a wall corner or a doorway. Raise one leg to rest against the wall or frame of the door while the other leg remains flat on the floor past the wall edge or entryway. You can adjust your position so the back of your raised leg is closer to the wall or doorframe for a deeper stretch. Extend your arms outwards at shoulder level with your palms facing upwards.
Step 2: Pull the toes of your raised leg downwards towards your body in order to stretch your hamstrings and calf muscles. Do not allow any movement in your hips or lower back during this stretch.
Step 3: Hold the stretch for 15 – 30 seconds while taking slow, deep breathes and then switch sides.
Standing Calf Stretch
Step 1: Face a wall, standing about 12 inches away from it.
Step 2: Extend one leg behind you, keeping both feet flat on the floor and your rear knee straight.
Step 3: Lean toward the wall until you feel tension in the calf muscle of the extended leg. You can press your hands against the wall for support.
Step 4: Hold the stretch for 10 seconds and then switch sides.
Quad Stretch
Step 1: Stand tall with your feet hip-width apart.
Step 2: Bend one of your legs, bringing its heel towards your butt. Grasp the raised foot with the hand opposite to it.
Step 3: Hold the stretch for 30 seconds and then switch sides.
A variation of this exercise can be performed while lying on the floor or a bed on your stomach. Loop a yoga strap either foot and gently pull the strap so your heel moves towards your butt. Hold for 30 seconds and then switch sides.
Side Lunges
Step 1: Stand tall with your feet hip-width apart and your feet facing straight ahead.
Step 2: Shift your weight over to one leg, bending the knee until it reaches a 90-degree angle and the other leg is straight.
Step 3: Return to the center and then switch sides.
Severe Injuries
More specific forms of treatment are required for injuries involving:
- Extensive ligament, muscle, and tendon tears
- Multiple ligament, muscle and tendon tears
- Instability of the knee joint
- Decreased range of motion
- Significant fractures
Grade III sprains and strains, anterior cruciate ligament (ACL) injuries, and severe instances of patellofemoral syndrome are examples of conditions that need to be evaluated by an orthopaedist. While RICE can still be beneficial in the early stages of your condition, it’s crucial that you see an orthopaedist as early as possible. If you and your doctor decide that surgery is appropriate, a recovery protocol will be provided to you based on your specific surgery.
Talk to an Orthopaedist Specialist
Contact an orthopaedist if your knee remains painful and swollen or if it cannot bear weight. Only a certified orthopaedic physician can accurately diagnose your condition and recommend a comprehensive treatment plan.
The expert team of orthopaedic surgeons and physical therapists at Beacon Orthopaedist and Sports Medicine can help you achieve a full recovery. If you would like to talk to an expert about what to expect following knee surgery or how to improve your current recovery program, schedule an appointment with one of our board-certified knee specialists.
The Most Common Shoulder Injuries and How They’re Treated
June 5, 2018
The anatomical structures of the shoulder are all highly interconnected. So much, in fact, that shoulder injuries rarely affect just one area of the joint. A single shoulder injury can affect multiple muscles, ligaments, cartilage areas, tendons, and bones.
Unfortunately, injuries are most likely to occur in those who rely on their shoulder the most—over-head athletes. Shoulder injuries are exceedingly common among athletes, especially those who compete in baseball, swimming, tennis, and football. This is often due to the repetitive workouts and intense competition that high-performance athletes endure.
Shoulder injuries, of course, are not limited to athletes. Professionals who frequently use their shoulder—such as those involved in painting, yard care, or construction—experience a higher risk of injury as well.
No matter how a shoulder injury occurs, everyone wants the same result: a fast recovery.
Dr. Robert Rolf is a leading, board-certified shoulder specialist at Beacon Orthopaedics & Sports Medicine. He has helped hundreds of patients in the Greater Cincinnati region achieve lasting improvements following their injuries.
The following information provides information from Dr. Rolf about the most common shoulder injuries and how they’re treated.
Shoulder Anatomy

The shoulder is the most mobile joint in the body. It consists of three bones: the humerus, scapula, and clavicle. It also consists of many muscles and tendons that hold the shoulder bones in place and stabilize the arm through its full range of motion. The four major muscles and tendons of the shoulder come together to form the rotator cuff.
Here is an image to better illustrate the anatomical structure of the shoulder:
Rotator Cuff Tears
A rotator cuff tear occurs when any tendon of the rotator cuff rips, either partially or completely. Rotator cuff tears are among the most common types of shoulder injuries.
Rotator cuff tears are most common in people who repeatedly perform overhead motions. These tend to be people with active jobs—such as construction workers—or athletes, though anybody can end up with a rotator cuff tear whether they’re active or not.
Rotator cuff tears vary in severity from partial- to full-thickness tears, with partial tears being far more common. It’s possible for a patient to have a partial-thickness rotator cuff tear without even realizing it.
Symptoms of Rotator Cuff Tears
- Pain that radiates from the upper shoulder down the elbow
- Difficulty moving the afflicted shoulder
- Pain that becomes worse after laying on the afflicted shoulder
- A dully, achy sensation in the shoulder and upper arm
- Weakness when moving the shoulder
- Pain when raising arm overhead
Common Causes of Rotator Cuff Tears
- Acute trauma (such as a fall)
- Repeated stress
- Normal wear and tear (as the rotator cuff naturally becomes more brittle with age)
Treatment Options
Nonsurgical
- Exercise and rehabilitation overseen by a physical therapist
- Improving posture and shoulder biomechanics
- Corticosteroid injections
- Platelet injections
Surgical
There are two main surgical options for rotator cuff tear repair: tendon reattachment or partial-tear trimming (also called “debridement”). If the tear is full, the surgeon will reattach the torn ligament back onto the bone detached from. If the tear is partial, the surgeon will shave away the torn/frayed part of the rotator cuff, as that portion often causes the patient’s pain. Debridement only removes the damaged tissue and does not affect the stability of the rotator cuff.
In either case, the procedures are performed by shoulder arthroscopy. This is a minimally invasive surgical procedure that uses a small camera (called an arthroscope) to aid in examining and repairing the torn tendons without having to make a large incision or open the shoulder.
Shoulder Impingement
Shoulder impingement occurs when one or more rotator cuff tendons get trapped and pinched between shoulder bones during arm movement, causing extreme pain and swelling/inflammation of the rotator cuff.
Shoulder impingement is most common in people who participate in physical activities requiring repeated overhead movements—again, mostly athletes. Swimmers, softball players, basketball players, tennis players, and golfers are all high risk for impingement. In fact, shoulder impingement is so common in swimmers that it has the nickname “swimmer’s shoulder.”
Symptoms of Shoulder Impingement:
- Weakness of the shoulders
- Difficulty raising arms or reaching up behind back
- Shoulder joint pain that gets worse after overhead movement or sleep
- Pinching feeling when moving the shoulder
Causes of Shoulder Impingement:
- Any injury (such as a sudden fall) that causes the shoulder to swell
- Bone growth/abnormalities in the shoulder
- Shoulder osteoarthritis
- Overuse of the shoulder muscles
- Improper form when swimming
Treatments
Nonsurgical
- Steroid injections
- Daily stretching
- Cortisone injections
- Therapy and activity modifications
Surgical
Note: Surgery is typically only considered when several months of sport-appropriate nonsurgical rehabilitation efforts have failed.
Most shoulder impingement surgeries involve either shaving down part of the acromion in order to relieve pressure from the pinched tendons, or shaving off any bone spurs to achieve the same effect.
Dr. Rolf is able to perform the procedure using an arthroscopic technique, which means that there will only be two small incisions made into the shoulder; this will lead to less scarring and quicker healing.
Other Common Shoulder Conditions
What Does Physical Therapy for Shoulder Injuries Entail?
In the majority of instances, an orthopaedist will recommend physical therapy as part of the patient’s treatment plan.
Education
First, the therapist will educate the patient on how the shoulder functions. The goal of this step is to help the patient understand how their posture and biomechanics may have contributed to their injury, and also to teach them how to avoid those issues in the future.
Evaluating and Retraining Movements
For athletes, it’s likely that some sort of improper form contributed to their injury. So, in physical therapy, the therapist and doctor will identify the improper form (if there is any) and train the patient on how to adjust their body mechanics.
Manual Therapy
Manual therapy is when a therapist or doctor will move and massage the recovering body part, as opposed to the patient moving it themselves. This gets the shoulder moving, which increases blood flow to the area, helps reduce inflammation, facilitates healing, and helps to improve range of motion after surgery.
Strength Exercises
Strength exercises are performed in order to restore strength to the shoulder. The type of strength exercises depends on the specific injury. Some injuries are exacerbated by weak muscles that cause other muscles to compensate. The physician will identify any weak shoulder muscles and recommend exercises to strengthen those muscles. Some of these exercises will be performed in the presence of the physician while others can be performed at home.
Range-of-Motion Exercises
When the shoulder is painful, many patients naturally avoid using their arm. While this can help reduce the frequency of pain, it can also cause the shoulder to become stiff. Range-of-motion exercises are performed in order to restore flexibility in the shoulder.
Functional Training
The therapist will also teach the patient how to adjust their functional activities in order to accommodate their repaired shoulder. This may include how to swim, how to throw a ball, or how to place items on a shelf. These adjustments allow the patient to maintain their active lifestyle while lowering their risk of further injury.
Receive Personalized Advice from Dr. Rolf
While rotator cuff tears and impingement are among the most common shoulder injuries, shoulder pain can be caused by a number of conditions. Only a certified orthopedic specialist can accurately diagnose your condition and prescribe treatment that is appropriate for your specific injury.
Dr. Robert Rolf is a board certified orthopedic surgeon at Beacon Orthopaedics and Sports Medicine who provides extensive expertise in rotator cuff tears as well as other conditions related to the shoulder.
For your convenience, Dr. Rolf meets with patients at Beacon’s Batesville, Lawrenceburg, or Northern Kentucky locations as well as Beacon West in Harrison, Ohio. Schedule an appointment online to meet with Dr. Rolf to start your journey toward shoulder relief.
A Practical Guide to Common Shoulder Pains
June 5, 2018
There’s no shortage of shoulder pain going around. In fact, in 2006, an astonishing 7.5 million people went to the doctor complaining of shoulder issues, according to OrthoInfo.
It’s no wonder, since the shoulder is an essential part of everyday life no matter what you do. While athletes rely on their shoulders extensively, individuals with semi-active hobbies such as cooking or gardening also depend on healthy shoulders. This is why shoulder experts such as Dr. Robert Rolf—a board-certified orthopaedic surgeon with a specialty in sports medicine—are in such high demand at Beacon Orthopaedics and Sports Medicine. Without healthy shoulders, completing even just simple tasks can be a real struggle.
The shoulder is the only part of the human body that allows full 360º motion, although the hips come close. This extreme mobility requires a complex system of bones, cartilage, muscles, and tendons to seamlessly work together. And, similar to machines, the more moving parts there are, the easier it is for something to go wrong.
This article provides a practical guide to common shoulder pains and issues with treatment information provided by Dr. Rolf.
Pinching When You Raise Your Arm
What Does This Pain Mean?
If you feel a pinching sensation when you lift your arm above shoulder level, it’s likely that you have a shoulder impingement. When you raise your shoulder, the space between the acromion (shoulder blade) and rotator cuff becomes narrow. It’s possible for the acromion to rub against the tendons and bursae of the rotator cuff, causing pain. This rubbing or pinching is also called “impinging,” hence the name.
What Causes an Impingement?
Shoulder impingement has two main causes:
1. Pinching that results from swelling of the nearby muscles or bursae
2. Bone growths/spurs that press on the tendons
In either case, the decreased amount of space in the shoulder joint increases the likelihood that tendons will get pinched. Swimmers and over-head athletes (baseball, softball, tennis) are especially at risk for impingement because of how frequently they perform overhead motions.
What Are Your Treatment Options?
In some cases, the fix for impingement is simply to stop overworking the shoulder. If rest isn’t enough to reduce swelling, anti-inflammatory injections can be administered to the afflicted shoulder.
If nonsurgical treatments don’t relieve pain, surgery may be considered. Depending on the cause of the impingement, the surgeon will go into the shoulder and either removed the inflamed part of the bursa, remove part of the acromion (in a process called anterior acromioplasty) or shave off any bone spurs.
Inability to Move Your Shoulder Without Pain/Stiffness
What Does This Pain Mean?
These symptoms strongly suggest a condition known as frozen shoulder, which is also called adhesive capsulitis. Frozen shoulder is a long-term condition where the capsule of connective tissue that encloses your shoulder joint becomes stiff and tight. This makes it difficult to move your shoulder without extreme stiffness or pain. The condition can sometimes last for years.
What Causes Frozen Shoulder?
There is no conclusive answer to what causes connective tissue around the shoulder to grow tight and stiff; however, diabetes and reduced shoulder movements for long periods of time (like when recovering from an injury) have been shown to greatly increase the risk of developing frozen shoulder.
What Are Your Treatment Options?
Though surgical treatments for frozen shoulder exist, nonsurgical treatments are much more common (and often extremely effective). A combination of anti-inflammatory medicine and physical therapy often completely restore the shoulder back to a healthy state.
If nonsurgical treatment does not help, surgery can be performed that will cut, tear, and stretch the stiff shoulder tissue. These methods often relieve stiffness and pain once recovery is complete.
Pain and Tenderness when Your Shoulder is Touched
What Does This Pain Mean?
This pain suggests bursitis, which is inflammation of a bursa, a tiny fluid-filled sac that reduces friction between moving parts of the body. There are several bursae in the shoulder, but the one most commonly responsible for shoulder bursitis is located just below the acromion and is called the subacromial bursa.
What Causes Bursitis?
There are three main causes of bursitis. In order from most to least common, causes are, sudden trauma, overuse, and infection.
Sudden trauma, such as falling and landing on one’s shoulder, is by far the most common cause of shoulder bursitis. The trauma causes the bursa to swell with blood, which puts pressure on other parts of the shoulder and makes it tender to the touch.
If overuse is the culprit, bursitis often accompanies impingement or tendonitis of the surrounding area. Overuse is most common in people who frequently move with their arms over their head. This covers most athletes, but also includes many manual laborers such as painters or construction workers.
Infections are uncommon but can still cause bursitis. Infection is most common in those with a weak immune system, such as those with AIDS or cancer.
What Are Your Treatment Options?
The most effective treatment for shoulder bursitis depends on the cause, but rest and anti-inflammatory medicine are effective treatments. If necessary, corticosteroids can be injected into the shoulder to decrease swelling, or a surgeon can drain excess fluid from the bursa.
Physical therapy is less common for bursitis than other shoulder conditions, but it still helps speed along recovery in certain patients.
Pain and Weakness after Lying on the Affected Shoulder
What Does This Pain Mean?
This pain points toward a rotator cuff tear. A rotator cuff tear is when one or more tendons in the rotator cuff tear. There are two kinds of rotator cuff tears: full and partial thickness.
To visualize the differences between the two types of tears, it’s easiest to imagine a taut rubber band. A full-thickness tear is like a taut rubber band that has been cut. It no longer has any tension in it, and it cannot hold two things together any longer. A partial-thickness tear is like a taut rubber band that has a rip. It is still taut, but more pressure is on the part of the rubber band that is still attached, and it is more likely to rip in the future.
What Causes Rotator Cuff Tears?
Just as there are two types of rotator cuff tears, there are two main causes of rotator cuff tears: acute injury and degradation.
To keep with the rubber band metaphor, an acute injury is when too much force is put on a rubber band and it snaps. A degenerative injury is when a rubber band that has been pulled taut for a long time becomes more and more brittle until it eventually wears out.
In either case, repeated overhead activities put one at greater risk for a rotator cuff tear.
What Are Your Treatment Options?
Roughly 80% of rotator cuff tears respond well to nonsurgical treatment, according to OrthoInfo. This treatment often involves rest, activity modification (such as avoiding the motion that caused the injury), strength exercises paired with physical therapy, and steroid injections if needed.
However, nonsurgical treatments don’t actually repair the torn tendon, which is a problem since rotator cuff tendons heal very slowly. In some cases, surgery is the better option.
In rotator cuff surgery, the doctor reattaches the torn tendon to the head of the humerus.
When It’s Time to See the Doctor
Ideally, you should see an orthopaedist as soon as you suspect you have a shoulder injury; however, once your shoulder pain begins to affect your everyday life, it’s imperative that you see a physician.
These guidelines above are an excellent way to self-diagnose any shoulder issues you might have. However, this is not a substitute for professional medical advice. If you experience any of the aforementioned symptoms, it’s unlikely that your condition will improve until you consult a specialist.
Schedule an appointment with Dr. Rolf at Beacon Orthopaedics and Sports Medicine for a professional evaluation of your shoulder. Dr. Rolf has had world-class training in complex shoulder reconstructive processes and can help you feel better, faster.
Exercises to Prevent Shoulder Injuries in Athletes
June 1, 2018
The shoulder is indisputably the most complex joint in the body. The arm would be drastically less useful without the range of motion the shoulder provides. Unfortunately, the shoulder’s complexity also means there are countless complications that can impair its function.
Consider this: the shoulder “[was] responsible for sending 7.5 million people to the doctor in 2006,” according to the American Academy of Orthopaedic Surgeons. Of those, 4.1 million cases were related to the rotator cuff, the “cuff” of muscles that keep the shoulder in place and assist with its mobility.
It’s difficult enough to complete everyday activities with an injured shoulder, but when you are an athlete, your shoulder is as much a tool of the trade as a paintbrush to a painter or a hammer to a carpenter. And like any good tool, the shoulder needs maintenance and care to work properly.
This article describes exercises that will keep your shoulders strong and flexible. Perform these exercises 2-3 times a week in order to increase your strength and flexibility.
The Biomechanics of the Shoulder
The shoulder may be more accurately described as the “shoulder system,” as the shoulder itself is actually made up of multiple muscles, tendons, and bones. The group of muscles and tendons that stabilize the arm through its full range of motion is called the rotator cuff.
The four muscles and tendons that compose the rotator cuff are:
- Supraspinatus—abducts the arm
- Infraspinatus—laterally rotates the arm
- Teres Minor—laterally rotates the arm and provides stability
- Subscapularis—medially rotates the arm
Exercises to Prevent Shoulder Injury
Exercise #1: Internal and External Shoulder Rotation
Internal Rotation
This exercise is both strengthens the shoulder and increases its stability. Internal rotation isolates the subscapularis muscle.
To perform internal rotation, either put a towel in between your chest and armpit or tightly press your elbow against your side. Make sure your arm is bent at a 90º angle. While in that position, take hold of a resistance cable or exercise band and, without moving your elbow, bring your fist in towards your sternum. Be sure to maintain control over the band while you reset your arm into the starting position. Make sure all the power comes from your shoulder; do not move your hips or back at all during this exercise.
This is a gentle exercise, so if you feel any pain, stop immediately.
External Rotation
This exercise isolates the infraspinatus and teres minor muscles, and through strengthening and stretching them provides more stability to the shoulder.
External rotation is performed in exactly the same way as internal rotation, except that your hand should start in front of your scapula and rotate outward. To achieve this, you’ll either have to switch the band or turn 180º.
Exercise #2: Wall Shoulder Raises (Also Called Wall Angels or Wall Slides)
For non-athletes, this exercise helps to regulate neck posture, as it helps to fight against the trend of jutting out one’s neck that develops after a long time looking at computer screens. Wall raises strengthen all four rotator cuff muscles, and they also promote good biomechanics in general, which will lead to more fluid movement and increased flexibility.
To perform a wall raise, all you need to do is stand with your back against a wall and ensure that your head, elbows, and hands are all touching the wall. This exercise cannot be performed correctly unless the head, elbows, and hands remain touching the wall at all times. Once you are in position, simply raise your arms above your head and lower them back down. This will be easiest if you slightly arch your lower back. Repeat the exercise until tired.
Exercise #3: Lateral Arm Raise
Lateral arm raises are excellent for athletes because they isolate the supraspinatus muscle, which is responsible for stabilizing the shoulder joint when you raise your arm above your head. If the supraspinatus is injured, the resulting shoulder impingement is often debilitating for an athlete.
Unlike the other exercises mentioned, lateral arm raises are best performed with light dumbbells. To perform a lateral arm raise, hold dumbbells at your side and keep your arms straight without locking your elbows. Extend your arms straight out and over your shoulders. Once you get above your shoulders, your supraspinatus stops working and your deltoid and trap muscles take on most of the work. If you stop at the shoulders, the exercise is called a scaption.
Build Your Best Body with Beacon
The factors that determine your athletic performance are complex—just like your shoulder. Both depend on a number of factors working together working together in unison. If you would like to get your shoulder back into shape, schedule an appointment with Dr. Robert Rolf at Beacon Orthopaedics & Sports Medicine. Dr. Rolf and his team of certified physical therapists will work together to provide you with a personalized, comprehensive exercise plan to help you achieve your performance goals.
Frequently Asked Questions about Total Hip Replacement
June 1, 2018
The hip joint rivals the shoulder joint in its complexity. However, the hip joint is unrivaled in its function. There is no other part of the body that combines such extreme mobility with so much weight-bearing responsibility. Whether you’re sitting or standing, the hip bears the brunt of your weight.
But that functionality comes at cost: the hip is especially prone to problems. Moreover, the hip’s fundamental role in walking means that those with hip pain are hard pressed to find relief.
When hip pain is chronic, whether it’s caused by wear and tear of the hip joint or a disease, a total hip replacement is an effective way to relieve pain and restore use of the hip joint. However, the procedure is highly technical and requires an expert surgeon in order to be successful.
Dr. Haleem Chaudhary at Beacon Orthopaedics & Sports Medicine is a board-certified and fellowship-trained joint reconstruction expert with extensive experience in total hip replacement. Dr. Chaudhary has performed hundreds of hip replacements. This article contains frequently asked questions about total hip replacement, including candidacy, the operation, and recovery.
Why Would Someone Need Total Hip Replacement?
Total hip replacement is often necessary after the cartilage between a patient’s femur and pelvis wears out. Severe arthritis often results from the lack of cartilage and leaves patients with severe achy pain and immobility. Typically, a hip replacement is not performed unless nonsurgical methods fail to relieve hip pain.
What Happens During a Total Hip Replacement?
While the patient is under anesthesia, the hip is cut open and the arthritic bone in the socket of the joint is cleaned out. The surgeon also removes arthritic bone from the femoral head, then inserts an artificial femoral head down into the femur. The joint is then complete and the surgeon shaves arthritic bone from the knee cap before replacing it and closing the incision. For a more visual, detailed explanation, check out this animation.
Will I Be Pain-Free After My Surgery?
Although patients are sore after surgery, most hip replacement patients report being completely pain-free after 3-4 weeks. Additionally, 95% of hip replacement patients reported having less pain one year after their surgery than before it, according to Total Knee Replacements.
How Long Will I Have to Stay in the Medical Facility?
At Beacon Orthopaedics & Sports Medicine, total hip replacements are performed on an outpatient basis. Patients who have a total hip replacement at Beacon’s state-of-the-art Surgery Center stay for just 23 hours, and then are back in the comfort of their own home to recover. Some Beacon patients may have their total hip replacement at a partnering hospital depending on their health insurance or if they are a high risk patient because of an existing medical condition. Patients who have their surgery done in a hospital typically stay for about 3 days.
Before you are discharged from care, you will need to accomplish several goals, such as:
- Getting in and out of bed by yourself.
- Having acceptable pain control.
- Being able to eat, drink, and use the bathroom.
- Walking with an assistive device (a cane, walker, or crutches) on a level surface and being able to climb up and down two or three stairs.
- Being able to perform the prescribed home exercises.
- Understanding any hip precautions you may have been given to prevent injury and ensure proper healing.
How Long Will I Have to Take Off Work?
It is recommended that patients take 2-6 weeks off of work depending on their occupation. Patients who have a desk job can typically go back to work sooner than patients who have manual labor jobs or have to be on their feet often.
How Long Will Full Recovery Take?
Patients should be able to move around the house after 4-6 weeks without experiencing pain or using walking aids. After that point, the amount of time that is necessary for a full recovery varies between patients. Some patients recover extremely quickly—within a month or two—while others require a full six months before returning to their pre-surgery levels of activity.
What Sort of Post-Operative Care Will I Require?
Initially, you will need the help of a close friend or loved one for everyday tasks such as getting dressed and showering. The length of time you will need assistance depends on the patient, but it is typically anywhere from several days to a few weeks.
Will I Need Physical Therapy?
Yes. Physical therapy is an essential part of your total hip replacement recovery process. Physical therapy begins the following day of your surgery and will take place over the course of several weeks. At first, you will do some simple exercises like contracting and relaxing your muscles in order to strengthen your hip. You will also learn new techniques for movements such as sitting, standing, and bending, in order to prevent any possible damage to your hip replacement. Typically patients are in physical therapy for 6-8 weeks and have sessions twice/week.
What Will Physical Therapy Entail?
The specific exercises depend on the patient and their rehabilitation goals. For example, if the patient’s home has lots of stairs, the physical therapist may prioritize preparing the patient for going up and down stairs. If a patient wants to swim freestyle, the physical therapist will teach exercises that prepare the hip for flutter kicking.
Regardless of individual goals, physical therapy is essential to hip replacement rehabilitation. Patients who attend their physical therapy appointments and perform their prescribed exercises tend to recover more quickly and have better outcomes than those who do not.
How Long Before I Can Drive After Surgery?
Some patients may drive as soon as 2 weeks after surgery, while others may need as long as 8 weeks. During this period, simply getting in and out of a car can be challenging, especially if the car’s seats are low to the ground. In order to drive a car safely, patients must meet the following requirements:
- The patient must be off of narcotic pain medication while driving. If the patient takes pain medication at night only and not during the day while driving, that is acceptable.
- The patient must be able to hit the brake quickly.
- The patient must be able to get in and out of the car comfortably and safely.
In addition, reflexes and muscle strength should have returned to their pre-surgical levels.
What Are the Risks of Hip Replacement?
Here is a list of potential post-surgery complications:
- Blood clots
- Infection
- Fracture
- Dislocation
- Loosening
- Need for second hip replacement
At Beacon Orthopaedics & Sports Medicine, Dr. Chaudhary and your physical therapists will evaluate your risk for complications and provide specific treatments to avoid these risks.
How Likely is it That My Hip Implant Will Dislocate?
While hip dislocation is the most common complication after hip replacement surgery, this only happens to less than 3% of all patients. Dr. Chaudhary uses the anterior approach method, which drastically reduces the risk of dislocation post-surgery because the procedure does not cut through the gluteus maximus or medus.
How Can I Reduce the Likelihood of Injury or Complications?
Do:
- Use ice or an ice pack wrapped in a towel to reduce pain and swelling
- Apply heat before exercising to help expand its range of motion
- Try to keep the leg elevated when possible in early recovery to reduced pain and swelling
Additional Reading
Conditions Treated by Total and Partial Hip Replacements
How Do I Receive an Evaluation for a Total Hip Replacement?
If you are concerned about your hip health, a comprehensive evaluation from Dr. Chaudhary at Beacon Orthopaedics & Sports Medicine is the next step. Dr. Chaudhary has performed hundreds of total hip replacements and is passionate about getting patients back on their feet and involved in active lifestyles. Don’t wait to schedule an appointment with Dr. Chaudhary today—get back to living your best life now.